Intercooler Piping- DONE!

reklund

Full Access Member
Joined
Oct 20, 2005
Posts
1,252
Reaction score
26
Location
Henderson, Nevada
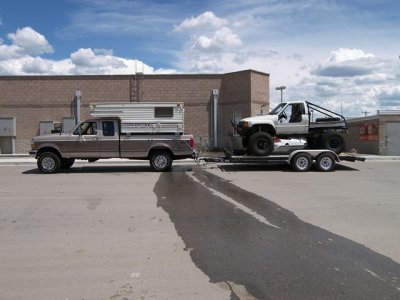
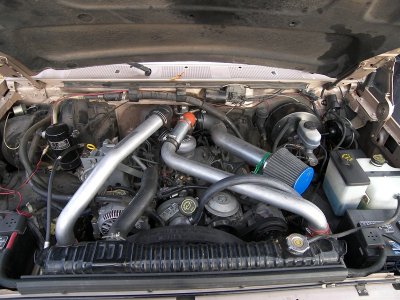
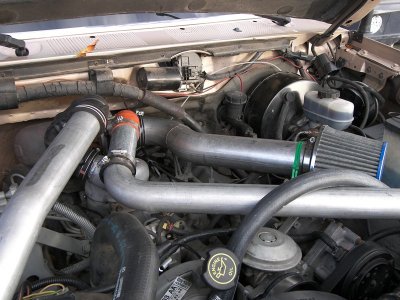
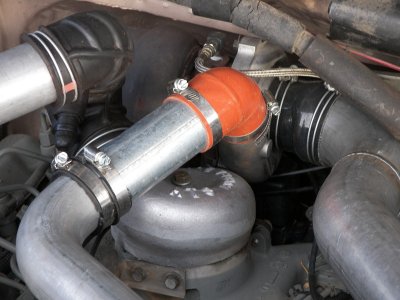
Hey guys, I think I've finally got all my issues sorted out with the intercooler, so heres the pics of the piping as they'll sit. I still need to replace one coupler (It's been ordered), and the air filter (Ordered an AEM Dryflow) but you can see how it all sorta fits.

The intake tube is actually the MBRP Downpipe for a PSD, that came with my exhaust kit. It just happened to be bent to the right shape to use as my intake tube. A 3" to 2.75" reducing coupler, and two clamps, and I was setup there. I'll fab a small tab (Rather than the zip ties) to bolt it down to the AC Compressor bracket when the new air filter arrives.

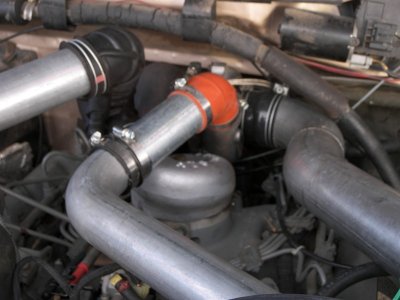
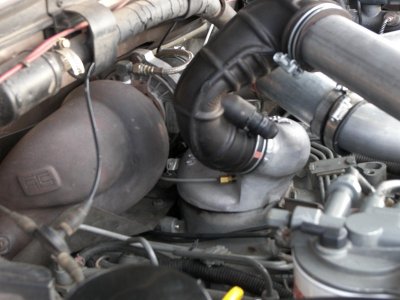
The intake hat is intended for the newer Aurora 2000 turbo kits that ATS sells, and was given to me as part of the IC kit when I purchased it from ATS in June. (They no longer make the correct hat to use this IC Kit with their turbo systems). Since I had the older non-wastegated turbo, I couldn't have used it anyway, as my airbox was right in the way... I had a piece of aluminum tubing welded to the hat, so I could simply use a coupler to attach it to the intercooler piping, rather than use the slip-fit that was designed to go on the compressor discharge. The black rubber tube that is attaching the IC Piping to the intake hat is actually the intake boot for a Scion xB, that was removed to install a cold-air intake. It just-so-happened to be the right shape to work on my setup, without any additional tube bending or welding. I may end up having that one tube re-made to eliminate the Scion parts, but for now it works great.

Post up with questions or comments!

Oh, and another big :hail to Mel on his RDT diagnosis...

Ryan
 

Attachments

  • Intercooler Piping 001.jpg
    Intercooler Piping 001.jpg
    160.3 KB · Views: 87
  • Intercooler Piping 002.jpg
    Intercooler Piping 002.jpg
    86 KB · Views: 54
  • Intercooler Piping 003.jpg
    Intercooler Piping 003.jpg
    146.9 KB · Views: 52
  • Intercooler Piping 004.jpg
    Intercooler Piping 004.jpg
    110.1 KB · Views: 54
  • Intercooler Piping 005.jpg
    Intercooler Piping 005.jpg
    97.6 KB · Views: 71

RLDSL

Diesel fuel abuser
Joined
Dec 14, 2005
Posts
7,701
Reaction score
21
Location
Arkansas
That setup looks way too **** ;Sweet
If it gets to be too much to handle looking at it, you can just send it to me and I'll spare you the agony :D

-----------Robert
 

big van

Nobody Special
Joined
Mar 16, 2006
Posts
135
Reaction score
0
Location
Green Lane, PA
Ryan, Looks good!;Sweet Did you road test it yet? Any results on EGT temps.? What are you thinking of replacing the Scion boot with metal pipe or a different rubber boot? By the way where's all the oil at LOL LOL You cleaned it up pretty good!! :thumbsup: Matt
 

reklund

Full Access Member
Joined
Oct 20, 2005
Posts
1,252
Reaction score
26
Location
Henderson, Nevada
Thanks for the kind words guys! I've road tested it, and EGT's seem to have dropped about 200°F, but that's running around unloaded. We'll see how it does with a load on it that'll work the engine a little harder.

I was thinking of bending up an entirely new upper pipe section, that will eliminate the Scion boot altogether, and just join up with the intake hat via a silicone coupler. I'll wait until after Christmas, and maybe buy a die for my tubing bender that'll do 2.25" exhaust tubing, and see what we get.

All the oil that leaked off is washed away! I burned 4 gallons of kerosene in the Hotsy pressure washing the engine bay and undercarriage of the truck. Unfortuneately, the oil soaked my hood insulator, and the only way to fix that is to replace it. For now, I washed it off as best as I could and will just deal with it...

Ryan
 

RLDSL

Diesel fuel abuser
Joined
Dec 14, 2005
Posts
7,701
Reaction score
21
Location
Arkansas
Unfortuneately, the oil soaked my hood insulator, and the only way to fix that is to replace it. For now, I washed it off as best as I could and will just deal with it...

Ryan

Try soaking it down with Simple Green and rinsing it off with a garden hose.

Might want to leave that flex piece in there, wouldn't want to make it too ridgid.

-------Robert
 

icanfixall

Official GMM hand model
Joined
Apr 10, 2005
Posts
25,858
Reaction score
673
Location
West coast
I really gotta say thats cool looking. You have opened up some ideas where I would take what you have done and run with it. Its not everybody that can "fix" what isn't broken with things that look so clean. I'm impressed with your workmanship most of all. I can "see" what a great job of installing something that was not supposed to fit and make it look great...:hail ;Sweet ;Sweet :Thumbs Up :cheers:
 

reklund

Full Access Member
Joined
Oct 20, 2005
Posts
1,252
Reaction score
26
Location
Henderson, Nevada
Man, thanks icanfixall! My motto is: If it isn't broken, fix it until it is!

I think that the new filter and a couple of brackets to hold things in place will clean it up further. I might paint the tubing too, but we'll see...

I need to lower the pipe on the passenger side about 1/2"- it rubs on the hood insulator just slightly. The tinkering never ends.........

Ryan
 

towcat

Supporting Member
Supporting Member
Joined
Jun 24, 2004
Posts
18,196
Reaction score
1,439
Location
SantaClara,Ca/Hamilton,TX
nice setup!
now you need a front bumper that found religion:D
i've got one but am not happy with the size of the holes. Now that brian has a plasma cutter, its time to get crazy with my bumper that has yet to find religion.;Sweet
 

Exekiel69

Registered User
Joined
Jul 6, 2005
Posts
5,391
Reaction score
8
Location
Maryland
Ryan, it looks very profesional and clean work what You did with this IC. What are the # on the coolant temp now? Please post back once You load it up.;Sweet
 

reklund

Full Access Member
Joined
Oct 20, 2005
Posts
1,252
Reaction score
26
Location
Henderson, Nevada
Towcat-

I do want a religious bumper, but I'll probably just pony up and buy a new one from Ford. With my discount, I can get the bumper and all the trim for around $400.

I'm not sure if I can plasma cut the holes in mine and not blue the chrome. I'd be willing to try, but even if I can cut the holes, I don't know if I could get the factory trim to snap in place. Anybody know how the factory trim attaches?

Ryan
 

towcat

Supporting Member
Supporting Member
Joined
Jun 24, 2004
Posts
18,196
Reaction score
1,439
Location
SantaClara,Ca/Hamilton,TX
Towcat-

I do want a religious bumper, but I'll probably just pony up and buy a new one from Ford. With my discount, I can get the bumper and all the trim for around $400.

I'm not sure if I can plasma cut the holes in mine and not blue the chrome. I'd be willing to try, but even if I can cut the holes, I don't know if I could get the factory trim to snap in place. Anybody know how the factory trim attaches?

Ryan
i cheated. I went aftermarket on mime. $100 for the bumper and $25 for the religous insert. I took off my rub strips and trimmed them down to fit the new bumper. yes, I am cheap.
I need more cooling, so I am going to cut a larger hole in the other bumper and put in expanded metal as the critter catcher.
 

Darrin Tosh

IDI Hound
Joined
Jan 11, 2005
Posts
5,408
Reaction score
91
Location
Grand Rapids, Michigan
I'm not sure if I can plasma cut the holes in mine and not blue the chrome. I'd be willing to try, but even if I can cut the holes, I don't know if I could get the factory trim to snap in place. Anybody know how the factory trim attaches

The Piping looks Great, Nice Job!

You can cut the bmper with a plasma cutter and not blue the chrome. It worked on mine. I found the factry plastic in a dumpster of a Ford body shop. It was on a bumper that was bent on the end so they just tossed it. So I guess I am cheaper yet!
 

Dsl_Dog_Treat

I lost my face to the jaws of a poodle
Joined
Jan 13, 2005
Posts
7,191
Reaction score
160
Location
Decatur,MI
Darrin Tosh said:
I found the factry plastic in a dumpster of a Ford body shop. It was on a bumper that was bent on the end so they just tossed it. So I guess I am cheaper yet!

Darrin, you dumpster diver!LOL

Ryan,

Have you had much of a chance to see what type of turbo lag the IC has added if any?
I'm curious as my non wastegated takes a bit to spool up then by time it gets going, I gotta dump the clutch, grab another gear and start all over again.:D
That is my biggest concern as to making my decision to add or not to add and IC.
 

reklund

Full Access Member
Joined
Oct 20, 2005
Posts
1,252
Reaction score
26
Location
Henderson, Nevada
Well, I might just have to get a piece of trim and fire up my plasma cutter...

Hows that trim attach, anyway?

Ron- The turbo lag is there, and it dropped about 1.5psi of max boost unloaded. The thing with the IC is that it'll be most effective at highway speeds, when hopefully I won't be doing that much shifting. Around town though, the turbo is definitely a little sluggish.

I normally tow my rockcrawler and have a slide-in in the bed, so if I can keep the EGT's down to a reasonable level, I'll be happy. Next up is a turbo calibrated IP and injectors- maybe after Christmas!

Ryan
 

Attachments

  • setup.jpg
    setup.jpg
    79.5 KB · Views: 30

towcat

Supporting Member
Supporting Member
Joined
Jun 24, 2004
Posts
18,196
Reaction score
1,439
Location
SantaClara,Ca/Hamilton,TX
its a push-in with the plastic expanding a little for a friction fit. nothing fancy, just be real close on the hole sizes.
 
Top