Correct way to do rear main?

jhenegh

Truck Still Earns its Keep
Joined
Jul 7, 2013
Posts
1,072
Reaction score
36
Location
Deerfield, WI
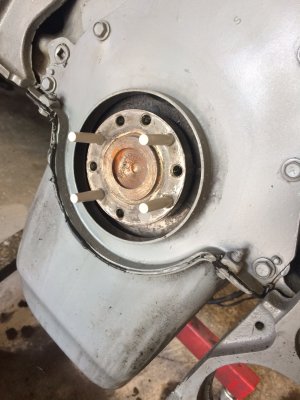
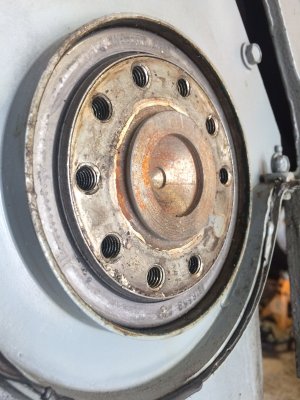
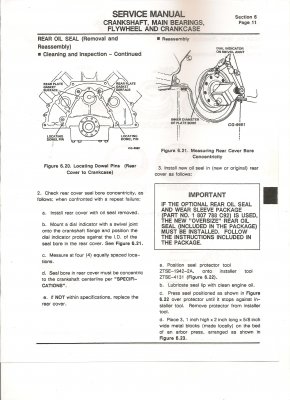
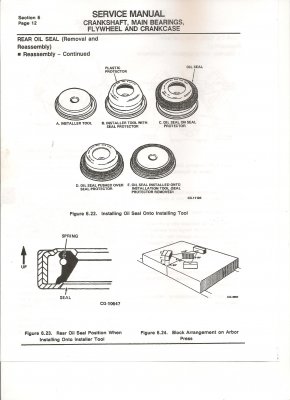
I've evidently boogered a rear main install twice now, both failing in similar fashions. They both stay dry for about a month of regular driving and then progress to serious drips. Yes I used thread sealer on the bolts to the flexplate.

I'm thinking I have the seal plate slightly off center of the crank, so it just eventually eats up the seal. My first one was a SKF (?) seal with no sleeve, 2nd one now is the Ford part with the sleeve on the crank. Both quality I believe, so I think the problem is me or how I've got the seal plate bolted on the back of the engine.

FROM THE BEGINNING IN IN TERMS CLEAR ENOUGH I CAN DO THIS FOR A 3RD AND FINAL TIME, can someone instruct me on how to do this?? Please :dunno Because I am openly admitting two successive failures on a pretty simple job.

Thanks!
 

Attachments

  • IMG_2658.JPG
    IMG_2658.JPG
    404.2 KB · Views: 86
  • IMG_2662.JPG
    IMG_2662.JPG
    458.2 KB · Views: 87

OLDBULL8

Good Morning Ya'll.
Supporting Member
Joined
Feb 12, 2009
Posts
9,923
Reaction score
338
Location
Delphos , Ohio
From the looks of the pics you didn't remove the seal plate, you used the install tool with the guide pins. Is that correct?
Did you use a pan gasket before the first seal install?

The seal may not be leaking at all if the corners on the rear of the pan where the seal plate meets is not sealed good with RTV.

To install correctly with a wear sleeve, if the seal plate has never been removed.
DO NOT remove the sleeve from the seal, install both together with the install tool making sure the seal and sleeve goes in straight. Do NOT pound/hit directly on the install tool, use a block or other ballpeen hammer on the face of the tool in the center and pound/hit on that.

To install if the seal plate has been removed before.
Remove seal plate, clean all old RTV, reseal with RTV, install seal plate leaving it a little loose before RTV sets up, install guide pins and tool, install seal with wear ring, everything should/will center itself, tighten bolts to torque spec.
Hope this helps, I know it's difficult with the engine in frame.
 

chris142

Full Access Member
Joined
Apr 15, 2012
Posts
3,007
Reaction score
353
Location
SoCal
We cut a fast food drink cup.put it inside the seal .gooped up the oil pan area and used a new gasket back there then slid the seal and plate up off the cup and onto the crank then bolted it up.
 

icanfixall

Official GMM hand model
Joined
Apr 10, 2005
Posts
25,858
Reaction score
673
Location
West coast
Well if you are using the new double lip seal that tells you not to use any oil and do not remove the sleeve from the seal. That might be the issues. The newer seal material is not that same rubberized stuff most seals are made from. Its a completely synthetic material and no grease or oil is to be used on it when you install it. Now saying all that I tried installing mine that way.. Not a chance of it working for me. So I removed the sleeve and installed it. Then installed the seal in the plate and then installed the plate with the seal on the crank with the new sleeve and bolted the plate to the engine. We do have an alignment pin back on the passenger side to adjust the seal plate a very little bit. I recall the hole in the plate to be a little bit larger for adjustment too. Also there is no need for a gasket behind the seal plate. Hell we don't use a pan gasket and the seal plate gets the same oil splash as the pan does.
 

jhenegh

Truck Still Earns its Keep
Joined
Jul 7, 2013
Posts
1,072
Reaction score
36
Location
Deerfield, WI
From the looks of the pics you didn't remove the seal plate, you used the install tool with the guide pins. Is that correct?
Did you use a pan gasket before the first seal install?

The seal may not be leaking at all if the corners on the rear of the pan where the seal plate meets is not sealed good with RTV.

To install correctly with a wear sleeve, if the seal plate has never been removed.
DO NOT remove the sleeve from the seal, install both together with the install tool making sure the seal and sleeve goes in straight. Do NOT pound/hit directly on the install tool, use a block or other ballpeen hammer on the face of the tool in the center and pound/hit on that.

To install if the seal plate has been removed before.
Remove seal plate, clean all old RTV, reseal with RTV, install seal plate leaving it a little loose before RTV sets up, install guide pins and tool, install seal with wear ring, everything should/will center itself, tighten bolts to torque spec.
Hope this helps, I know it's difficult with the engine in frame.

For the 1st seal I had the plate off, I'm thinking I got it back on slightly out of alignment somehow??

For the 2nd seal I did use that plastic tool but man is it hard to use! It just bounces. I was using a block of wood against it and it was all I could do to get the thing to drive in straight, even with those pins. They fit loose. I'll try your "if the plate has been removed before" instructions. Thanks!
 

jhenegh

Truck Still Earns its Keep
Joined
Jul 7, 2013
Posts
1,072
Reaction score
36
Location
Deerfield, WI
We cut a fast food drink cup.put it inside the seal .gooped up the oil pan area and used a new gasket back there then slid the seal and plate up off the cup and onto the crank then bolted it up.

How do you drive the seal into the plate then? Mine for sure doesn't just slide on
 

jhenegh

Truck Still Earns its Keep
Joined
Jul 7, 2013
Posts
1,072
Reaction score
36
Location
Deerfield, WI
Well if you are using the new double lip seal that tells you not to use any oil and do not remove the sleeve from the seal. That might be the issues. The newer seal material is not that same rubberized stuff most seals are made from. Its a completely synthetic material and no grease or oil is to be used on it when you install it. Now saying all that I tried installing mine that way.. Not a chance of it working for me. So I removed the sleeve and installed it. Then installed the seal in the plate and then installed the plate with the seal on the crank with the new sleeve and bolted the plate to the engine. We do have an alignment pin back on the passenger side to adjust the seal plate a very little bit. I recall the hole in the plate to be a little bit larger for adjustment too. Also there is no need for a gasket behind the seal plate. Hell we don't use a pan gasket and the seal plate gets the same oil splash as the pan does.

I'll likely attempt the same. Thanks
 

chris142

Full Access Member
Joined
Apr 15, 2012
Posts
3,007
Reaction score
353
Location
SoCal
How do you drive the seal into the plate then? Mine for sure doesn't just slide on
Take the plate off. Put the new seal in it.goop things up. Put the mcdonalds cup over the crank and slide the plate with seal in it onto the crank
 

needlenose

Full Access Member
Joined
Dec 9, 2013
Posts
399
Reaction score
87
Location
Irrelevant Data
Never done a rear main on a 7.3, but I did do front and rear mains on my 12 valve a few months ago. I ruined the first rear main as well.

I saw one guy who used 4 bolts with tight-fitting washers to drive the seal in slowly and evenly 1/4 turn at a time. I actually thought about turning out a bolt driven install tool on the lathe, but I got the second one in evenly. I hate pounding on sensitive engine parts!

One thing the Oreilly parts guy told me; Felpro has the market on seals and gaskets. Most people just buy from them. This includes OEMs. My first seal was a Cummins factory part. The second was a Felpro. I compared the packaging and seal. Everything was identical. Even the print on the protective wax paper wrapper inside the sealed plastic bags was the same. Cummins seal was around $70, Felpro was around $30. A lot cheaper mistake with the Felpro.
 

TahoeTom

Supporting Member
Supporting Member
Joined
May 19, 2010
Posts
749
Reaction score
113
Location
S. Lake Tahoe, CA
I feel your pain. My first attempt was using the factory seal/sleeve combo, with the engine on a stand. I drilled out the holes on the installer tool and tried to press it in with allthread and nuts. I was doing this with the oil pan off and the plate was bending. I got it done but had no faith that it would seal. I had a leaker, but it was at the oil pan rear. The seal was actually ok. I removed the rear plate to reseal the joint with the pan and now the rear seal leaked because I had it separated from the sleeve. I should have used some sort of seal protector when I put the plate back on. Now I was where you are now, with a factory sleeve on my crank. I bought a SKF seal #38649 which is used with the oem sleeve. This time I found a suitable seal protector (large Mt High yogurt container) and I think I have success. The factory tool kit has a seal installer. The seal presses into the rear cover from the inside surface. It seems backward, but there is a rolled transition there to get it started. Maybe use the factory install tool from the other side to make sure the seal is in the correct amount. Use some aviation permatex between seal and plate.
You should have two alignment dowels at the rear of the block to align the rear plate.
 
Last edited:

Ford86

Full Access Member
Joined
Jun 10, 2015
Posts
66
Reaction score
0
Location
mass
im doing my main seal right now as well. i removed my rear plate and took the seal out that way and ford actually sent me messed up seal so im getting mine tomorrow.so i just put my rear plate back on and sealed it with rtv. sealing the oil pan than pressing the seal on. my crank did not have a wear sleeve on it to begin and there is no wear on my crank so i dont have to use the wear sleeve correct? not trying to highjack the thread or anything. i also ordered a manual and it should be in tomrrow. i can post pics of what it says to do!
 

IDIBRONCO

IDIBRONCO
Joined
Feb 5, 2010
Posts
12,361
Reaction score
11,094
Location
edmond, ks
Ford86, you're right. If you don't have any wear on your crank, you don't have to use a wear sleeve. Icanfixall, that's the same way I do it. I always remove the rear plate because it makes it easier to install the seal. On the "no oil" type of seals, I even will use carb cleaner or brake cleaner to make sure there's no oil on the sealing surface of the crank. I spray it off good and then wipe the crank off with a clean rag. One caution here. Years ago, I installed a 7.3 into an ambulance. It was remaned by the shop IO was working at. The guy who built the engine needed glasses, but wouldn't wear them. After the engine was running, the rear seal started leaking right away. When I got the transmission out and the flexplate off, I could see that the crank had a small burr on it for some reason. The builder who wouldn't wear glasses installed a wear sleeve over the burr, leaving a small ridge in the sleeve. I had to remove the sleeve and use a small file to remove the burr. After I made sure that the crank was smooth, I installed a new wear sleeve and seal. There was no more leak. It's just a good thing to watch out for before installing your engine and having a leak.
 

TahoeTom

Supporting Member
Supporting Member
Joined
May 19, 2010
Posts
749
Reaction score
113
Location
S. Lake Tahoe, CA
I scanned the pages related to the rear main. The manual assumes you have the related tool kit. If your crank has no groove worn into it you don't need a wear sleeve. There are two seal sizes. The Ford seal/sleeve set has a different inside diameter because of the thickness of the factory wear sleeve. If no wear sleeve, the seal is sized to run on the crank. If a Speedi-Sleeve is used, I believe they are thin enough to use the stock seal. The Ford seal and sleeve is designed to be installed from the outside using the installation tool. It is not so easy as described by the OP. The seal without sleeve is installed with the rear plate removed and pressed in from the inside side of the plate. The plate then is installed, using a seal protector to avoid damage to the seal lip.
 

Attachments

  • Image (25).jpg
    Image (25).jpg
    443.6 KB · Views: 81
  • Image (26).jpg
    Image (26).jpg
    466.2 KB · Views: 76
  • Image (27).jpg
    Image (27).jpg
    336.9 KB · Views: 78
  • Image (28).jpg
    Image (28).jpg
    493.8 KB · Views: 74

icanfixall

Official GMM hand model
Joined
Apr 10, 2005
Posts
25,858
Reaction score
673
Location
West coast
If the seal you purchase COMES with a speedi sleeve you must use that seal with that sleeve. If the crank does not have a worn groove then purchase the seal without the sleeve.
 

Latest posts

Forum statistics

Threads
91,316
Posts
1,130,204
Members
24,122
Latest member
radeon1314
Top