Brake Job Questions

TronDD

Full Access Member
Joined
Mar 8, 2013
Posts
151
Reaction score
0
Location
MA
I started my brake job because of a sticking caliper. When I got in there to grease the pins, the rotor was already scored, the pads almost gone and the caliper piston boots on both sides were barely present.

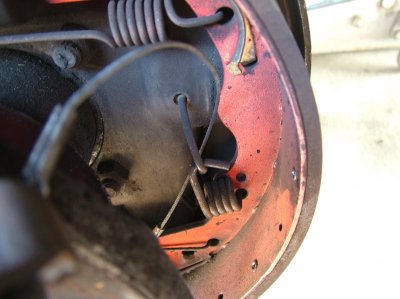
Some 2 months later, I'm still replacing things. Besides calipers and rotors (which were a bear), replaced bearings, hoses, seals, hub seals, broke 3 brakes lines, replaced the master, replaced the RABS valve, and now have a rear adjuster just spinning in place so I have to dig into the rear brakes. l'll spare you the details of my sob story.

Being in KY, you probably won't have the rust issues nor the freezing cold weather to deal with. Rotors are behind the hubs. You have to take the hub off (now you should replace the seal), knock the lug bolts out with a soft but heavy mallet, and knock the hub out of the rotor.

Have fun! :)
Tim.
 

gandalf

Senior Member
Joined
Jan 21, 2005
Posts
3,883
Reaction score
1,073
Location
CA &/or Maine
That brake shoe hold down tool from tooltopia and what Gandalf posted really does simplify removing the spring. the spring in question is the one that is about in the middle of the brake shoe. It connects to the pin thru the backing plate and nope. That pin is not bent from use. It MUST be bent like that to work. But any other shoe type brake job this pin is straight.


To build on what Gary (Icanfixall) said... There are two of these springs in each of the read brake drums on my truck. The spring must be twisted in order for the pin to meet and hook on. That twist is what applies the pressure to hold the shoe in place.

The hard part in the process is the twisting. The spring connects through the shoe on one end, while the other end must be depressed to meet the hooked pin coming through the backing plate. The result is what you see in this picture.


attachment.php


I took this picture mid-way through the job, so the brakes are partially disassembled, but the spring in question is still connected.
 

Attachments

  • DSCF0433.jpg
    DSCF0433.jpg
    478.3 KB · Views: 118

icanfixall

Official GMM hand model
Joined
Apr 10, 2005
Posts
25,858
Reaction score
673
Location
West coast
Thanks Ken. Thats a great pic referring to the problem spring I was commenting on.
 

skeeter72

Full Access Member
Joined
Jan 3, 2013
Posts
88
Reaction score
0
Location
lexington KY
You must be registered for see images attach

Guys thanks for all the advice. Unfortunately I have not been able to get passed the problem brake to get to the maintenance of the others., embarrassingly I can not get the damn rotor off. The pictures are where I am at now. I'm stopping from the lack of light and it is starting to rain. Any tips would be helpful. I have doused any joint I could see in penetrating oil. So maybe a little time will help. On another note, how can I tell if my t-case is blown. Gunning it to the side of the road with the brake seized might have done it in. Any help, thank you in again, you guys rock.
 

stealth13777

Full Access Member
Joined
May 28, 2014
Posts
493
Reaction score
37
Location
Jacksonville, FL
That rotor doesn't have a screw on the lower part we can't see does it? I've never done brakes on these trucks but I've found that on other fords. Probably won't help but maybe


Sent from my iPhone using Tapatalk
 

dunk

Dunce
Joined
Oct 25, 2013
Posts
991
Reaction score
4
Location
NJ
To remove the rotor you need to remove the hub. It's a 4 point spindle nut socket remove the two nuts inside the spindle then pull the whole thing off. To change the rotor press the studs out and it'll come apart with a few whacks and prying if it doesn't just fall apart. You have three pieces.... Hub, rotor, spindle. The studs are press fit to hold them together. If you don't have a press Harbor Freight is cheap and handy, if not a BFH along with heat and penetrant works in a pinch. Failing that remove the hub assembly and bring it to a machien shop or a good NAPA along with your new rotors and they likely won't charge much to do it.
 

Bashby

Full Access Member
Joined
Aug 29, 2011
Posts
232
Reaction score
0
Location
Charles Town WV
When you get the rotor hub assy off, it is easy to separate the rotor from the hub, no press or heat required. Drive all the wheel studs out with a hammer. The design of the studs makes it nearly impossible to mess up the threads. I usually just use my 3 lb sledge, one or two hits each. Then stand the assy on edge and drive the rotor away from the hub. Don't beat on the hub or you'll booger it up, hit the rotor. Yours may break since it's worn so thin but that's ok, just watch for flying bits. (Safety glasses?). Then set the old rotor on the ground "hat up".. Like this, (trying to draw a rotor with symbols) __---__. Then drop the hub, seal side up into the old rotor lining up the stud holes. The new rotor the sits on top, this way --__--. Drop your wheel studs in the drive them in with a hammer and drift. An air hammer is easier yet. The old rotor is just there to give you a stable platform to hold the hub, the new assy will not be attached when you are done.
 

skeeter72

Full Access Member
Joined
Jan 3, 2013
Posts
88
Reaction score
0
Location
lexington KY
You must be registered for see images attach

I want verify that the copper washers are for the connection to the brake hose on between the caliper and brake hose(bottom) and between bolt and brake hose top. Also see the piston in the pic. That's what happens when drop it? I'm assuming I need to replace it but it's a shot in the dark to see if any of you that's to badly damaged. Lastly any one have a picture of the z-thingy (best way I can describe it) spring fits on the caliper. Both of my old ones where not there. Just want to make sure I'm putting it on right thank you.
 

skeeter72

Full Access Member
Joined
Jan 3, 2013
Posts
88
Reaction score
0
Location
lexington KY
Yeah it was another shot in the dark to see a complete caliper setup. I'm not asking anyone to remove a tire for a quick picture. I'll take a picture when I have mine assembled to see if it looks right. But am I correct with the copper washer placements.
 

79jasper

Chickenhawk
Joined
Oct 13, 2012
Posts
17,367
Reaction score
1,930
Location
Collinsville, Oklahoma
I can't actually remember.
If both sides aren't apart, pull apart the other side to compare.
I could be wrong, but I think it goes under the bolt head.

Sent from my SM-T537R4 using Tapatalk
 

skeeter72

Full Access Member
Joined
Jan 3, 2013
Posts
88
Reaction score
0
Location
lexington KY
I tried looking at the other side but everything is so corroded it is hard to tell where one thing begins and another starts rusting. I have the rubber/metal push pins that hold the caliper to the bracket. The only thing that has a bolt it is the break line to the caliper. Unless I am missing something obvious; which I am known to do thus me asking and being doubly sure.
 

79jasper

Chickenhawk
Joined
Oct 13, 2012
Posts
17,367
Reaction score
1,930
Location
Collinsville, Oklahoma
Looks like the washer goes on both sides of the line at the caliper.
The z thing is shown in this video. Front Brake Replacement Ford F250 F250 6.9L: http://youtu.be/LvWZOJRFfGA
But looking at your signature I see you're working on a 94, and I can't remember what year they quit using those.

Sent from my SM-T537R4 using Tapatalk
 

skeeter72

Full Access Member
Joined
Jan 3, 2013
Posts
88
Reaction score
0
Location
lexington KY
Thanks that was quite helpful and those look just like mine. However I do not know how he was able to compress one piston at a time with a c-clamp. For me I push one in, the other comes out. I took me doing that a couple of times before I put a piece a wood in there to do both at the same time.
 
Top