parallel turbos

1mouse3

Full Access Member
Joined
Nov 28, 2013
Posts
1,391
Reaction score
969
Location
il
This 1971 truck had all the sport custom trim on it when I bought it in 1974. It was a little beat up from the woods so I took it all off.

dscn0478-jpg.135440


This is that one and lost the trim in a past life, I have the 72 centers not installed so dont get damaged and it came with a steel 69 grille.


You must be registered for see images attach


this a past one that had all its moldings.

You must be registered for see images attach
 

1mouse3

Full Access Member
Joined
Nov 28, 2013
Posts
1,391
Reaction score
969
Location
il
Time has come to pass that I shall now dig up this corpes of thread, its zoom zoom time. I have parts in hand to have matching turbos, got a he300wg reman fitted with a 10cm turbine. @IDIoit has a 54 trim t04e and @94idift had a 57 trim t04e, that did well in parrallel config. The compressor on the hx35/he300 at 54/78 is close to the 50 trim t04e, that had a good map and within ballpark of the other two. The turbine housing on the hx35w I have was 12cm, that is around 0.80 A/R and was too big compared to the t04e's that where found to work. In deliberation of what could be found at what cost, settled on a 10cm housing I found that is close to 0.65 A/R. This is in ballpark of know working turbos, the turbine wheel is 5mm bigger tho. The t04e's t3 turbine is 65/55 and the hx35/he300 is at 70/60, this should give a slightly slower spool. So might work out better since @94idift was having issues braking flex plates.

You must be registered for see images attach


This is size difference between the 12cm and 10cm housing, without the waste gate its substantially lighter. Going to use external waste gates so there out the way

You must be registered for see images attach

You must be registered for see images attach


Now just need to rebuild the hx35 and install the billet comp wheel, then will have a matched set of turbos.

You must be registered for see images attach


After hours of drooling over photos past me took of possible placements, this is where I decided they will go. Need to get some square tube to make something work and have someone weld them up, might raise them up sightly tho.

You must be registered for see images attach

You must be registered for see images attach

You must be registered for see images attach

You must be registered for see images attach
 

1mouse3

Full Access Member
Joined
Nov 28, 2013
Posts
1,391
Reaction score
969
Location
il
that way you know itll fit!

Thanks for reminding me to measure twice and cut once.


i highly advise to mock up the entire engine before doing any fab work.

Thing is time is withering away waiting and 7.3 block needs sent to get work. Do have a noisy one in
a parked truck that can serve a prop.


and also install the belt driven accessories you want before hand.

The alternator one is the only one needed for mock up.

You must be registered for see images attach


This shows that if the comp housing is about in line with this bracket there would be clearence of the fan. Also this far foward gives room to run the exhaust out on the outside of the frame without hitting the hvac box

You must be registered for see images attach


There is room for it to go down and is hanging on wires right now.

You must be registered for see images attach


This side its just that Id need to clear a passsage for a pipe.

You must be registered for see images attach


And looks that as long as it not pass foward of the head it should be in a good place

You must be registered for see images attach

You must be registered for see images attach


Will have to sort out this spaghetti mess of hoses I have here. Need longer ones routed a different path that would be out the way to get the turbo closer

You must be registered for see images attach
 

1mouse3

Full Access Member
Joined
Nov 28, 2013
Posts
1,391
Reaction score
969
Location
il
I have to give you and IDIoit props here. This is farther than I'd ever care to try going.

Thanks, guess im michelangelo and this is the sistine chapel that needs painted. Id rather build off a $300 pos than have that shinny new one that aint what I want. To me that shinny new one has a million and one extra gizmos that makes it oversized for it all to fit, a lot is unneeded. What I want is what I have built, its simple and to the point and trying to have little to fail in short order. I have a king pin d60 for durability and simplicity of service. I went with a saginaw pump with hydroboost for no noise and pinky steering when on the brakes with no need for vacuum. I have moved the fuel filter to the frame with a second to get rid of clutter in the engine bay. I have 60g glow plug since are self limiting so can run them without worry. The batterys are frame mounted to give room for this point in the build. Have partly painted the frame white just to be different. Have brick xlt captains chairs with coach headliner board so far to make the interior nice. I have no objection to the f-super spirings I have all around since gives the desired lift and can run 2 ton of gravel without bracking a sweat. So could say I have a f350 xlt hd 4x4 clone made from a f250 xl 4x4.

Since progress on the 7.3 rebuild has turn into a diy tidi build, it deserves boost to finalize the build. Factory placement of the turbo is not a place of easy service and dealing with several turbos on duramaxes, there has come hatred to that placement. So spliting the load between two that are in a place of easy service is more viable to me, and falls in line with the goals of this build. Yes the air to air cooler will have pipes that can blow off and water to air can have all hard pipe, but using what I have for now. So the path to what I want means to blaze a trail few have traveled.

Giving me some duct tape and some bailing wire, something can be made work. Example is these snipets of some that I did to the f100 to get it ready to be driven. This was the other month and was trying a cam out to see if could make vidieos, but unsure on some of what I captured.

xc_hide_links_from_guests_guests_error_hide_media
 

1mouse3

Full Access Member
Joined
Nov 28, 2013
Posts
1,391
Reaction score
969
Location
il
I got the lines made longer and grabed extra fitting out the "I will" box

You must be registered for see images attach

You must be registered for see images attach

You must be registered for see images attach


With that in order, the turbo can sit in a good spot. This show that if the t3 flange is in line with the log end its good.

You must be registered for see images attach


Passage of a pipe down is about cleared as well.

You must be registered for see images attach


Rebending some brake lines will give clearance to run exhaust on the outside of the frame as well.

You must be registered for see images attach
 
Last edited:

1mouse3

Full Access Member
Joined
Nov 28, 2013
Posts
1,391
Reaction score
969
Location
il
:sly

You must be registered for see images attach


I ask someone to grab 2-1/2inx3/16inx4ft tube when at the metal shop, what I got back was 1/4 wall.

You must be registered for see images attach

You must be registered for see images attach


It is a usable size sinice can be ported to size.

You must be registered for see images attach


Random cheap 38mm input/ 35mm output wastgates that claimed 10/20/30 psi, is what I got and dont know if right size. This one peaked my interest with its inconel seat and valve.

You must be registered for see images attach


I see something with this tube in its about correct size for the ports, It would just need the edge filled. As for bolting it down, what about plug holes for cap screew access?

You must be registered for see images attach
 

1mouse3

Full Access Member
Joined
Nov 28, 2013
Posts
1,391
Reaction score
969
Location
il
I see something with this tube in its about correct size for the ports, It would just need the edge filled. As for bolting it down, what about plug holes for cap screew access?

2022-03-19%2020.32.52.jpg

Im not sure if not having runner to the log will cause issues with flow but is close to equal volume of the oem. Thinking some more on that ideal, dont see having the bolt inside would be good since have a chance to come lose and wreck a turbo. Running tube through for bolts to give compression on the head face would give restriction of flow. Just holes for bolts would not be as bad but is the 1/4 wall adequate to not deform on the head face surface?
 

IDIBRONCO

IDIBRONCO
Joined
Feb 5, 2010
Posts
12,325
Reaction score
11,047
Location
edmond, ks
Since it appears that you're going to run the turbos on the driver's side, what are you going to do for the oil return? Maybe you already showed that and I just don't remember.
 

1mouse3

Full Access Member
Joined
Nov 28, 2013
Posts
1,391
Reaction score
969
Location
il
Since it appears that you're going to run the turbos on the driver's side, what are you going to do for the oil return? Maybe you already showed that and I just don't remember.


Maybe one these -10 fittings on the timing cover and other one fuel pump block off.

You must be registered for see images attach


Looking at this further, there is further thought brewing on the subject. Say this section of the tube is the passenger side exhaust manifold log, and extra being the driver side. This would be enough material for the base structure, would need extra for the up pies. The old manifold gives example for a 1/4in plate to be welded to the tube, this is the pace to bolt to the head. Then take some 2in dom to fill in what would be the open areas off the ports going into the log. Thinking could somewhat mimic the oem ones, as apposed to trying to build off them.

You must be registered for see images attach


And back to this mock up for the passenger side, I would want this turbo about here.

You must be registered for see images attach


From there would want the turbo up pipe tapered outward one inch from the alternator bracket, this gives room for a down pipe.

You must be registered for see images attach


As for bulding the drivers side manifold, it will be inverted of the passenger side and same size as the gasket. I will be wanting this turbo alinged with where this log ends.

You must be registered for see images attach


This shows that if I aim this up pipe out and up one inch it sould be good to clear.

You must be registered for see images attach
 
Last edited:

1mouse3

Full Access Member
Joined
Nov 28, 2013
Posts
1,391
Reaction score
969
Location
il
I had a dream to stand it off...
:smoke:

You must be registered for see images attach


rub..

You must be registered for see images attach


may be rub...

You must be registered for see images attach


That should do.

You must be registered for see images attach


So somewhere there.

You must be registered for see images attach


Dont touch the teeter totter.
:backoff

You must be registered for see images attach


Then fill the void with 2in dom.

You must be registered for see images attach

You must be registered for see images attach


Room here for a mirror copy, check.
:sly

You must be registered for see images attach


having the up pipe point out ward the turbo can fit.

You must be registered for see images attach


So think there is good light at the end of this tunnel.

You must be registered for see images attach
 

Attachments

  • 2022-03-21%2017.44.12.jpg
    2022-03-21%2017.44.12.jpg
    1.2 MB · Views: 7
Last edited:

1mouse3

Full Access Member
Joined
Nov 28, 2013
Posts
1,391
Reaction score
969
Location
il
Now to mock up pieces.
:popcorn

You must be registered for see images attach

You must be registered for see images attach

You must be registered for see images attach

You must be registered for see images attach


It dose stand out some from the valve cover and a slight bit more, this may do.

You must be registered for see images attach


Now to hack up a hack jig.
:joker:

You must be registered for see images attach


Then can hack up some 2 1/2 dom with a saz-all, a hack saw starter aids in a guild to start.
:fight:

You must be registered for see images attach


Now have two batches the roughly match each other.
:sly

You must be registered for see images attach


-Drool

You must be registered for see images attach

You must be registered for see images attach

You must be registered for see images attach

You must be registered for see images attach


This is a bit high like this.

You must be registered for see images attach


I can see better placement with it off.

You must be registered for see images attach

You must be registered for see images attach
 
Last edited:

1mouse3

Full Access Member
Joined
Nov 28, 2013
Posts
1,391
Reaction score
969
Location
il
More cuts were made on the jig, made end caps and had someone weld them.

You must be registered for see images attach

You must be registered for see images attach


Next is trying to make holes, a hole saw failed but can make imprint. I ended up using a cut off and finishing with a burr.

You must be registered for see images attach

You must be registered for see images attach

You must be registered for see images attach


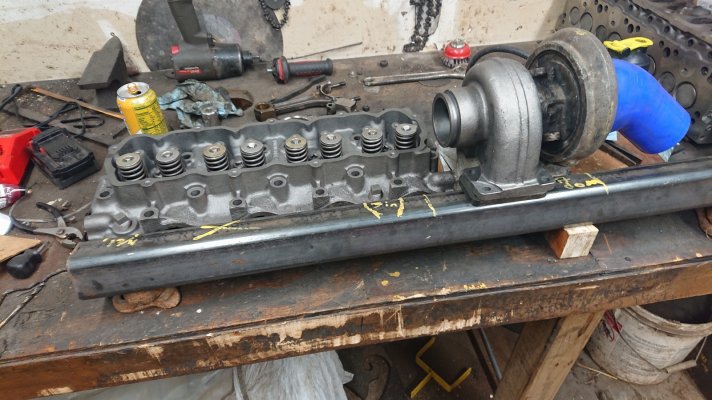
Now have the tubes fitted to one manifold log.

You must be registered for see images attach
You must be registered for see images attach

You must be registered for see images attach


Now need to make a plate and this one is ready for welding.

You must be registered for see images attach
 

Latest posts

Forum statistics

Threads
91,287
Posts
1,129,810
Members
24,104
Latest member
Wheelsrollin
Top