Ex Wife- my LONG term build

IDIBRONCO

IDIBRONCO
Joined
Feb 5, 2010
Posts
12,236
Reaction score
10,925
Location
edmond, ks
And finally, the last box that couldn't get wet in the rain. I got my set of Turbo rods in for the future engine build for this truck (as if I needed help spending money on this thing).
Earlier, I forgot to add "Thanks Torinojts!"
 

1mouse3

Full Access Member
Joined
Nov 28, 2013
Posts
1,367
Reaction score
948
Location
il
I like those mirrors, keep seeing them on square bodys at the yard and have thought about getting a set. The small ones I have on now dont do very well and give a bit of blind spot of small cars.
 

IDIBRONCO

IDIBRONCO
Joined
Feb 5, 2010
Posts
12,236
Reaction score
10,925
Location
edmond, ks
The ones on here were mismatched and neither style looked very good to me. The one that had been rigged on the passenger's side was this style of mirror, but if I was going to replace one, I was going to replace them both. They came with new mounting elbows so don't buy them separately like I did. I won't be able to attempt to align them until the interior's back in and the dually fenders are back on. I may not be able to run them inward like they are now with the fenders on. At least that part is easy to change.
 

IDIBRONCO

IDIBRONCO
Joined
Feb 5, 2010
Posts
12,236
Reaction score
10,925
Location
edmond, ks
Today, I took the trim pieces to the car wash to wash the mouse yuck off of them. $8.50 later, it may not be perfectly clean, but I think it's good enough. What little is left there should clean up fairly easily with Simple Green.
 

Attachments

  • 001.JPG
    001.JPG
    428.3 KB · Views: 11

IDIBRONCO

IDIBRONCO
Joined
Feb 5, 2010
Posts
12,236
Reaction score
10,925
Location
edmond, ks
Even though the trim pieces are now clean, I'm going to have to wait for a while longer to install them. The headliner needs some help. The bigger hole is where the hole in the roof from the old style antenna was at. The smaller hole is from mice (I think). I'm going to cut the holes out bigger and put some more cardboard inside them for patches. Both of the front corners came off so I'm going to have to reattach them as well. THEN I can get some more material to cover this all up.
 

Attachments

  • 001.JPG
    001.JPG
    487 KB · Views: 9
  • 002.JPG
    002.JPG
    362.8 KB · Views: 9
  • 003.JPG
    003.JPG
    430.5 KB · Views: 9
  • 004.JPG
    004.JPG
    353.3 KB · Views: 9
  • 005.JPG
    005.JPG
    450.8 KB · Views: 9

5 oclock

Full Access Member
Joined
Feb 9, 2021
Posts
109
Reaction score
18
Location
Oregon
Got my headliner in the trunk right now about to drop it off at an upholstery shop nearby today. I took apart the hvac and welded it all back together yesterday with the jounjip plastic welder and the stock rods that came in the package. Not pretty but who is asking. SO far it seems adequate and fairly sturdy. Nice to know i have a clean system to blow air in my face with lol.
 

5 oclock

Full Access Member
Joined
Feb 9, 2021
Posts
109
Reaction score
18
Location
Oregon
I also put the right stuff in the channel seams where it comes together. Not sure how much if any that will help the seal.
 

IDIBRONCO

IDIBRONCO
Joined
Feb 5, 2010
Posts
12,236
Reaction score
10,925
Location
edmond, ks
Thanks. They are Grote #28093-5. I'm liking them better all the time. I bought them on Ebay for $85.58 (couldn't do that again if I tried) for the pair. Like I said before, they come with the mounting elbows.
 

IDIBRONCO

IDIBRONCO
Joined
Feb 5, 2010
Posts
12,236
Reaction score
10,925
Location
edmond, ks
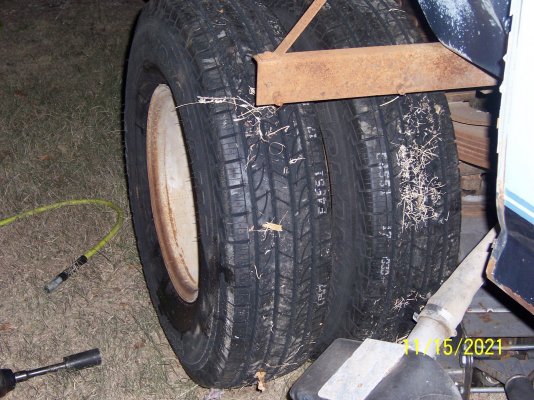
Well I let myself get distracted from this for WAY too long. It wasn't much, but tonight, I put two new tire on her. I had a pair ready, but had to steal them to put on the Blue Truck for a while since the ones that I am running on it were unavailable. I ordered a pair to put on the Ex Wife (again) to replace the stolen ones. I also have now ordered another pair of the A/T's to go on the Blue Truck so I'll put them on and then put the H/T's on here where they belong. The main reason that I bothered to post about the tires is because I want to brag a little. I pulled up to my garage at 4:30. I had to open the garage, dig out my dirt bike, get all the tools ready, kick on the air compressor, take the tires off of the Ex Wife, and dig out the new tires all before I got started on replacing the tires. Now I did remove the valve cores to let the air out of the old tires while I was digging out the new tires, but I had finished airing up the second tire at 5:37. That's pretty darn fast to change out two tires by hand plus add the Dyna Beads and replace both valve stems. It had to be less than 20 minutes per tire. To me that's worth bragging about. No I didn't put the simulators on yet, but I figure that there's plenty of time for that yet. No the dually fenders aren't back on yet either. I think that I'll leave them off until I get the engine and transmission swapped out just to reduce the chances of them being damaged while inside my garage.
 

Attachments

  • 001.JPG
    001.JPG
    473.4 KB · Views: 6

The_Josh_Bear

Full Access Member
Joined
Jun 1, 2016
Posts
1,916
Reaction score
1,498
Location
Western WA
Nice work! That IS crazy fast for hand-mounting. I've done about 4 sets plus 2 more tires over the last few years and I'm just finally starting to get comfortable with it! Haha. 2 of those sets were aluminum rims though and they are no fun with hand tools.
 

IDIBRONCO

IDIBRONCO
Joined
Feb 5, 2010
Posts
12,236
Reaction score
10,925
Location
edmond, ks
I sure can believe that. The tires did break down pretty easily with my slide hammer type of bead breaker. The new tires had also been sitting expanded for a while with tube in them so there was no issues with seating them. I did air them up to over 40 PSI with no valve cores in so that part went faster too. I think that I forgot to mention that I put new valve stems in the rims while I had the tires off.
 

subway

be nice to the admin :D
Joined
Oct 4, 2006
Posts
6,542
Reaction score
1,038
Location
York PA
that is pretty good, I actually enjoy changing tires when they break off the rim ok. It is when the tires bond to the rim that it starts really turning into work with a sledge and running them over to break the bead!
 

lotzagoodstuff

Supporting Member
Supporting Member
Joined
May 19, 2007
Posts
2,726
Reaction score
668
Location
Carmel, IN
Thanks for sharing. Can you post a pic or maybe even just a description of your hand bead breaking/tire mounting set up so us "junior varsity" tire mounters can learn from your 33.5 minutes per tire expertise? It sounds like you've had really good luck with Dynabeads: do you have any recommendations on using them or best place to purchase them?

I have some time off coming and I have a pesky front tire that balanced with what I can only describe as an excessive amount of weights that results in a shimmy right at 65 MPH which of course is right where I like to run on the highway. I'd like to take a shot at rebalancing that tire/wheel. If you were closer I'd drop it off and pay your hourly rate ;)
 

Forum statistics

Threads
91,217
Posts
1,128,519
Members
24,046
Latest member
VWAudiFord

Members online

Top