So what did you do with your truck today?

Old Goat

Full Access Member
Joined
Jan 14, 2021
Posts
2,401
Reaction score
2,541
Location
Northern Nevada
Cut a hole in it :)
You must be registered for see images attach
I wanted to mount this on the drivers side to cut down on my chances of leaving it plugged in and pulling away. I know me best lol
OH she is just Nursing.


Goat
 

Old Goat

Full Access Member
Joined
Jan 14, 2021
Posts
2,401
Reaction score
2,541
Location
Northern Nevada
Dang time fly`s. I posted back o the 2nd about my rear brake problem.
Week before last got new Shoes, Brake Cylinders, and Hard Wear Kit. Got her up on Jack Stands and the 3 ton Hyd Jack under the Diff. for back up.
Pulled both drums and used the L/R for the L/R for the, "Now how do these thing go back together guide?".
First thing is to blow out all the Brake dust etc... with Spray Brake Cleaner, and a big drain pan under it.
Took everything apart. The curved lever and assembly is held on with a small bolt and 7/16" Nut on the back of the Backing Plate.
Took it apart and wire wheeled all the rust off the parts, and slathered it up with Anti-Seize.
Also wired wheeked the Brake adjuster gizmo and Anti-Seized it.

But getting the Shoes and Springs on is a PITA working around the Hub Flange.
Must have watched 1/2 dozen YT Vids of guys doing this job. Looks easy, but Iam a DA. Why not just remove the Hub, would make it easier...right?
Pull the Axle and Hub, had it together in 30 min.
The Hub Seal did look a bit damp around the edge after removing it.
Washed up the Inner and outer Bearing, threw them in a pan of Gear Oil, washed up the Hub, pressed in the new Seal, and slid her on the Spindle.
I was surprised the Nut that holds it all together is a ratchet affair. never seen one of those before. had to buy the special Socket at O`Really`s.
All the truck axles I have pulled before had a paper or metal seal on the back side of the Axle, this 86 they use a big "O" Ring. Better design to keep it leak free as I have seen some older axles in the past.

Be sure to wire wheel the Axle bolt threads and lock tite them.
Gravity blead both wheel cylinders, and got her all adjusted , and she stops good w/o the L/R locking up.

The part# for the Spindle Socket is, W83008
Hub seal is PSO 370047A
Both from O`Really`s.

EDIT: Just remembered, I used the HF Tire Iron to pull the
Seal out of the Hub. That thing was really in there.

Then after 5 days sitting in the yard, When I started her, she fired off like an old Detroit 2 stroke. Dang did she blow smoke.
Must have been oil leaking past the valve Guide into the cylinders. Guess with 361K, she is old enough to smoke.


Goat
 
Last edited:

divemaster5734

Full Access Member
Joined
Aug 23, 2009
Posts
405
Reaction score
324
Location
Olympia, Washington
You must be registered for see images attach
the other side of the plug on the fender
Looks like you cut the end off a 12AWG splitter and mounted to the W/P receptacle.

Don't think I'm ready to cut a 1 1/2" hole in the body yet, but that's a perfect way to skip a lot of bs and simplify life.
The block heater end is severely mucked up after decades of 10 amp use, been thinking about what to do to fix.
Nice work, like the idea.
Hmm, maybe install a 120v coil to avoid having to deal with the plugs anymore with a w/p toggle.
ug, why bother with analogue, do a wifi relay.
Sheesh, I just don't know how to quit....
 

DougBoy66

Full Access Member
Joined
Feb 5, 2024
Posts
431
Reaction score
631
Location
Cass County Missouri
Looks like you cut the end off a 12AWG splitter and mounted to the W/P receptacle
It is actually already premade with the two pigtails. the body of it is all one molded piece with the plug to the outlet being a second piece that is also the gasket backing it. I have went back and forth about where to put it. didnt really want to cut a hole there, could have used the bumper but YOLO :rock:
 

DougBoy66

Full Access Member
Joined
Feb 5, 2024
Posts
431
Reaction score
631
Location
Cass County Missouri
been thinking about what to do to fix.
Complete performance offers this, I think you can by just the plug mount by itself without the charger


DougBoy66

Full Access Member
Joined
Feb 5, 2024
Posts
431
Reaction score
631
Location
Cass County Missouri
So I have all the guts back in the ol' boy and all the wiring. Been a long road, just about a year ago I started disassembling it and had the Dana 50 rebuilt, the transmission and xfer case rebuilt. The motor I had machined added new heads and I rebuilt it with all new internals minus crank and rods.
Tonight I stuck the batteries back in it and with the glow plugs out and fuel pump disconnected I used a remote trigger to turn the motor for the first time. It turned smoothly and no part introducing themselves to each other. That was a tremendous relief for me. I hit the starter about 4 times for about 15 seconds each. I did not show oil pressure to the turbo during that test but I am not sure if that would have been able to during those short bursts. It is also a new oil pump. Here are a couple picks of when I started and where I am so far
You must be registered for see images attach

And now
 

Attachments

  • 20241229_193146.jpg
    20241229_193146.jpg
    318.4 KB · Views: 16

chickenpot

Full Access Member
Joined
Apr 11, 2023
Posts
110
Reaction score
91
Location
Central IL
Installed new stock replacement headlamp assemblies earlier this afternoon, and also did the relay mod for them. Wow! i was basically driving blind before, crazy what you get used too.

Also replaced the glow plug solenoid as well, this is the second one ive had start to stick especially when cold when it's needed the most. it's been on a push button for a couple years. i installed a typical start solenoid which grounds the coil through the mounting plate vs the typical GP solenoid which has the coil + - across the top posts. maybe it's heavier duty, if this one messes up I'm going fender mounted White-Rodgers
 

KansasIDI

I hate printers
Supporting Member
Joined
Jan 21, 2023
Posts
2,051
Reaction score
1,880
Location
Wilsey, KS
Well when I converted to serpentine I was expecting less belt noise… not so… had much more. Developed screeching at times. So I replaced all the idlers, tensioner, and messed around with it. I had put a new Dayco belt from Oreillys on when I did the conversion, it was in Manhattan while I was up there and no one else had a belt in stock. Was just using the A/C delete pulley from the donor truck until I had time to get the AC compressor converted. I ordered all that from Napa. Wound up replacing the delete pulley, didn’t change anything. Well tonight I installed a Napa belt. Smooth and quiet now.

So, my recommendation is to not buy a Dayco serpentine belt.
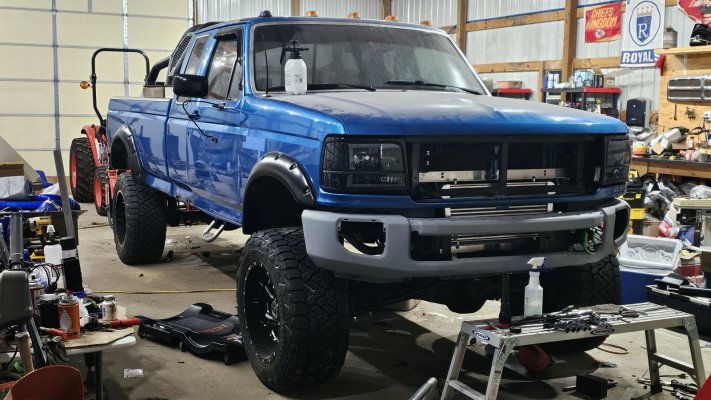
 

Forum statistics

Threads
92,929
Posts
1,155,100
Members
26,429
Latest member
-fawked-

Members online

Top