bike-maker
Full Access Member
So I've been laid off for the last couple of weeks and finally finished up (for the most part) my new gauge cluster setup. This truck has become the family wagon, so I've been making a lot of effort to make the interior nice for my wife and kids to ride around in. It was originally red (EVERYTHING was red) and beat to hell.
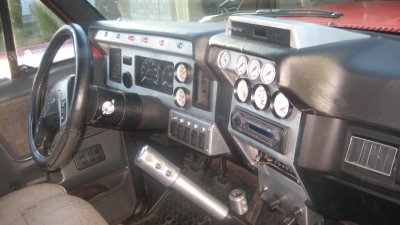
Over the past 6 or so months, I used my lunch breaks at work to bend and Tig this mess together. The panels are made from .080" aluminum sheet. I managed to fit all the gauges I wanted into the dash area (never really liked those pillar mounts), and even retained the factory AC vents on either side of the gauge cluster. Before ya'll flame me for the cheap ass gauges, just know that I traded some junk in my garage for them.
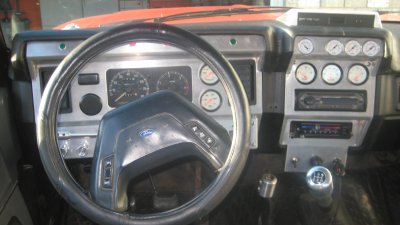
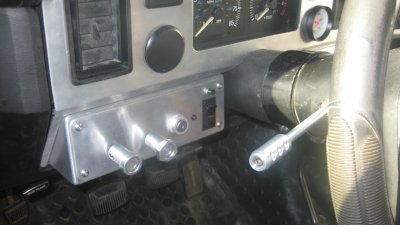
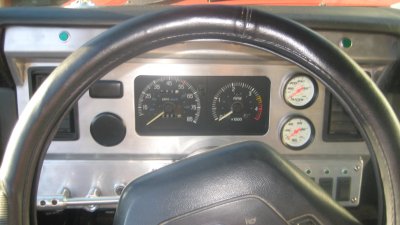
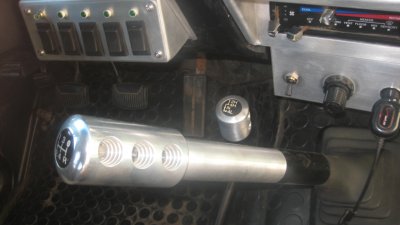
It all started when I couldn't locate a good diesel tach for the 84's gauge cluster; and since I had a perfectly good speedo and tach out of a 89' that I parted out, the wheels started turning. So, yes, the speedo and tach are out of a bricknose dash. To the left of them will eventually sit a boost gauge (need that turbo first) with a Auberin's EGT gauge above that. To the right of the steering column I built a box to house 5 switches with indicator lights for the fuel pump, high idle solenoid, cold start solenoid, fog lights, and a spare for future expansion. To the left of the steering column I built another box that houses a 3-way switch for the manual glow plugs and starter. The LED indicator above the switch tells me that the switch is pushed, and the red LED beside it gets it's signal through a timer - so the red light comes on after the glow plugs have been on for about 12 seconds. Pushing the switch up lights the glow plugs, pushing it down engages the starter. I made extensions for the light and wiper switches to move them out so they are easier to reach while driving. Then I thew in a generic parts store ignition switch (the original is now non-functional), because the only time any of my IDI's have left me stranded is when I had the steering column linkage self destruct in a previous truck. I went down to an electronics supply house and picked up some various panel mount indicators and mounted them on top to indicate; right/left turn, brights,4x4, brakes, and fuel filter vacuum.
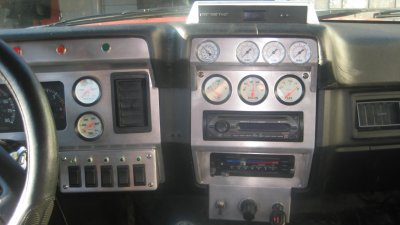
On the center dash, I repositioned the stereo deck down about 1/2", and was able to fit 3 2-1/16" gauges above that. I now have a gauge for each fuel tank, and the ohm rating coincides with the Sunpro fuel level sending units that I will eventually retrofit into my tanks. And above them; on the left is actually pressure/vacuum gauge that I use for measuring vacuum, and the other 3 are air pressure gauges. One air gauge is for the rear air bag pressure, the other 2 will be for future on board air monitoring. The top row of gauges are all 1-1/2" diameter.
Underneath the center dash (in place of the ash tray) is another panel I made that houses an air switch and air pressure regulator so that I can adjust the rear air bag's pressure while driving. And I threw the cigarette lighter in there as well.
I wanted to fill that big ugly hole on the top center of the dash, and hadn't yet figured out where to put my factory clock, so I fabbed an aluminum bucket for the clock and threw it up on top of the dash. Also note that I covered the dash pad in some ultraleather material (doesn't look too professional - but good enough for me) that was leftover from recovering the headliner.
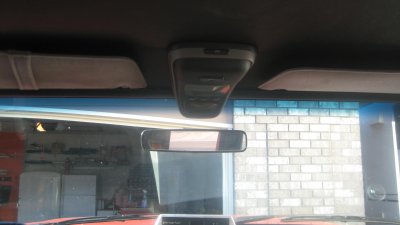
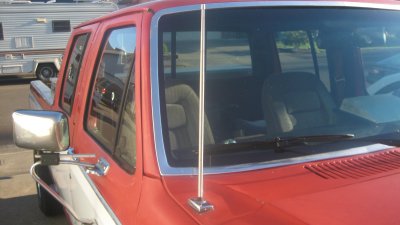
Finishing touches are an overhead console from a late 90's Ford explorer, and a hand full of parts that I machined on my dad's lathe - billet shifter, transfer case shift knob, turn signal lever, headlight and wiper switch levers, and even a billet aluminum radio antennae.
Those with a keen eye will also spot the steering column, door panels, and visors (the wife had to have a vanity mirror) are also from a 89.
Sorry for the long post, I know how you guys like details.....here's some pics
Over the past 6 or so months, I used my lunch breaks at work to bend and Tig this mess together. The panels are made from .080" aluminum sheet. I managed to fit all the gauges I wanted into the dash area (never really liked those pillar mounts), and even retained the factory AC vents on either side of the gauge cluster. Before ya'll flame me for the cheap ass gauges, just know that I traded some junk in my garage for them.
It all started when I couldn't locate a good diesel tach for the 84's gauge cluster; and since I had a perfectly good speedo and tach out of a 89' that I parted out, the wheels started turning. So, yes, the speedo and tach are out of a bricknose dash. To the left of them will eventually sit a boost gauge (need that turbo first) with a Auberin's EGT gauge above that. To the right of the steering column I built a box to house 5 switches with indicator lights for the fuel pump, high idle solenoid, cold start solenoid, fog lights, and a spare for future expansion. To the left of the steering column I built another box that houses a 3-way switch for the manual glow plugs and starter. The LED indicator above the switch tells me that the switch is pushed, and the red LED beside it gets it's signal through a timer - so the red light comes on after the glow plugs have been on for about 12 seconds. Pushing the switch up lights the glow plugs, pushing it down engages the starter. I made extensions for the light and wiper switches to move them out so they are easier to reach while driving. Then I thew in a generic parts store ignition switch (the original is now non-functional), because the only time any of my IDI's have left me stranded is when I had the steering column linkage self destruct in a previous truck. I went down to an electronics supply house and picked up some various panel mount indicators and mounted them on top to indicate; right/left turn, brights,4x4, brakes, and fuel filter vacuum.
On the center dash, I repositioned the stereo deck down about 1/2", and was able to fit 3 2-1/16" gauges above that. I now have a gauge for each fuel tank, and the ohm rating coincides with the Sunpro fuel level sending units that I will eventually retrofit into my tanks. And above them; on the left is actually pressure/vacuum gauge that I use for measuring vacuum, and the other 3 are air pressure gauges. One air gauge is for the rear air bag pressure, the other 2 will be for future on board air monitoring. The top row of gauges are all 1-1/2" diameter.
Underneath the center dash (in place of the ash tray) is another panel I made that houses an air switch and air pressure regulator so that I can adjust the rear air bag's pressure while driving. And I threw the cigarette lighter in there as well.
I wanted to fill that big ugly hole on the top center of the dash, and hadn't yet figured out where to put my factory clock, so I fabbed an aluminum bucket for the clock and threw it up on top of the dash. Also note that I covered the dash pad in some ultraleather material (doesn't look too professional - but good enough for me) that was leftover from recovering the headliner.
Finishing touches are an overhead console from a late 90's Ford explorer, and a hand full of parts that I machined on my dad's lathe - billet shifter, transfer case shift knob, turn signal lever, headlight and wiper switch levers, and even a billet aluminum radio antennae.
Those with a keen eye will also spot the steering column, door panels, and visors (the wife had to have a vanity mirror) are also from a 89.
Sorry for the long post, I know how you guys like details.....here's some pics


 That is the kind of custom work that I like to see.
  I just can't say enough good stuff about your work; that is awesome.