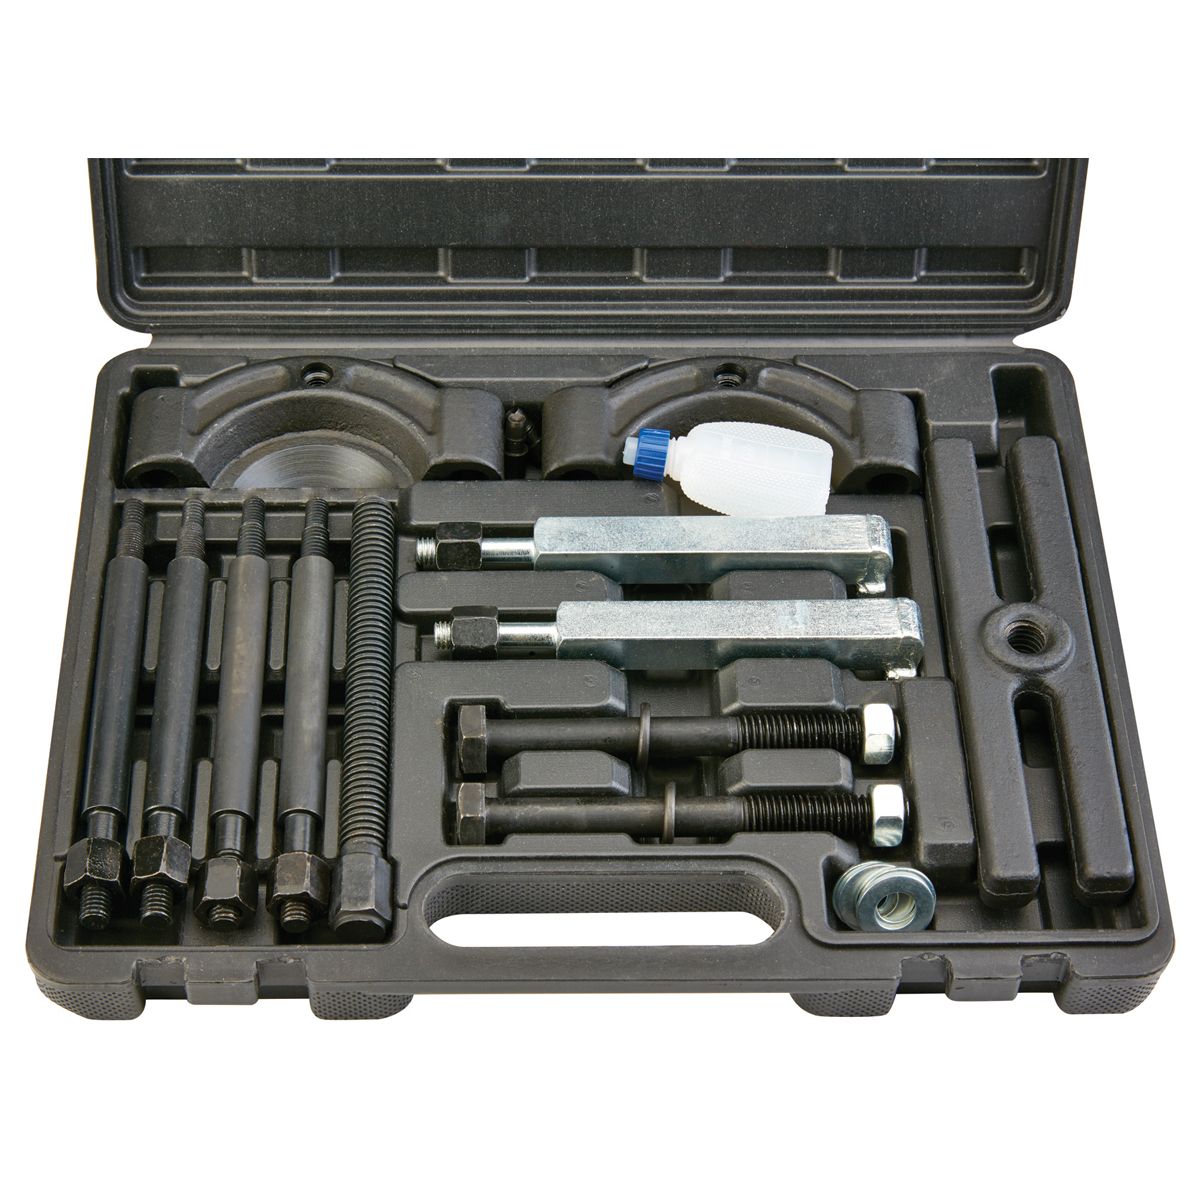
Driveline Center Support Bearing replacement

Old Goat

Full Access Member
Joined
Jan 14, 2021
Posts
1,658
Reaction score
1,645
Location
Northern Nevada
I have had this low gear noise for the past year First thought maybe the Clutch Throw out bearing as I have replaced it twice since the Clutch was installed a few years back. But it usually started as a chirping sound.

Then I was thinking maybe the input Shaft Bearing on the T-19, maybe the shaft dropped down and the gears not lining up causing low whine gear noise. Was told that couldn`t happen.
In mean time picked up a T-19 Transmission rebuild kit that was on sale for a good price, and eventually won`t be finding these . Also have another T-19 high mileage one I might go through.

Also thinking maybe the Differential as Iam now up to 341K miles.
I know noise can be deceiving, as it can travel down the DL.

I was thinking maybe the center support Bearing? Naaa that can`t be, had the DL gone through a few years back, even had to replaced the Splined Stub.
Last Fall replaced 2 U-Joints that had some looseness.

Yesterday jacked up the rear end, put it in nutural so I could spin the DL by hand.
I could hear the low bearing roughness...It`s the frickin Center bearing.
I have a HF Stethoscope, put the pokey thing on the bearing and can hear the dry bearing growling.

Checked online for the Center Bearing, O`Really shows 3 of them, and different shaft diameter`s. OH Great. So I need to pull it, use my Caliper to see the diameter, then go down there and order it. Or order one of each, use the right one and take the other 2 back.

Did a Google search last night, and finally watched about 10 different YT`s. Cutting it off with a cut off wheel, beating on it with a chisle etc.... Looked like a hack job way to remove it, but ea one the guy did it the same way.
I thought we would use a puller and then tap them on with a proper diameter piece of pipe.
Look`s like I need a bigger Hammer...LOL

Is this the way you guy`s do it?

This is on my 86 F-250 T-19 1 X 4.


Goat
 

hacked89

Full Access Member
Joined
May 30, 2018
Posts
1,783
Reaction score
2,392
Location
Bucks County PA
I use a 10 ton hydraulic puller to remove it and heat to install it. Some people like to debate against using heat to install it while they beat it on with a pipe. Pick your poison.
 

Cubey

Van dweller
Joined
Oct 18, 2017
Posts
4,118
Reaction score
1,614
Location
USA
In 2017, it cost me about $300 in Colorado to have a shop do it on my 87 F250. The bearing was totally trashed by the time I limped it to a shop (banging), but thankfully the driveshaft wasn't damaged. The new one when freshly installed:
You must be registered for see images attach
 
Last edited:

IDIBRONCO

IDIBRONCO
Joined
Feb 5, 2010
Posts
12,323
Reaction score
11,045
Location
edmond, ks
I used a cut off wheel and a chisel end on my air hammer to remove mine a few years back. Going back on was much easier. I didn't know what size mine was so I cheated and bought both. I returned the one that I didn't use.
 

Old Goat

Full Access Member
Joined
Jan 14, 2021
Posts
1,658
Reaction score
1,645
Location
Northern Nevada
Thanks guys for the feed back.
I suppose the bearing could be placed in a toaster oven to heat it up, Dry Ice placed on the shaft, and tap it on.
Only thing is, the heat on the Bearing could melt it off the balls.
Too bad there isn`t a Zerk for this bearing, I know I have never seen one. Could extend the life of it, but only as long as the rubber lasts.
I replaced one on our 80 Mercedes 240D, and it lasted 33K miles, the Chicom rubber just sort of rotted away, bearing was still good.

I think I have a Gear Puller with long Arms that may reach to pull it off.
Be next week before I can get to it.


Cubey, wish I could Copy and Paste your picture and place it under my truck.


Goat
 

lotzagoodstuff

Supporting Member
Supporting Member
Joined
May 19, 2007
Posts
2,728
Reaction score
673
Location
Carmel, IN
+1 on the cut off wheel and chisel method. For installation, if you want to shrink something a little bit to aid pressing a bearing on, and you don't have dry ice and/or it's too big to put in the freezer, go get a can of Loctite Freeze and Release. It's really made to loosen frozen bolts (it's works better than anything I've ever used for that purpose) but it's a nice localized cooling aid as well.
 

Austin86250

Full Access Member
Joined
Oct 5, 2021
Posts
836
Reaction score
473
Location
idaho
I just beat mine off no issue and used well pipe to install it wasn’t that hard dont see why most think it’s the end of the world
 

rvitko

Registered User
Joined
Dec 25, 2021
Posts
44
Reaction score
35
Location
Manchaca TX
My new one just slid on, it fits loose enough you could push it on or pull it off but tight enough it doesn’t just shake off and you could pick up the shaft by the bearing. I did run some emery cloth over it and put some grease on. The old one came apart trying to get it off and I used a dremel cut off wheel to cut the inner sleeve of the bearing and split it
 

ISPKI

Welding/metallurgical engineer/Metalsmith
Joined
Jul 13, 2015
Posts
1,080
Reaction score
658
Location
Granby CT
Anyone know the shaft diameter and housing ID for the bearing? Curious if there is a match in industrial bearings that are sealed and with grease fittings.
 

ISPKI

Welding/metallurgical engineer/Metalsmith
Joined
Jul 13, 2015
Posts
1,080
Reaction score
658
Location
Granby CT
Ahh nevermind, Rockauto has about 30 of them for less than 40$. Not going to get an industrial bearing for anywhere near that price.
 

XOLATEM

Full Access Member
Joined
May 5, 2023
Posts
614
Reaction score
796
Location
Virginia... in the brambles
heat on the Bearing could melt it off the balls.
the thing about heating up a sealed bearing is...you might make a path for the grease to eventually exit...and you never know if the ball bearing cage is plastic...

The auto trans bearing cages on a renault alliance were plastic...and lasted about 25-30K miles..

I do agree with the chilling of the shaft...works real nice...

I have replaced a few over the years...having had a driveline shop...and they either slid off without a lot of coaxing...popped off with a little more persuasion...meaning a brass drift and a hammer...or needed to know who was Boss...and it was not the bearing...by using an air chisel with a flat-face bit...carefully....or in an extreme case...the shop press and a grimace...

As far as putting a new one back on...measure the ID and OD first...and determine if it is going to be easy...or not...after both are cleaned...

Easy..? Copper tubing or soft exhaust tubing...by hand...

More difficult..? soft exhaust tubing and a hammer....

Hard...? Soft tubing and a larger hammer...after first polishing and lubing the interfaces...

S!O!B....? okay...you have now graduated to the shop press....again...and you are going in there...we can make this comfortable for you...or we can teach you a lesson you will never forget...

Your choice...and you better do your job...and like it...or else you are hitting the waste metal can...and we can use the 'dealer' word...

Just think long and hard about all of the places you will NOT go.... out of that little box....

...Using logic and reasoning with an aftermarked bearing support...


As an aside....I drove a '74 chevy C-10 for a lot of years...put a 700R4 in it and...when things were optimal...I managed to get approx...18 MPG out of it...with a quadra-jet carb...but...the poor thing had so many rust holes in it...I swear that it made a unique song as it went down the road...

What the song was...I have no clue...but it flew down the road doing 79 MPH every now and again...like trying to run with a 4x8' sheet of plywood...

Anyway...the 2-piece driveshaft had a center bearing...and the shaft and bearing fit was so loose that every now and again I would slide the front shaft forward...just to keep the yoke as far into the unit as possible...
 

KansasIDI

Hopelessly addicted to IDIs
Supporting Member
Joined
Jan 21, 2023
Posts
1,184
Reaction score
976
Location
Wilsey, KS
I used a cut off wheel and a chisel end on my air hammer to remove mine a few years back. Going back on was much easier. I didn't know what size mine was so I cheated and bought both. I returned the one that I didn't use.
I did the exact same thing when I replaced the center bearing and all the u joints on my 86. Two u joints were going out, but I always figured, they’ve all spun over the same number of times, and I’ve already got the driveshaft out, just do em all
 

KansasIDI

Hopelessly addicted to IDIs
Supporting Member
Joined
Jan 21, 2023
Posts
1,184
Reaction score
976
Location
Wilsey, KS
Too bad there isn`t a Zerk for this bearing, I know I have never seen one. Could extend the life of it, but only as long as the rubber lasts.
I think mine is greasable. Could be wrong though.
 

Old Goat

Full Access Member
Joined
Jan 14, 2021
Posts
1,658
Reaction score
1,645
Location
Northern Nevada
Yesterday I replaced the Bearing.
Watched some YT Vids, and this one, the guy used a HF Gear puller.
Advance to 2:25 and it shows how he modified it to reach.
xc_hide_links_from_guests_guests_error_hide_media


I picked up one, ($37) picked up a 3ft piece of 3/8" All Thread, cut it in 1/2. and some nuts and washers.

First I cut the rubber off with a hack Saw, part was rotted and pealed off.

Screwed ea piece into the Gear puller head with a nut to hold it tight.
On the other end, place a 3/8 Nut on each rod, 3/8 Washer and then a larger one, put the "H" shaped piece, with the Nuts and Washers on the other side. Screw in the big Screw Rod.

Place the Gear Head around the bearing, adjust the All Thread so the Screw Rod sets in the Splined shaft.
Tighten every thing down, used Kroil, and cranked down till it got tight. Tapped around with a Hammer, tighten, Hammer, Kroil etc...
and she slowly slid off.

Cleaned up the shaft, greased it and slid on the new bearing. tapped it on with a 1 3/4" 12" section of exhaust tubing. Didn`t take much to get it on.

When you look these bearing up on line, they show 2 or 3 size`s of shafts. So you need to measure what you have. Mine was 1.5.

When I dropped the DL, I left the front section on, and set it on a Jack Stand. Hardest part was getting the Splines back in, as the grease I put on it compresses air, and wouldn`t go together.
Wiped the grease out of one of the splines. and it let the air escape and she slid right together.

The Straps over the rear "U" Joint were pretty grungy, threw them in a pan of Wax and Grease remover, then threw on some blue Lock-Tite and tightened them down.

Greased all 3 joints, and called it a day.
Runs a lot smoother now.


Goat
 

Forum statistics

Threads
91,284
Posts
1,129,796
Members
24,099
Latest member
IDIBronco86

Members online

No members online now.
Top