Trailered home a 1989 F350 dump truck that looks great on the outside, but the 7.3 IDI is something else

IDIBRONCO

IDIBRONCO
Joined
Feb 5, 2010
Posts
14,983
Reaction score
14,082
Location
edmond, ks
So best practice would be to take them off and gap them for the bore they are going into, correct?
You shouldn't have to. you can check one ring if you want t, but you shouldn't have to at all. Since your block has been bored, in theory, all of the cylinders are the same diameter so you could gap the rings in any cylinder. If you were going to gap them, that is.
 

crazydane

Full Access Member
Joined
Jan 20, 2024
Posts
222
Reaction score
152
Location
Afton, VA
Ah good point. And yeah, since they were bored, they should have no taper to them at all. I'll just leave the rings on. I did notice they forgot to install a freeze plug where the block heater was. Will call them tomorrow to see if I can borrow the install tool and get one more freeze plug. Will be a lot easier than me taking the block back to them again.
 
Last edited:

crazydane

Full Access Member
Joined
Jan 20, 2024
Posts
222
Reaction score
152
Location
Afton, VA
Another month has slipped by. Being tied up with other projects and what not, but hope to get back on this engine very soon.

Got the parts in I need to do the rebuild:

You must be registered for see images attach


New injectors, glow plugs, fuel line kit, block off plate and a NOS Ford block heater (machine shop said the opening was a little different than the other ones so he couldn't put in a freeze plug in the opening).

Also picked up a much stouter engine stand with a 20% off coupon at HF:

You must be registered for see images attach
 

crazydane

Full Access Member
Joined
Jan 20, 2024
Posts
222
Reaction score
152
Location
Afton, VA
Finally able to start putting this think back together! I know its been like 6 months since my last update. Just lots of other stuff got in the way, both family and other projects.

Anyway, got the new pistons installed on the existing rods:

You must be registered for see images attach


When I went to install the crank in the block, I realized I was missing the lower main bearings. After searching forever, I came to the conclusion the machine shop pulled them out of the caps when they torqued them down to bore the block. So I ordered a new set of STD bearings from rockauto. I went with a set of Sealed Power 5110M.

Installed the NOS OEM block heater:

You must be registered for see images attach


Cranked installed and end play at the lower end of the specked range, so that's good.

You must be registered for see images attach


Cam also slipped in nice and tight. As did the pistons:

You must be registered for see images attach


I put the old pistons bank in the original block (that's the one where the #5 wrist pin scored the cylinder wall badly). Just need to clear off the workspace for layout out the rest of the parts.

Looking at the valve covers side by side, I noticed that the ones off the '92 have some noticeable humps that my '89 covers don't have:

You must be registered for see images attach


I'm assuming they are still interchangeable, right? As for the intake, I plan to use my original '89 one since the screen is not all messed up on that one.

My Fell-Pro gasket kit came with a cork oil pan gasket. Should I use it, or just go with RTV only (like ultra black)? If I do use the gasket, give it a light coat of RTV on both sides?

Speaking of oil pan, the drain plug didn't have a washer on it. The other engine had a worn out plastic washer. Would you guys recommend going with an aluminum/copper crush washer?

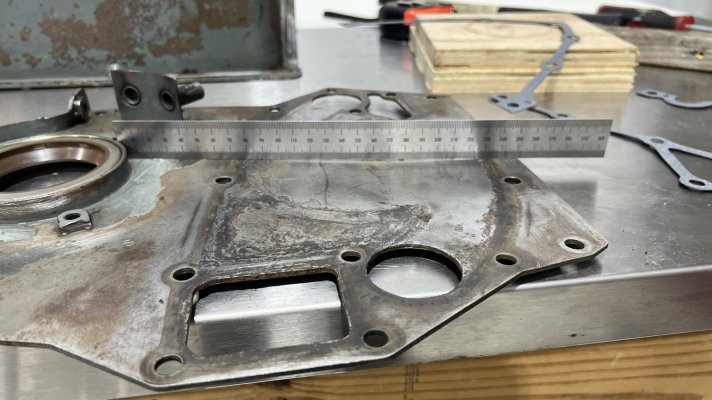
Today hopefully I'll get the oil pan, front and rear covers cleaned up, and get those installed. Both the '89 and '92 oil pumps look to be in good shape. I'm leaning towards using the one out of the '92 since it still had original sized pistons in it. They both feel fine. Ditto on the water pumps, although again, the bearing feel fine in both.
 

IDIBRONCO

IDIBRONCO
Joined
Feb 5, 2010
Posts
14,983
Reaction score
14,082
Location
edmond, ks
I'm assuming they are still interchangeable, right?
As far as I know they are.
As for the intake, I plan to use my original '89 one since the screen is not all messed up on that one.
Either one makes no difference. The screen is easy enough to remove and even swap over to a different intake. All you have to do is the unscrew the center bolt that holds it down.
or just go with RTV only (like ultra black)?
This is the recommended way.
Would you guys recommend going with an aluminum/copper crush washer?
I would. The plastic ones never seem to last very long.
 

crazydane

Full Access Member
Joined
Jan 20, 2024
Posts
222
Reaction score
152
Location
Afton, VA
Thanks for the feedback @IDIBRONCO as always!

Got the oil pan, front and rear covers cleaned up. Took a lot longer than I thought. That old gasket material seems fused to the front cover. Looks a lot better now:

You must be registered for see images attach


And:

You must be registered for see images attach


Turns out a 4" schedule 80 conduit was perfect size for pressing in the rear seal:

You must be registered for see images attach


A 3" piece of PVC conduit was similarly perfect for the front seal.

The Fel-Pro front rear seal is supposed to be installed dry:

You must be registered for see images attach


Won't be able to use that plastic installation tool as it won't slip over the crank journal. I mean the wide side will slip on there partially, but it won't pull easily through the bearing lip. Any experience installing this type of rear seal?
 

Attachments

  • IMG_8722.JPEG
    IMG_8722.JPEG
    233.7 KB · Views: 4
Last edited:

crazydane

Full Access Member
Joined
Jan 20, 2024
Posts
222
Reaction score
152
Location
Afton, VA
Also noticed the front plate had a bulge where the water pump impeller is:

You must be registered for see images attach


After some time in the press, it got it almost eliminated:

You must be registered for see images attach


The plate appears to be 1/8" think, so I'm not sure how that happened in the first place? Anyway, hopefully that small amount of variance still left won't cause any issues, being that the plate will be sandwiched between the block and and water pump housing.
 

IDIBRONCO

IDIBRONCO
Joined
Feb 5, 2010
Posts
14,983
Reaction score
14,082
Location
edmond, ks
That old gasket material seems fused to the front cover.
Yes they do seem that way. That's why I like to use a thin coat of RTV on each side of those gaskets. It keeps them from sticking to the metal so badly and the clean up is SO easy. When I changed the lift pump on my truck recently, I had done that during the install. All it took was one pass with a scraper to clean all of the leftovers off.
Won't be able to use that plastic installation tool as it won't slip over the crank journal. I mean the wide side will slip on there partially, but it won't pull easily through the bearing lip. Any experience installing this type of rear seal?
I slip the sleeve over the crank and then install the plate/seal combo. I grab the sleeve with a pair of pliers and pull it out.
Also, before you install your water pump, set a flat file on the sealing surface, flat side down. Then run it over the surface to see of there's any imperfections. I spread my fingers out as wide as I can and use very light pressure. That's just another trick that I've learned over the years. After having to change out a water pump on a 6.2 Chevy because of a burr, I do that every time. Our water pumps are simple to change out compared to one of those monstrosities.
 

crazydane

Full Access Member
Joined
Jan 20, 2024
Posts
222
Reaction score
152
Location
Afton, VA
@IDIBRONCO Seal pulled out with little effort with a pair of pliers, so appreciate the advice! Still feels odd to install it dry...

I did notice the rear lip comes out past the end of the crank:

You must be registered for see images attach


So I guess I need to be careful when installing the flywheel that it doesn't pinch that lip? Seal was installed flush with the plate, which matches how its installed on my spare engine.

Also, on the PCV (I'm assuming that's what I show below is), what's that rubber tube that's all brittle and broke called?

You must be registered for see images attach


I found these pieces on rockauto:

You must be registered for see images attach


But none of those look quite right to replace that long rubber tube. Any suggestions?

Thanks!
 

Nero

HD Diesel nut
Joined
Jan 3, 2022
Posts
4,166
Reaction score
4,720
Location
OR
That rear main seal is not installed deep enough. There Shouldn't be any part of thr seal past the crank.


As for thr CDR parts,


crazydane

Full Access Member
Joined
Jan 20, 2024
Posts
222
Reaction score
152
Location
Afton, VA
Thanks @Nero I'll tap the seal in a bit further once I get the engine off the stand and have access. Guess the Fel-Pro dry install seal is different than most as it has dual lips on it, which requires it to be seated deeper than a "regular" seal. Don't recall seeing anything in the install about that, but I could have missed it.
 

Nero

HD Diesel nut
Joined
Jan 3, 2022
Posts
4,166
Reaction score
4,720
Location
OR
No problem.

Here's a good guide on how to do the rear main seal to correct depth;
 

crazydane

Full Access Member
Joined
Jan 20, 2024
Posts
222
Reaction score
152
Location
Afton, VA
Thanks for the link. Good stuff!

Here's my spare engine, which, if anything, has the rear seal slightly proud:

You must be registered for see images attach


Anyway, I don't think I'll have an issue knocking it in a little further with the rear plate still installed on the block. I used Permatex Aviation sealer when pressing it in. Not sure how hard that stuff gets.

I have 3 oil coolers:

You must be registered for see images attach


I picked the nicest lookin gone (one on top) and spent some time working on getting it cleaned up. Got it apart pretty easily and cleaned up the ends in the ultrasonic. The tube was too large to submerge, so used my parts cleaner to run diesel through it for about an hour:

You must be registered for see images attach


Lots of nasty stuff came out for a while, but then it started running clean and much better flow than initially. Also used a rod the push through the coolant holes and then blew them out with compressed air after.

O-rings all looked surprisingly good, but I plan to replace them just for good measure.
 

Nero

HD Diesel nut
Joined
Jan 3, 2022
Posts
4,166
Reaction score
4,720
Location
OR
I almost wonder if the crank is shifted, or the seal carrier isnt on right... But yeah the old one looks like all other rear main seals Ive seen on idi's
 

crazydane

Full Access Member
Joined
Jan 20, 2024
Posts
222
Reaction score
152
Location
Afton, VA
That Fel-Pro seal has 2 lips, one that folds in towards the crank, and a 2nd one that folds out towards the flywheel. I did temporarily remove the pre-installed plastic installation tool when I was first checking it out. Perhaps both lips were folded in towards the crank from the factory and when I put it back on, I did it so that the outer one was folding out? It sort of makes sense that they should both be facing in towards where the oil pressure is. If that's the case, I can easily remove the rear cover, put the plastic installation tool back on and this time make sure both lips fold in towards the crank?
 

Forum statistics

Threads
92,932
Posts
1,155,156
Members
26,432
Latest member
pwillis

Members online

Top