Rear Main Seal Questions

WrenchWhore

Full Access Member
Joined
Jun 2, 2022
Posts
326
Reaction score
309
Location
Lake Havasu City
Thanks @Old Goat for that recon. That definitely looks like the Navistar seal from that mexico sight. Not sure how I feel about them writing on it and having it out of the box but that's an option if I want the same seal that came out. That Ford part looks to be a original replacement but it's nice that it comes with a tool. That One on Ebay for $50 definitely looks like the beefy metal tool you could throw in a press and install the seal right the first time. Man so many options!

 

WrenchWhore

Full Access Member
Joined
Jun 2, 2022
Posts
326
Reaction score
309
Location
Lake Havasu City
I am pretty sure the OEM Navistar seal kit containing a sleeve has a thicker sleeve than the Speedy Sleeve. That kit has an installation tool and the rear cover isn't removed. I installed that kit and after it still leaked I realized as the OP that my leak was at the oil pan corners. SKF has a seal that works if the OEM sleeve is in place. I bought it on Rock Auto. I just checked and SKF #38649 is used with OEM sleeve. SKF#37405 is used without OEM sleeve.
I think you just Nailed it! That would be considered O.E.M. sleeve since it's the Navistar kit.
 

TahoeTom

Registered User
Supporting Member
Joined
May 19, 2010
Posts
777
Reaction score
142
Location
S. Lake Tahoe, CA
The Ford kit linked in Old Goat's post is the one I used. I think it was branded Navistar. The installation tool is plastic and the plastic dowels index the tool to the FW bolt holes in the crank. It was supposed to be used without removing the rear cover, and installed by tapping (pounding) with a hammer. I was installing on a rebuild without the oil pan in place and the hammering was bending the rear cover. I thought I could do better so drilled the holes oversize and used flywheel bolts to press it on. The sleeve never went flush so I had to file off the bit that protruded. Anyway, the sleeve is thicker than a Speedy Sleeve so when I replaced the seal I had to use the SKF38649.
 

Attachments

  • DSC00127.JPG
    DSC00127.JPG
    191.7 KB · Views: 7

Old Goat

Full Access Member
Joined
Jan 14, 2021
Posts
2,401
Reaction score
2,541
Location
Northern Nevada
This is the seal I finally used.

The other one they show for $46 has the speedy seal.

So if you take the plate off, you will need the paper gasket. and Felpro is the only one I found with it.

I traced around the gasket on a manilla folder so I can now make a new one if I need one from gasket material.

The Ford parts Giant is the same one the E-Bay show.


Goat
 

IDIBRONCO

IDIBRONCO
Joined
Feb 5, 2010
Posts
15,051
Reaction score
14,149
Location
edmond, ks
This is the seal I finally used.
That's the one that I'm going to install when I have my engine out this summer.
I traced around the gasket on a manilla folder so I can now make a new one if I need one from gasket material.
I know it can be done. I made a water pump gasket for one of these engines one time when I was pretty short on funds. It worked just fine.
 

Old Goat

Full Access Member
Joined
Jan 14, 2021
Posts
2,401
Reaction score
2,541
Location
Northern Nevada
The reason I mention tracing the gasket. I messed up and had to remove the Plate. Naturally the gasket gets messed up. tried to gently remove it but to no avail.
After searching through the whole Internet and not finding anyone selling the paper gasket. had to purchase another Felpro kit. That was a pricy gasket.

Iam an expert now, next Rear Main seal will be a snap.

I do need to give Hacked89 credit for the work he did and the YT Vid he made.


Goat
 

steelholder

Full Access Member
Joined
Aug 5, 2025
Posts
120
Reaction score
24
Location
Up and away
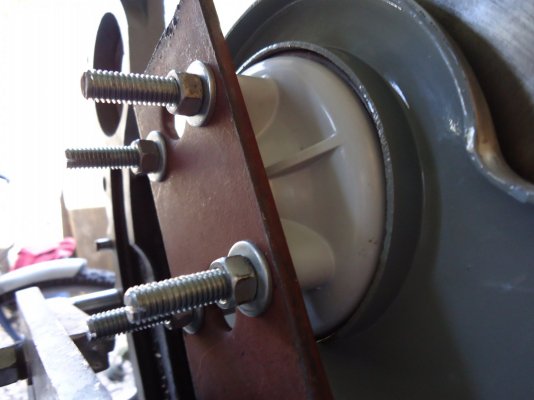
Going to revive this thread and add a new question. I just installed a new rear main and upon inspection it looks like the edge of the seal rolled while it was going on. I did not have to fight it or do anything extreme to get it on. I just lined it up, got it started over the crank and then put the bolts in the plate to get it fully seated. This looks like an obvious leak to me, I’m curious on other people’s opinions. At this point the plan is to buy a new seal and try again. Any tricks to ensure this doesn’t happen again?
You must be registered for see images attach
***Please open attachment in quoted text****

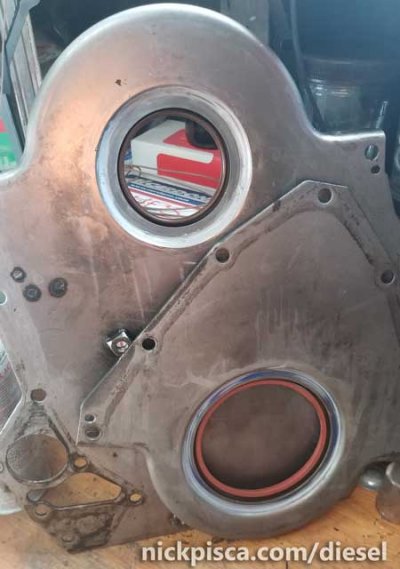
Reviving this one - I am getting very differing opinions on whether this seal pictured is installed correctly or backwards. I have this exact seal, the way it is installed in this picture would point the lips facing towards the transmission. Other people have installed this seal, or ones like it, with the lips facing towards the engine. See Nick Piscas picture as a reference for the seal facing the other direction (towards the engine). What say you gurus?
 

Attachments

  • 20180201_105904sfw.jpg
    20180201_105904sfw.jpg
    28.5 KB · Views: 9
Last edited:

miked

Full Access Member
Joined
Dec 9, 2005
Posts
103
Reaction score
102
Location
Bruce County Ontario Canada
The picture in the attachment looks like the seal was installed the correct way, and the original poster is correct that when it was installed they hooked the forward lip and rolled it backwards in a couple of locations.
Ruining the seal
Lip should point towards the engine

Here is a picture of the back of my engine. As far as I know this is the original seal
You must be registered for see images attach
 
Last edited:

IDIBRONCO

IDIBRONCO
Joined
Feb 5, 2010
Posts
15,051
Reaction score
14,149
Location
edmond, ks
I haven't seen the words on a front seal, but on the rear seal, the "install dry" part should face the transmission. The plastic install sleeve is installed in the correct direction when you buy the seal.
 

steelholder

Full Access Member
Joined
Aug 5, 2025
Posts
120
Reaction score
24
Location
Up and away
This is a new rear seal.
This side faces engine
You must be registered for see images attach


This side faces transmission
You must be registered for see images attach
Thanks how do you like this seal? I've heard some people bash it and say to only use the national
 

miked

Full Access Member
Joined
Dec 9, 2005
Posts
103
Reaction score
102
Location
Bruce County Ontario Canada
The new seal is one my locale parts store brought in when I ordered. I was not given any other options.

Pretty sure, it is the same design that is on the truck now and also pretty sure, the one in the truck has been there since the truck was new.

I believe this seal will work for me as long as I install it properly.
I have an arbor press so pushing it into the cover plate evenly won't be a problem.
You can drive the seal in with a hammer but you need to use a plate or some kind of driver that applies contact on the full face of the seal while allso being carefull to not to allow the seal to tilt in the bore.

Striking the seal directly with a hammer or mallet can cause distortions in the seal that will affect its ability to seal properly.
 

Forum statistics

Threads
92,996
Posts
1,155,931
Members
26,574
Latest member
sramasya

Members online

No members online now.
Top