Plans for plumbing Air intake through custom bumper

jwy

Registered User
Joined
Dec 9, 2005
Posts
17
Reaction score
0
Location
Idaho and North Carolina
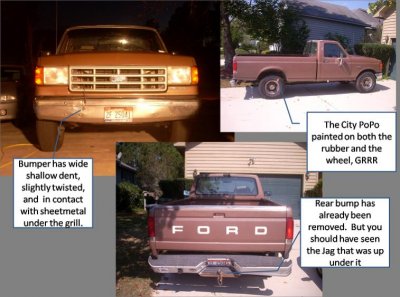
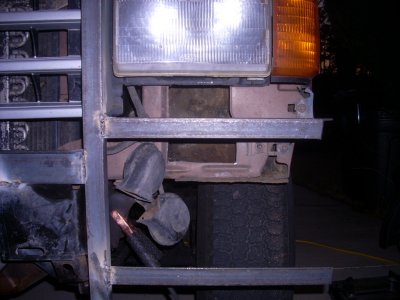
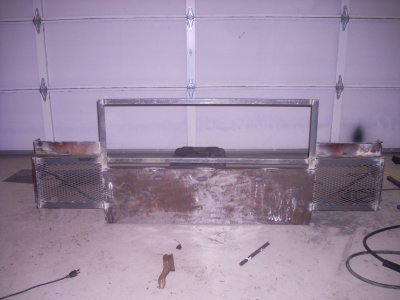
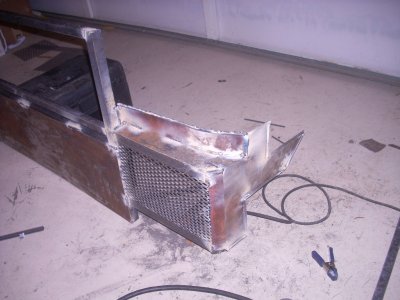
So to make a long story short. I was rearended by a Jaguar a couple of months ago at a stop light and it pushed me into a semi. So I now need to replace both bumpers...

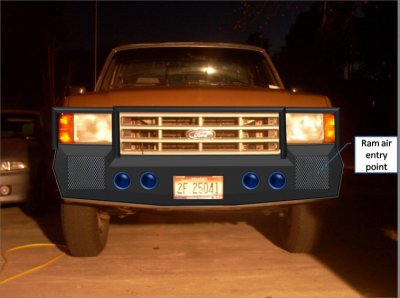
I have been doing quite a bit of research on a new intake, and would like the following:

1. Open Element
2. Pull coolest air possible (preferably being forced in, like a couple in the air intake thread under IDI Articles)
3. Easy to convert to use with a turbo later down the road

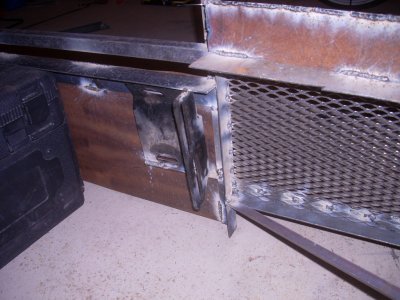
So, I thought I would try and take care of both projects at once. I think the pictures explain it better than I can in words. I kind of went crazy with Powerpoint to make the plans.

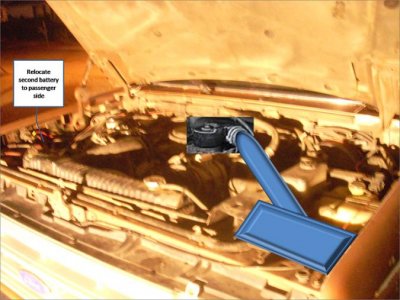
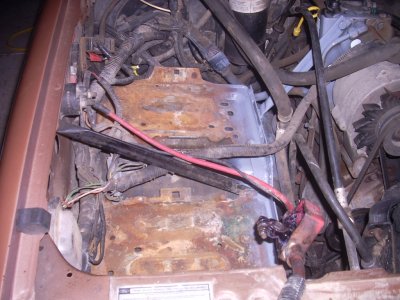
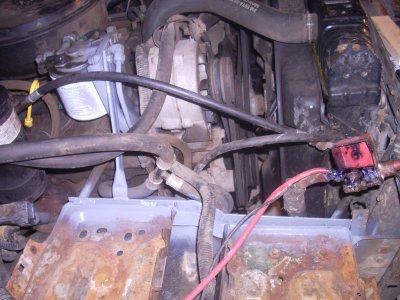
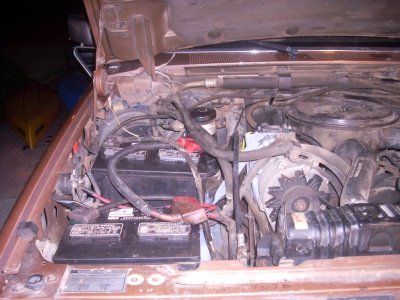
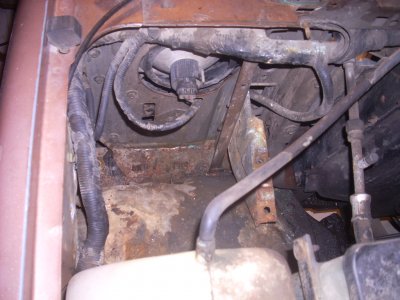
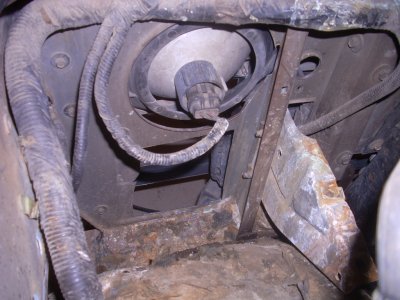
After relocating the driver's side battery, I would plumb the air opening behind the expanded metal on the driver's side up behind the headlight and into a closed box with a the filter element (probably a K&N) and then plumb that back into the intake with a setup similar to the Ghost Tube.

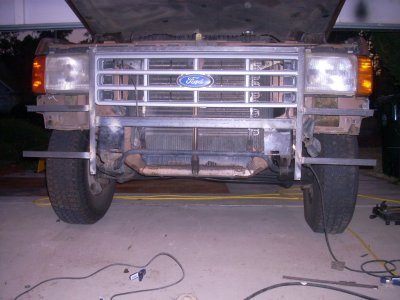
I am not sure I like the bumper design on this pickup. It would look better on a '92 or newer. But I am planning on painting the pickup dark blue, repainting the grill, and puting in new headlights. Then I will put on a bugshield and maybe a half-moon visor. I think that would tie everything together more or less.

I am very open to new ideas and critiques. Thanks.
 

Attachments

  • Picture1.jpg
    Picture1.jpg
    72.8 KB · Views: 71
  • Picture2.jpg
    Picture2.jpg
    46.2 KB · Views: 95
  • Picture3.jpg
    Picture3.jpg
    57.5 KB · Views: 73

F350farmboy

The Hornet
Joined
Nov 27, 2008
Posts
373
Reaction score
0
Location
N.E Ohio
I was going to do my dual ram from the same spots as you want to, but the stock bumper was too close to the wheel to plumb pipes to the intake box.

Looks good to me though!
 

Papabear

Papabear
Joined
Jul 13, 2008
Posts
590
Reaction score
1
Location
Grande Prairie, AB
i am very interested in this concept please keep me posted as the only real idea i have come up with is an external air canister similiar to on the older highway tractors or an air scoop/snorkel design but the later seems to restrictive and i think he first one would just look dumb i was wanting to increase breathability as you do and also perhaps incorporate a heated air intake for cold starts utilizing a glow plug similiar to some of the cummins i have heard about. an i was wanting to design and build a winch bumper with tool boxes incorporated into the design to hold all the recovery gear for the winch ie. snatch blocks, slings and other misc. rigging equipment. and fabbing up a rear bumper to also function as an air tank for an air suspension, and to perhaps run air tools.
 

F350farmboy

The Hornet
Joined
Nov 27, 2008
Posts
373
Reaction score
0
Location
N.E Ohio
I wouldn't think it would be too safe to have the PSI real high in that tank in case you'd get in a collision and have the tank rupture and explode. Reminds me of the old pintos with the fuel tank/rear bumper.

But I dont know much about air tanks, compressors, etc...
 

Papabear

Papabear
Joined
Jul 13, 2008
Posts
590
Reaction score
1
Location
Grande Prairie, AB
good point maybe i should just make the rear bumper a tool box as well perhaps to store load securement and find some highway tractor air tanks
 

jwy

Registered User
Joined
Dec 9, 2005
Posts
17
Reaction score
0
Location
Idaho and North Carolina
I will definitely post pictures as I go, start to finish will probably take a while. Before I do anything else, I have to syphon the 7 gals of unleaded gas out of the rear tank that my wife put in a couple of days ago. hmmm. :backoff oh well, at least she noticed and then put #2 in the front tank. Got to love her.
 

jwy

Registered User
Joined
Dec 9, 2005
Posts
17
Reaction score
0
Location
Idaho and North Carolina
Step 1 complete

Well, I finally got started. I relocated the driver's side battery tray to the passenger side this weekend. I basically just reused the brackets from the driver's side mount and added a piece of angle with a couple of cuts and bends to mount it on, except the tray support bracket is now connected to the fuel filter head instead of the inner fender wall. Here is are some pictures:

I went a little crazy with the spray paint on the new brackets:dunno

The second battery sits a little higher than I would prefer, but the leads don't touch the hood. There are 3 things that concern me:

1. The heater hoses going directly over the second positive lead
2. Both grounds are connected to the same bolt on the block...is that a problem? I don't think it would be.
3. I will need to watch all the wires and hoses closely to make sure there is no major chaffing. I think it will work out okay.

This definitely leaves a nice big hole on the drivers side where I can build a air filter box as you can see in the picture. Now I just need to get to work on the bumpers. Maybe I can get started this weekend.
 

Attachments

  • DSCN0726.JPG
    DSCN0726.JPG
    233.5 KB · Views: 28
  • DSCN0727.JPG
    DSCN0727.JPG
    232.6 KB · Views: 29
  • DSCN0733.JPG
    DSCN0733.JPG
    236.6 KB · Views: 35
  • DSCN0730.JPG
    DSCN0730.JPG
    231.3 KB · Views: 22

trj

MPG
Joined
Jul 24, 2008
Posts
72
Reaction score
0
Location
Colorado
The bracket to the fuel filter mount may be a problem. I wouldn't recommend anything attached to the engine like that.
 

punkmechanic

diesel tech
Joined
Jun 5, 2008
Posts
765
Reaction score
0
Location
North East Portland Or
^^^^^^^^^^ I second that. these shake a bit if any little thing goes out of new spec (fuel quality, cold start, etc). that vibration is going straight to your fender and batteries. batteries dont like vibration and neither to body bolts (loctite helps though).

good luck. keep us all posted, you got me thinkin about the arb on the front of mine now, may stuff some storage in the big empty thing.
 

GenLightening

Yeah, it's a CHEVY!
Joined
Oct 24, 2006
Posts
1,917
Reaction score
1
Location
Pukalani, Hawaii
I'd run that bracket down to the frame. And how about just turning the battery around so the hoses run near the negative terminal?
 

91f2504x4

Full Access Member
Joined
Oct 23, 2008
Posts
815
Reaction score
1
Location
KY
I have to agree, I don't think that you new battery tray would last very long fastened to the engine like that. Something would give out pretty quickly once you started driving it. I have seen people mount stacks in the bed without a piece of flex pipe and it broke brackets and even split the floor in the bed from engine movement and vibration.
 

LCAM-01XA

Full Access Member
Joined
Mar 17, 2008
Posts
5,932
Reaction score
12
Location
my very own hell
I'd run that bracket down to the frame. And how about just turning the battery around so the hoses run near the negative terminal?

What Doug said - remove that brace ASAP and run it to the frame instead, or something will break the first time you stomp on the throttle good. Other than that, it looks good. The hose I probably wouldn't worry much about, just put another piece of hose over it so it ain't rubbing directly on the battery.
 

jwy

Registered User
Joined
Dec 9, 2005
Posts
17
Reaction score
0
Location
Idaho and North Carolina
Good point, I didn't even consider the twist and vibration of the engine, it looks like I am back to the drawing board, like mentioned, I think I will run it down to the frame instead. Thanks everyone.
 

jwy

Registered User
Joined
Dec 9, 2005
Posts
17
Reaction score
0
Location
Idaho and North Carolina
I made a little more progress over the weekend, I got the old bumper off, cut the hole in the grill wall below the drivers side headlight. I petty much got the new bumper fabricated. It isn't really heavy and probably wouldn't be much good in a wreck, but it does meet the air intake requirement and I think it will look pretty decent, I guess it will do for a 2wd pickup. I used the original mouting brackets to bolt it to the frame. I still have some finish work to do but that will wait until tomorrow because I need to get another spool of flux core.
 

Attachments

  • DSCN0736.JPG
    DSCN0736.JPG
    235.6 KB · Views: 12
  • DSCN0740.JPG
    DSCN0740.JPG
    230.1 KB · Views: 8
  • DSCN0741.JPG
    DSCN0741.JPG
    230.4 KB · Views: 6
  • DSCN0742.JPG
    DSCN0742.JPG
    237.6 KB · Views: 16
  • DSCN0743.JPG
    DSCN0743.JPG
    234.7 KB · Views: 12
  • DSCN0745.JPG
    DSCN0745.JPG
    232.8 KB · Views: 8

jwy

Registered User
Joined
Dec 9, 2005
Posts
17
Reaction score
0
Location
Idaho and North Carolina
Work was called off due to snow today, so I got the bumper done, gave it a quick rattle can paint job and got it on the truck so it is driveable. I think I will do a herculiner paint job later on. Sorry the picture isn't the greatest, I was in a hurry and took it with my phone. Now it is time to get to work on the rear bumper and the air intake.

Jared
 

Attachments

  • img002[1].jpg
    img002[1].jpg
    78.1 KB · Views: 25

Latest posts

Forum statistics

Threads
91,310
Posts
1,130,117
Members
24,120
Latest member
SixFourShanks08

Staff online

Top