Factory Ford E-Locker Install

david85

Full Access Member
Joined
Feb 21, 2008
Posts
4,953
Reaction score
1,244
Location
Campbell River, B.C.
Some of you may recall this thread from a little while back, where I had purchased a used factory Ford E-locker and did some investigating by taking it apart: https://www.oilburners.net/threads/ford-factory-e-locker-teardown-and-some-discussion.90536/

This weekend, I finally found the time and gumption to install it.

The install is pretty straight forward:
1. Remove old carrier
2. Swap ring gear to new carrier
3. Install new carrier
4. Wire switch ***

*** This part can be tricky.

For steps 1 to 3, it's no different than any other gear swap. In my case, even the shims worked out fine, giving me 0.008" back lash, which is right where Yukon recommends. So no real gear setup was needed in my case; it just worked on the first try.
You must be registered for see images attach


You must be registered for see images attach


For wiring, it depends on how you want to run the wire from inside the case, since older sterling axles have no provision for this. From what I've seen, there are generally three options:

1. Cut grooves into the diff cover flange and route the wires out through the gasket material. This is the least intrusive if you modify the pan, and not the diff housing.
2. Drill a hole next to the driver's side and run the wires through there using a strain relief or similar fitting.
3. Adapt the OEM style bulkhead connector to mimic the OEM style connection.

More to come...

Some have suggested putting a fitting on the cover, but I haven't figured out how to do this, so I opted for #3.
 

david85

Full Access Member
Joined
Feb 21, 2008
Posts
4,953
Reaction score
1,244
Location
Campbell River, B.C.
Alright, so about that electrical connector.

My first plan was to drill the correct size hole into the case, so that I could just use the O-ring on the connector to keep everything sealed. Unfortunately, because there is no raised casting on the older differential cases, the connector punches through on an angle, and interferes with the bearing cap.

My fix for this was to build a spacer out of marine grade "starboard". The connector seals to the plastic with it's own O-ring, while the starboard will seal to the case with "Ultrablack RightStiff" RTV. I've had good luck with this particular RTV but if it doesn't work here, I'll come up with something else.

Next up, I just have to wire the switch. I did test it under the truck with a 12V battery, and the locker works.

More to come...

You must be registered for see images attach

You must be registered for see images attach

You must be registered for see images attach
 

The_Josh_Bear

Full Access Member
Joined
Jun 1, 2016
Posts
2,298
Reaction score
1,962
Location
Western WA
Nice upgrade! What a treat that you didn't have to shim it, saved at least an hour right there, in my case 2.

How long did it take to drill that hole and how did you keep shavings out of the bearings, etc?
 

david85

Full Access Member
Joined
Feb 21, 2008
Posts
4,953
Reaction score
1,244
Location
Campbell River, B.C.
Very interesting. Not often I see other people use dial indicators. Mechanics who do thing the right way isn't a dying trade I swear here's my proof :rotflmao

Well actually, I'm just a guy puttering in his own shop. So maybe the trade really is dead.LOL

Nice upgrade! What a treat that you didn't have to shim it, saved at least an hour right there, in my case 2.

How long did it take to drill that hole and how did you keep shavings out of the bearings, etc?

Sometimes we get lucky. Or maybe Ford really was that good in keeping things consistent over the last 35 years? (yeah, I'll call it luck...)

I'd suggest a full vocabulary of weapons grade expletives for the drilling part of the job. Wasn't fun and the cordless drill wasn't happy either. Even with a pilot hole and plenty of oil, it was slow going. I didn't do any drilling with the bearings in place. Once I knew where to drill, the case was emptied again so it could be properly cleaned of all cuttings.

The thread tapped hole was fairly easy.

My biggest worry is that the RTV will start leaking at some point but I'll deal with that when it happens.
 

david85

Full Access Member
Joined
Feb 21, 2008
Posts
4,953
Reaction score
1,244
Location
Campbell River, B.C.
Wires are routed to a simple rocker switch under the dash, just ahead of the 4wd shifter. I still like the idea of using a toyota land cruiser switch, since they come with dual locker functionality for when I eventually put a front locker in: https://www.yotamasters.com/shop/differential/lockers/80-series-land-cruiser-diff-lock-switch/

The simple rocker switch will probably stay for a long time, considering how long it too for me to get this far with the upgrades.


The wire is a shielded twin sheathed cable (surplus I had lying around) and should hold up nicely to whatever road spray there is. I also terminated the end of the wires directly inside the connector at the differential instead of using an external splice. The original connector wires were both black, but the twin sheathed cable are black and red.

No rolling test tonight, but it works fine on jack stands. Once I finish cleaning up tomorrow I might give it a try in the yard. For now, I'll put my feet up and call it a day.

You must be registered for see images attach
 

david85

Full Access Member
Joined
Feb 21, 2008
Posts
4,953
Reaction score
1,244
Location
Campbell River, B.C.
Well, I think that's a wrap. I tried it in the yard in a few places on the slushy snow and gravel. I can certainly see it working correctly with no slip. As expected, the rear tires start chewing up the gravel on a tight turn as well. It's not an earth shattering improvement in traction, since most of the weight is still on the front axle.

The only thing now is to monitor over the next few weeks to make sure there are no oil leaks. Oh, and start looking for front E-Locker options.
 

03wr250f

Full Access Member
Joined
Jan 13, 2014
Posts
707
Reaction score
504
Location
Hamilton/Montana
love it, just did the same on mine, and basically have seen all the things you have.
the starboard was a nice touch!
 

david85

Full Access Member
Joined
Feb 21, 2008
Posts
4,953
Reaction score
1,244
Location
Campbell River, B.C.
love it, just did the same on mine, and basically have seen all the things you have.
the starboard was a nice touch!
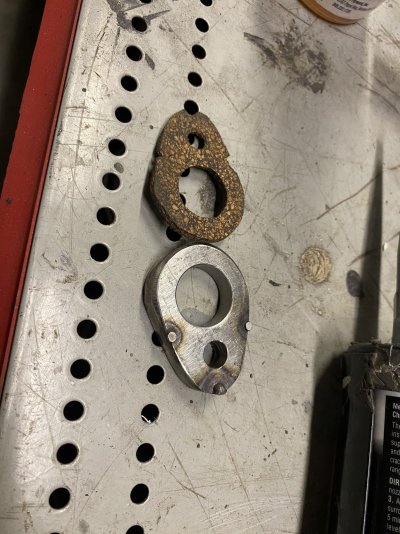
If I were to do it again, I’d probably just pass the wires through the gap for the gasket, with a couple of notches carved into the cover plate. That’s how I’m told most of the conversions are done. The starboard ended up slowly weeping oil so I recently replaced it with a piece of steel and a cork gasket. We’ll see if it stays sealed this time. I do plan water crossings eventually, so I want it as sealed up tight.

Aside from the minor oil leak, it’s been perfectly reliable since installing it. I wish there was an equivalent available for the front axle.
 

Attachments

  • IMG_1950.jpeg
    IMG_1950.jpeg
    401.3 KB · Views: 9

david85

Full Access Member
Joined
Feb 21, 2008
Posts
4,953
Reaction score
1,244
Location
Campbell River, B.C.
Here are the part numbers for the electrical connectors. I get asked this by PM once in a while so thought I would update the thread (already updated the other one where I tear down the E-Locker to see how it works).

You must be registered for see images attach


The top black connector is integral to the actuator solenoid. I don't know if its available separately.
Middle is the Differential through hole connector (black): AU5Z 14489-AAA
Bottom is the Exterior Harness connector (green): 2U2Z14S411BB

Google those OEM ford numbers and you'll get plenty of hits. I got the middle connector on Ebay, while the bottom one came from Rockauto.

And yes, I still love this thing. Even if I rarely used it on my vacation recently:

And by rarely, I mean I didn't use it once LOL on the trip.

You must be registered for see images attach


You must be registered for see images attach


You must be registered for see images attach


You must be registered for see images attach
 

drtyx-cursion

Registered User
Joined
Nov 18, 2025
Posts
1
Reaction score
0
Location
Paris, KY
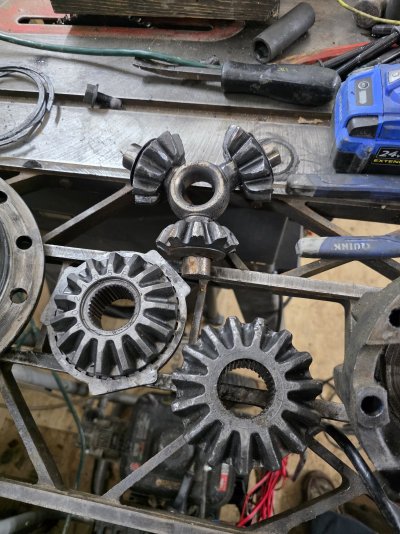
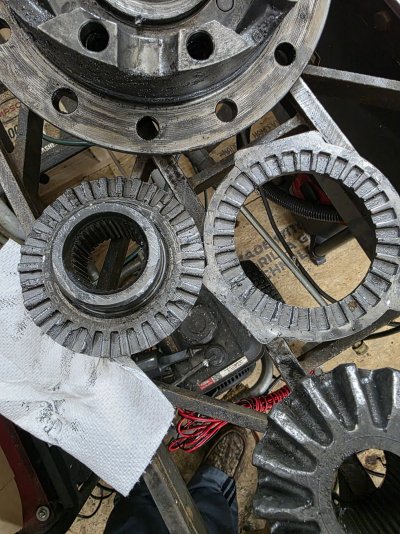
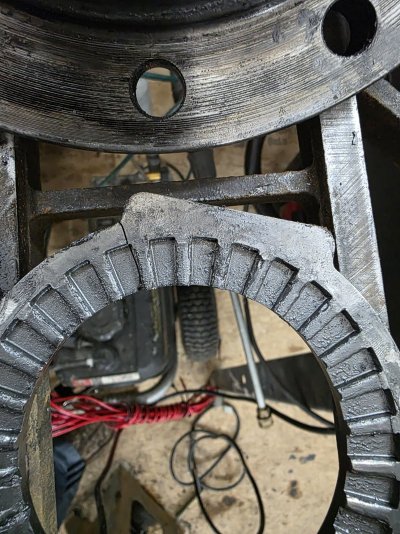
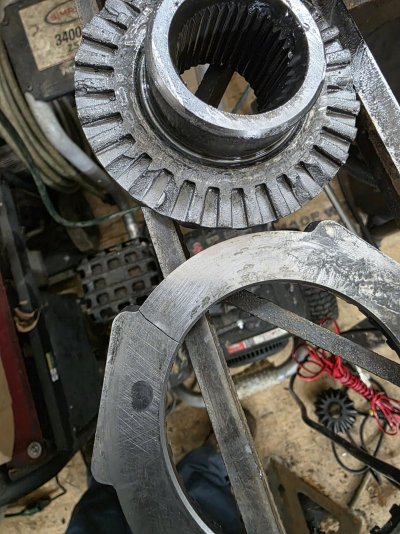
Hey david85, newb here. Got what I thought was a really good deal on a complete set of front and rear axles (whole wrecked truck actually) from a 2012 super duty at the tune of $500! Well come to find out upon tear down of the rear end it had a tooth or 5 broke on the ring gear. That wasn't a huge deal considering I'm planning a regear anyway. It did however peak my interest to investigate the carrier closer. I could see quite a bit of gaulding on the spider gears so I decided to tear it apart (BTW loved your write up on that process). Once I cracked it apart and pulled the chewed up spider gears out I discovered that the actuator plate that sets under the gears is cracked and missing a couple teeth as well as the back side of its corresponding gear. Would you, or any of the other fine folk here, happen to know where I might be able to source the parts to rebuild this thing without turning to the stealership?
 

Attachments

  • 20251118_235751.jpg
    20251118_235751.jpg
    396.5 KB · Views: 10
  • 20251118_235830.jpg
    20251118_235830.jpg
    511.1 KB · Views: 9
  • 20251118_235835.jpg
    20251118_235835.jpg
    451.5 KB · Views: 9
  • 20251118_235909.jpg
    20251118_235909.jpg
    414 KB · Views: 8

Old Goat

Full Access Member
Joined
Jan 14, 2021
Posts
2,401
Reaction score
2,541
Location
Northern Nevada
These guys may have what you need.


Goat
 

david85

Full Access Member
Joined
Feb 21, 2008
Posts
4,953
Reaction score
1,244
Location
Campbell River, B.C.
Hey david85, newb here. Got what I thought was a really good deal on a complete set of front and rear axles (whole wrecked truck actually) from a 2012 super duty at the tune of $500! Well come to find out upon tear down of the rear end it had a tooth or 5 broke on the ring gear. That wasn't a huge deal considering I'm planning a regear anyway. It did however peak my interest to investigate the carrier closer. I could see quite a bit of gaulding on the spider gears so I decided to tear it apart (BTW loved your write up on that process). Once I cracked it apart and pulled the chewed up spider gears out I discovered that the actuator plate that sets under the gears is cracked and missing a couple teeth as well as the back side of its corresponding gear. Would you, or any of the other fine folk here, happen to know where I might be able to source the parts to rebuild this thing without turning to the stealership?

As far as I know, they are only sold as an assembly, from Ford.

Having said that, it appears that Yukon now offers a direct replacement "clone". Which means they may have parts available, if you call and ask.

It's worth a shot:

 
Top