Cheap-O clutch master and slave cylinder?

Mad Maxine

Full Access Member
Joined
Jun 4, 2015
Posts
73
Reaction score
1
Location
Austin, Texas
I've spent a little time under my truck lately, and I noticed that it has what appears to be a fairly new clutch slave cylinder and master cylinder as well. However, they're PLASTIC, as is the line. :***:

The clutch doesn't feel all that great, although at this point it is functional. Maybe it needs to be bled.

Just out of curiosity, i went looking around on line to see what was available, and it seems that all (or most all) of the replacement clutch master/slaves are plastic. Seems a little flaky to me....
 

madpogue

Full Access Member
Joined
Mar 16, 2009
Posts
1,707
Reaction score
169
Location
Madison, WI USA
The OEM were plastic. There are metal ones available, but they're hard to find, and they're $$$$'y. I just blew out my slave, so I converted to the OBS version so I could buy a complete master-line-slave pre-bled kit. Some fab work to start with, but no bleeding. And at least the LINE is steel, except for the part that obviously needs to be flexible, and that part covered in braided steel. These systems are a PITA to bleed.

I have not seen an OBS pre-bled pre-built kit made with a steel master and/or slave.

What exactly is going on with your clutch? Excessive pedal effort? Not fully disengaging? Engaging too low on the pedal travel?
 

Mad Maxine

Full Access Member
Joined
Jun 4, 2015
Posts
73
Reaction score
1
Location
Austin, Texas
What exactly is going on with your clutch? Excessive pedal effort? Not fully disengaging? Engaging too low on the pedal travel?

Yes, all of that. Actually, it disengages, but seemingly just barely. It is very stiff, but I don't know if that's normal or not, never having driven one of these trucks before. And, yes, you have to put that pedal on the floor to disengage.
 

jaluhn83

Full Access Member
Joined
May 19, 2012
Posts
1,597
Reaction score
48
Location
Upper Marlboro, MD
Carquest at one point had aluminum cylinders with a real bleeder on the slave. Not hard to remove the stock lines, but it is a PIA to bleed the thing.

Rock auto appears to have a metal master, but couldn't find a slave in the brief search. (under 84 F250)

That being said, I would bet your problem is the bushing on the end of the mater pushrod above the gas petal inside the cab. These wear out and cause a loss of petal travel and sometimes the rod popping completely off losing the clutch entirely. Fairly easy fix, I like to find a nylon or brass bushing that fits in there and then drill and install a cotter pin to hold the pushrod on.
 

TahoeTom

Supporting Member
Supporting Member
Joined
May 19, 2010
Posts
749
Reaction score
113
Location
S. Lake Tahoe, CA
I wouldn't be too concerned about plastic master and slave. As stated, look under the dash at the pushrod and pin that actuates it. Once the plastic bushing wears out there is a lot of play and the pin and pushrod wear. The shaft the clutch pedal mounts to has bushings also. If these go out the pedal mounting bracket can wear. The firewall where the master mounts may develop a crack, and flex every time the clutch pedal is depressed. Ford issued a reinforcement plate for the firewall to fix this, but the part is NLA. Freebird, a member here, makes a copy of the plate. I installed one and didn't realize my firewall was as bad as it was until I pulled the master. You may be able to see it move with an assistant pushing on the pedal. The trans input housing shaft the throw out bearing rides on may need some grease. The clutch fork can be removed and some grease dabbed on with a paint stir stick or a screwdriver. Unfortunately this requires R&R of the slave from the bell housing.
http://www.oilburners.net/forums/sh...e-to-cracked-Firewall-Here-s-what-to-do-PART1
 

Attachments

  • DSC00146.jpg
    DSC00146.jpg
    381.7 KB · Views: 85

madpogue

Full Access Member
Joined
Mar 16, 2009
Posts
1,707
Reaction score
169
Location
Madison, WI USA
Simple "divide and conquer" test - get that woman who named your truck in the cab, and have her work the pedal, and you slide under the truck with a ruler / tape measure. Measure the movement of the fork at the tip, make sure she's pushing the pedal all the way. Fork movement should be at least 1/2" - 9/16". If it's at least that, then there's a problem "downstream" - fork, throwout, pressure plate fingers, etc. If there's less than that, then you've got a problem "upstream" - hydraulics, firewall, linkage/bushings in the cab.

Here's been my experience, with my '85:

In the cab:
- Pedal box bushings - the shaft going through the pedal box, between the pedal arm and the arm that engages the pushrod rides on a set of nylon bushings. When they wear, pedal action is diminished; if it's allowed to go too long, you'll get metal on metal and the steel shaft will chew up the aluminum(?) pedal box. DON'T let it get that bad. Replacement set is $20-ish at the dealer
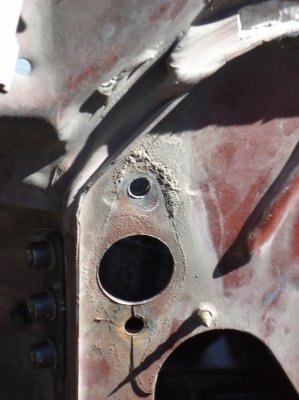
- Firewall - see above. See that sheet metal screw pointing toward the camera in that pic. I *THINK* that's one of the screws securing the reinforcement bracket to the firewall. My '85 looks similar.
- Infamous pushrod bushing - craptastic plastic bushing inside the pushrod eyelet. Again, if it wears all the way through, you get metal on metal, and either the "pin" on the arm wears, or the pushrod eyelet does, or both. Not likely to pop out as described above on your truck; our generation of truck has a hole in the pin, and a clip going through the hole, to keep the pin in place on the eyelet. So it'll stay put, but it can get REAL sloppy. The later trucks literally depend on the bushing to "snap" onto the pin, so when the plastic wears, the pin pops out of the eyelet, your pedal drops to the floor, and you have an "oh $#!+" moment. Since we have two of those trucks ('95s) along with the '85, I bought a 1-foot piece of 1/2"OD x 7/16"ID brass tubing, and cut off pieces aprx. 1/2" long to use as replacement bushings for all three trucks. I have plenty more "stock" left if/as these wear.
- Arm/pin/pushrod. Another issue is that the end of the pedal arm shaft, that holds the arm that engages the pushrod, is splined. And when you attach it, and tighten down the nut, the arm sorta "homes in" on one position or another, based on the splines on the shaft and the grooves in the arm. The arm on later trucks is made of a softer metal, so you can position it anywhere you want, and when you tighten the nut, the splines on the shaft dig new grooves into the arm. This is how I get the arm to engage the pushrod in juuuuust the right place on our '95s. But it just doesn't work that way on the '85. The arm is harder metal, so as you tighten the nut, the arm falls into one of the pre-existing notch positions. For me, that meant it was either too "far" (creating an unacceptable amount of free play and having to really mash the pedal to disengage the clutch) or too "close" (meaning the arm is slightly pushing the pushrod even with the pedal all the way up, obviously an undesirable situation). Solution - adjustable pushrod, about $10 at RockAuto.

In the tranny: I found out the fork had been inserted too far into the tranny. The "tines" of the fork were still pushing the throwout properly, but the pivot ball that's bolted to the inside of the bellhousing, just inside of the opening/boot where the fork goes in, was no longer lined up with the "divot" on the fork where the pivot ball is supposed to rest. This made for excessively hard pedal effort, and a noisy squeak. The farmer who owned the truck previously welded the fork, and when he reinstalled it, he probably figured he should just push it in as far as it would go. Nope. You let the pivot ball ride in the divot / dimple on the fork.

In between (hydraulics) - The plastic master and slave were not a concern (I have them on both our '95s), but it was that semi-hard plastic line between them that always gave me the *******. I just imagined the flex in it, absorbing at least some of the pedal action. That was why I opted for the full kit adaptation when the slave blew out. To get the master to mount to the firewall, I had to do the following; referring to TahoeTom's pic above:
- Again notice that sheet metal screw. I had to grind off a bit of the outside of the "base" (bracket) of the master to clear that screw
- See that flange on the left side of the pic (toward the TRUCK'S right from the opening)? I had to grind the edge of the bracket down a fair amount, almost to the master itself, to clear that.
- Notice the bottom mounting hole is closer to the "through" hole than the top mounting hole? I had to elongate that hole downward just slightly, and likewise elongate the hole on the master bracket UPward just slightly, in order for them to line up.
- Finally, the OEM master has studs built into it that go through those holes in the firewall, and two nuts inside the cab secure it. On the '92-up trucks, the pedal box has the studs built into it, so they're sticking out of the firewall into the engine compartment, and two nuts on the engine side secure the master. Once I got the hole alignment thing resolved, I just bought two stainless 5/16-18 bolts, two washers (esp. to accomodate the elongated hole), and two nuts with flange heads, to secure the master to the firewall.
The slave is pretty-much the same, so it went right in. One helpful tip there - any new slave has a clip that holds the slave rod in; it clips to the slave body on either side. The "official" instruction is to leave that on, to ease installation, then the first time you hit the pedal to push the fork, that clip breaks. (Think "*****", or, er, "cherry".) Rather than do that, I installed it with the clip in place, but then unclipped the ends ("ears") from their notches on the slave body. Slave works exactly the same way, but now I have the option, if I ever have to remove the slave again, I can re-clip the clip to the slave body, and when I remove it from the tranny, the rod will be held in place. Pushing that rod back from an uninstalled slave, after it's been extended, is REALLY hard, and in fact, trying to push it back was how I blew out my old slave.

So, excuse the "drink out of a firehose", but hopefully there's enough there to give you some things to try.
 

Mad Maxine

Full Access Member
Joined
Jun 4, 2015
Posts
73
Reaction score
1
Location
Austin, Texas
Well.
I have been busier than a one-armed paper-hanger, and haven't had a lick of time to do anything with the truck in a couple of weeks -- or anything else for that matter.
But I had some time today, so I replaced the leaky heater core, replaced the high-beam switch, and did the U-joints.
I took a look under the dash, and the clutch linkage looks in order--bushings appear OK, firewall isn't cracked. But as for the stiffness, I noticed that there was a HEAVY yellow-colored spring connected to the clutch pedal arm. I'm thinking that THAT is what is making the pedal so hard...but why is it there? I mean, it's a BIG ASS spring. Way bigger than a return spring needs to be (I would think). It's been my observation that hydraulic clutches are easier vs. the old-fashioned pushrod and Z-arm stuff. Even those just had a moderate return spring, just enough to make sure the throwout wasn't riding on the pressure plate all the time.
:***:
Is that just what it is, or what?
 

jaluhn83

Full Access Member
Joined
May 19, 2012
Posts
1,597
Reaction score
48
Location
Upper Marlboro, MD
That spring seems to help return the petal - I suspect it helps make a smooth clutch as well and to keep load off the throw out brg. It's not directly bearing on the petal, but rather through a can setup iirc. It wolnt make the petal that hard to push unless something is afu.
 

madpogue

Full Access Member
Joined
Mar 16, 2009
Posts
1,707
Reaction score
169
Location
Madison, WI USA
I always thought it went - busier than a one-legged man in an @$$-kicking contest....

That spring looks impressive, but it doesn't amount to much. Indeed, just to make sure the pedal returns and the fork/throwout are not riding. Disconnect the pushrod, and you can overcome that spring and floor the pedal with your hand. I don't think that's a factor in your pedal effort.
 

Mad Maxine

Full Access Member
Joined
Jun 4, 2015
Posts
73
Reaction score
1
Location
Austin, Texas
I guess it is what it is. I'm getting 1/2" of travel at the fork. I noticed there is a little movement of the master cylinder when the pedal is pushed; it appears that it already has the steel plate reinforcement, and I don't see any cracks.
 

Diesile

Full Access Member
Joined
Feb 5, 2008
Posts
442
Reaction score
5
Location
Smalltown, Ma.
Years ago there was a service bulletin from Ford that called for the removal of a U shaped petal stop from the back of the clutch arm.
That simple act restored my clutch to full operation ('86 T19) when I had total disengagement issues.
The 'stiff' or heavy clutch petal may be another issue.
My return spring is big-ass and yellow in color.
 
Top