Realistic budget of a 2wd -4wd and goodies build

Greg5OH

Full Access Member
Joined
May 14, 2011
Posts
2,373
Reaction score
42
Location
MI
thanks b.

i seam sealed most of the undercarriage yesterday. will finish it tonight and will spray the undercoating on as well. Also swithc over wheels on the lexus, wash and wax it, eat, seal the deal on our new home, pack for florida and get some sleep somewhere in that time. Your only young once, gitrdone.
 

Greg5OH

Full Access Member
Joined
May 14, 2011
Posts
2,373
Reaction score
42
Location
MI
hello friends, I am not dead! just returned from our trip to daytona beach with the new fiance. Was a heck of a drive. weather is totally unlike MI weather. firs ttime seeing palm trees.

couple goodies were waiting for me, R&D intake manifold, 2 out of 4 5.75" hella lights from Susquahenna motorsports, optilux ultra yellow h4 bulbs for the yet to arrive headlights. got more seam sealer down and a few more small patches. tomorrow hopefully friggin finish welding in the seat tabs and get that dang undercoating on. Got a busy day tomorrow though so well see when i can squeeze it in.

You must be registered for see images attach


got some decent shots of the lexus on the beach
You must be registered for see images attach
 

Ugly Moosling

Full Access Member
Joined
Jul 10, 2013
Posts
79
Reaction score
0
Location
Lancaster, PA
I hope the Lexus IS bagged, if that's static dropped stay out of PA haha. I wore through 2 oil pans in my old Jetta and it wasn't quite that low.
 

Greg5OH

Full Access Member
Joined
May 14, 2011
Posts
2,373
Reaction score
42
Location
MI
for sure is bagged. I ride 2" with the bumper off the ground and it still gets destroyed. I put alooot of miles on it a month. 80 miles a day to work, plus at least 1-2 times a week a 350 mile trip.

got a question reardin the drain pan. How do I eliminated the old CDR plastic stack? Also the rear plug..its just to hold the valley pan down? Id like to turn the original CDR plastic pipe into the turbo drain back, but not actually use that plastic tube. Want to use AN fittings at both ends, because i want to completely eliminate any chance of leaks. I know people say go as large as you can, so at least 3/8th.
Just wondering how do I take this plastic pipe out, its encased underneath by the baffle. Any ideas or pics are welcome!

You must be registered for see images attach
 

TahoeTom

Registered User
Supporting Member
Joined
May 19, 2010
Posts
777
Reaction score
142
Location
S. Lake Tahoe, CA
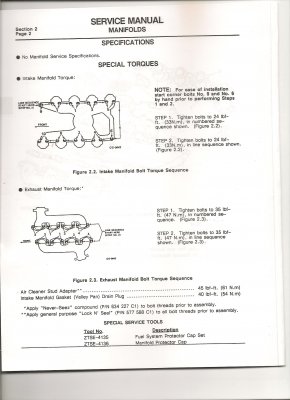
Were you going to reuse the valley pan? It is also the intake gasket as you can see and I wouldn't reuse it. The rear drain is threaded into the block and holds the rear of the valley pan down. Use a 3/8 drive extension to remove it. The CDR tube is just a rubber tube with a grommet formed to seal where it goes through the pan. It should just pull out but may break up if it is old and dried out. The intake and valley pan should be installed at the same time. The manual calls for a 1/4" bead of RTV at the front and overlapped 1/2" onto each cylinder head. Use two 1/4" beads at the rear and overlap 1/2" onto each head , then install valley pan, front strap, rear drain, intake and torque before RTV sets up.
 

Attachments

  • Image (9).jpg
    Image (9).jpg
    347 KB · Views: 100
Last edited:

Greg5OH

Full Access Member
Joined
May 14, 2011
Posts
2,373
Reaction score
42
Location
MI
lol, too bad! I figure its against the grain of 99% of people on this board but i like ruffling feathers.

Got the undersiude of the cab sprayed today, thet metal shield stuff is THICK. good thing i got a shutz gun and dint try using the electric sprayer..i would have killed it for sure. its very syrupy and almost chunks off when pouring it off. The consistency is like my fiances apricot face scrub i had to use to get the crap off my face lol.

Tomorrow coating the inside floor, and spraying the roof in the grey color. Maybe get the doors too if i can dig them out of the shed. friggin i cracked my windshield!!! Probably this mornin when it was below freezing and i went to stand the cab compltely verticle. So much handling of the cab...and today I crack it, frig...its not big but i think its going to be directly at my eye level...grrrr...money i did not want to spend.

Turbo headers-got them tacked up decently well just the manifold. tomorrow will attempt drilling the 2`tube to slip over the 90 degree fabbed elbows I made out of the 1.5". well see what kinda progress i can make tomorrow
 

Greg5OH

Full Access Member
Joined
May 14, 2011
Posts
2,373
Reaction score
42
Location
MI
You must be registered for see images attach
 

Greg5OH

Full Access Member
Joined
May 14, 2011
Posts
2,373
Reaction score
42
Location
MI
You must be registered for see images attach


Cat medium dawn grey, semi gloss.
 

IDIoit

MachinistFabricator
Joined
Aug 26, 2014
Posts
13,438
Reaction score
4,186
Location
commiefornia
my grain still runs deep with ford!

You must be registered for see images attach


has the wind sheild cracked yet?
shes coming together man good work.

You must be registered for see images attach
 

Greg5OH

Full Access Member
Joined
May 14, 2011
Posts
2,373
Reaction score
42
Location
MI
yup, just recently cracked. pretty pissed.

got one side of header mocked up. I dont remebr if theyres room this way by the cab...honestly, im making it like this, and if i have to mod the cab ill do it..or reposition the engine a bit or...

started making a mock turbo pedestal. I want to weld the T3 manifold flange to the pedestal but am afraid it will warp. Should I bolt the turbo on to the flange then weld? Theyres no easily accessible areas to bolt the turbo housing to the pedestal..Hard to explain...harder to design.

You must be registered for see images attach

You must be registered for see images attach
 

IDIoit

MachinistFabricator
Joined
Aug 26, 2014
Posts
13,438
Reaction score
4,186
Location
commiefornia
the "correct" way to do it is to make a 1/2" - 3/4 plate "bore plate"
but as long as your welding atleast 3/8" with your current welder,
you will be alright.
i did this with a custom turbo set up, but with argon/c02,and 220V. took it to the belt sander and it cleaned up really really quick.
at your exprience level, and equipment, i would weld as much as you can with it installed. and turbo dukt taped closed
nothing like tach'n it together, pulling it apart for final welding and then finding out it dont fit no more.

why did you decide to use straight pipe, instead of buying bends?

you can never tell another man how to do something, but bends would have flowed better.
 

Greg5OH

Full Access Member
Joined
May 14, 2011
Posts
2,373
Reaction score
42
Location
MI
Would have tacked on another 100+$ for the long radius or 200+ for the short runner version.
 

Greg5OH

Full Access Member
Joined
May 14, 2011
Posts
2,373
Reaction score
42
Location
MI
tonight continuing on the turbo pedestal mount. Going to try to drill all the body mount holes all the way thru as well so I can put the cab back on the frame and mock up the engine one more time, make the motor mounts, and make sure my turbo headers clear. thats my greatest concern at the moment.

So in order of operation, drill mount holes, pedestal, put engine in chassis, make motor mounts, pray the headers clear.

ps...the turbo normally sits on something other than just beign supported by the flange and 4 bolts right? thats an aweful lot of weight on a relatively small area IMO.

im also kind of hating myself for doing this turbo thing now, as the project would be much closer to completion if i didnt have to mess with it..TBH...if i find a stock Up pipe kit...ill probably buy it if it pops up soon enough... i might be thinking crazy, but...might be saving myself alot of time and headache...this idea was great on paper lol but i have alooot of hours into what seems like nothing yet.
but..im also concerned if my turbo will even fit weith the stock up pipe flange location.
 
Last edited:

Forum statistics

Threads
92,996
Posts
1,155,950
Members
26,579
Latest member
truckonfire

Members online

Top