clutch heim joint mod success

rreegg

Full Access Member
Joined
Feb 10, 2022
Posts
237
Reaction score
137
Location
Puget Sound
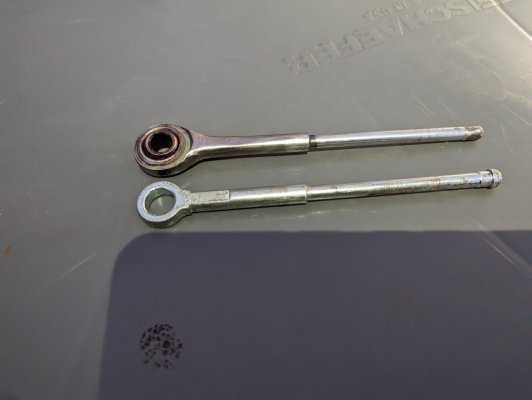
Holy f0ck1ng cow - I did the heim joint clutch mod on an 88 idi yesterday and it's like driving a new truck, cannot even believe I was driving it before. The old clutch action didn't seem horrible but was definitely a left leg workout, i also got pretty used to pulling up the pedal with my toe every few shifts. i'm almost speechless the difference is so drastic.
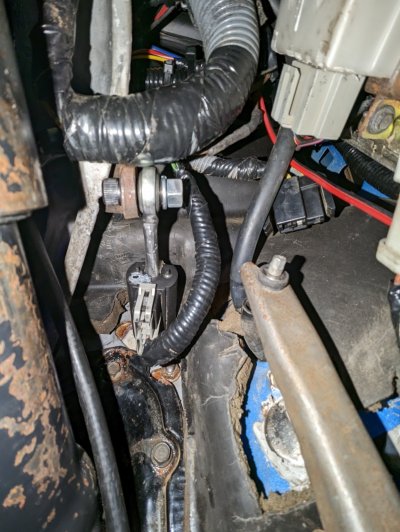
but f0ck1ng h3ll it was a bear to get er done. the splined fittings that need to be removed on the clutch connections are a major pita to remove, was able to stick a chisel in from where the clutch master cylinder fits through the firewall and hit with a hammer to remove.
was it worth it? h3ll yeah. do i want to do it again? h3ll no.
if you have sloppy clutch action i definitely recommend the heim joint mod but just be persistent.

feeling better with the idi as a daily now ;burnout
 

ROCK HARVEY

Full Access Member
Joined
Oct 3, 2021
Posts
417
Reaction score
372
Location
Dayton OH
100% agree about that splined connection, what a pain! After I had struggled for a while I found a tip somewhere that said to grab the arm with vice grips so you can wiggle it off. That’s what finally worked for me. The end result is awesome, and I love that I never have to worry about that flimsy plastic retainer anymore.
 

1mouse3

Full Access Member
Joined
Nov 28, 2013
Posts
1,363
Reaction score
946
Location
il
Doing a hemi joint mod here is not that bad if you pull the arm out. This arm is on a rod with a nut on both ends where removal of the driver side nut is easyer to alow the rod to slide out, mine I used a 18mm ratchet wrench. The clutch arm is a tight fit on the rod and dont recomend trying to get them apart in the truck. Sorry to hear you fought to get the pin off the arm with out pulling it off first.


You must be registered for see images attach
 

Old Goat

Full Access Member
Joined
Jan 14, 2021
Posts
1,579
Reaction score
1,568
Location
Northern Nevada
I have one of these Heim Joints I was going to install a couple years ago, but the stupid bracket lever would not come off. So I replaced the Micky Mouse plastic clip on the pin for the clutch rod and has been ok? for a while.
Been having some problems with the Clutch, so took a look at it again...dang don`t know what keeps it together, has a look it is going to drop off.

Not only the Heim Joint for the fix in slop, there is also the 4 plastic bushings in the peddle assembly for the clutch and brake levers. if they wear through and into the aluminum mount bracket, the holes will get ovaled out and more slop in the peddle movement.

These trucks are getting long in the tooth, and I doubt any have been replaced. Iam in the process now of replacing these along with the Heim Joint. I have a spare peddle assy I got out of a 85 F250 6.9 Iam going through.
The truck had 165K on it and the bushings are more than 1/2 way worn through.

The local dealer still had the bushings in stock and bought 2 bags. 4 in ea bag. Part#EOTZ-2471-A

The assy is super easy to take apart, and then the little lever for the Heim Joint is easy to get to, pull the shaft out and there it is. grind off the weld, punch it out with a drift and there ya go.
Ford only paints what you can see, the upper ends of the levers were all rusty. Wire wheeled them down to clean metal, used phosphoric acid to etch the metal and get any rust I missed, coat of POR, and then 2 coats of POR chassis black.

I`ll get this together tomorrow, and next week dig into R&Ring the peddle boxes.

The Heim Joint kit comes with a bolt threaded all the way to the head. Would it be better to have a shoulder bolt where it is smooth inside the joint? Will the threads eventually wear into the joint? Also a flat washer and a Nyloc nut be better than a reg nut and lock washer?

You must be registered for see images attach
 
Last edited:

rreegg

Full Access Member
Joined
Feb 10, 2022
Posts
237
Reaction score
137
Location
Puget Sound
100% agree about that splined connection, what a pain! After I had struggled for a while I found a tip somewhere that said to grab the arm with vice grips so you can wiggle it off. That’s what finally worked for me. The end result is awesome, and I love that I never have to worry about that flimsy plastic retainer anymore.
Dang that’s a good call, Im almost curious to check now if a vice grip would fit in there. Probably would
Doing a hemi joint mod here is not that bad if you pull the arm out. This arm is on a rod with a nut on both ends where removal of the driver side nut is easyer to alow the rod to slide out, mine I used a 18mm ratchet wrench. The clutch arm is a tight fit on the rod and dont recomend trying to get them apart in the truck. Sorry to hear you fought to get the pin off the arm with out pulling it off first.


You must be registered for see images attach
wow looks like you’ve got a lot more room around there than I do. The steering column is pretty in the way on my 88 - is anything other than clutch arm removed here?
 

rreegg

Full Access Member
Joined
Feb 10, 2022
Posts
237
Reaction score
137
Location
Puget Sound
I have one of these Heim Joints I was going to install a couple years ago, but the stupid bracket lever would not come off. So I replaced the Micky Mouse plastic clip on the pin for the clutch rod and has been ok? for a while.
Been having some problems with the Clutch, so took a look at it again...dang don`t know what keeps it together, has a look it is going to drop off.

Not only the Heim Joint for the fix in slop, there is also the 4 plastic bushings in the peddle assembly for the clutch and brake levers. if they wear through and into the aluminum mount bracket, the holes will get ovaled out and more slop in the peddle movement.

These trucks are getting long in the tooth, and I doubt any have been replaced. Iam in the process now of replacing these along with the Heim Joint. I have a spare peddle assy I got out of a 85 F250 6.9 Iam going through.
The truck had 165K on it and the bushings are more than 1/2 way worn through.

The local dealer still had the bushings in stock and bought 2 bags. 4 in ea bag. Part#EOTZ-2471-A

The assy is super easy to take apart, and then the little lever for the Heim Joint is easy to get to, pull the shaft out and there it is. grind off the weld, punch it out with a drift and there ya go.
Ford only paints what you can see, the upper ends of the levers were all rusty. Wire wheeled them down to clean metal, used phosphoric acid to etch the metal and get any rust I missed, coat of POR, and then 2 coats of POR chassis black.

I`ll get this together tomorrow, and next week dig into R&Ring the peddle boxes.

The Heim Joint kit comes with a bolt threaded all the way to the head. Would it be better to have a shoulder bolt where it is smooth inside the joint? Will the threads eventually wear into the joint? Also a flat washer and a Nyloc nut be better than a reg nut and lock washer?

You must be registered for see images attach
Yeah I definitely noticed some rounding out of the bracket that contains the pedal assy. Seems there’s a plastic gasket in there or something. I’d anticipate needing to take off the splined connection sometime in the far future if it gets much worse.

My heim joint kit contains the same parts that’s shown on your post - the lock washer and bolt mate directly against the heim ball. Some guys online have put some extra washers there but I’m not too concerned about it. I reckon if the outer assy can rotate on the ball it should work fine - the ball should be static and is steel so should be strong enough.
As I’m writing this a nylon washer would sound good for safe redundancy long as it’s not too think
 

Old Goat

Full Access Member
Joined
Jan 14, 2021
Posts
1,579
Reaction score
1,568
Location
Northern Nevada
Yesterday I got the replacement Peddle Box Assy. installed.
Took some finagling to work it up under the Dash, and get the 2 front bolts to hold it up.
Then get the Brake Booster in and lined up with the peddle assy. You need 3 arms, 2 under the Hood and one under the dash.

Once installed it was connecting the brake rod and then the Heim Joint Mod.

My Clutch Rod is a 2 piece that threads together which made it much easier than trying to cut off the Ring end and file it down to fit working under the dash.
I unscrewed it and put it in a Vice, and cut off the Ring with my HF air powered cut off wheel. gently used the side of the wheel to whittle it down to fit into the end of the Heim Joint hole.

I didn`t use the Threaded Hex head bolt and set screw that came with it. I replaced the Set Screw with a small hex head bolt, and a grade 8 2 or 2 1/2" bolt. This way I had the smooth part for the heim to ride on.
Don`t remember which of the two i used, but when the bolt is in and the joint slid on, it comes right to the end of the smooth part of the bolt. Then a Ny-Lock nut hold it tight and no washers or spacers need to be used.

Used my Drill press to drill a hole in the Clutch rod for the Hex head Bolt to screw into, and used red loc Tite to hold it for ever.

Get the clutch rods screwed together....and...crum, ran out of threads and its putting pressure on the MC. Didn`t cut enough off, so out it came, cut, drill, Lock-Tite and reinstall and looks like I got it.
Haven`t driven the truck yet.....

Today I installed the Steering column which was fun, after fighting it for a while, had to cry uncle and ask my Wife to give me a hand so I could get things lined up to get the bolts started.
And the steering shaft to the Column had a mind of it`s own....GRRR
Fiddled all day with it, replacing the head Light switch...
why couldn`t Ford add 6" more wire to make it easier to replace the switch? yeah I know they saved 5 cents on wire X 500K trucks etc...

Installed SW vacuum gauge where the Tach goes, and swapped out the Amp Gauge for another Fuel gauge...
But that is for another thread down the road.

Goat
 

Old Goat

Full Access Member
Joined
Jan 14, 2021
Posts
1,579
Reaction score
1,568
Location
Northern Nevada
Here we are 9 months later. HMMM...and can`t just edit any more...

I do not recommend to drill a hole in the Clutch Rod.
Almost 2 weeks ago on Sunday we were a bit late for Church, so parked on the side of the building behind another car.
After Church went out to move the truck, and Clutch didn`t disengage, trans just ground.
So pushed her in reverse, started in gear, sut off, put in first restarted and moved to another spot.

Pull up to stop with Clutch pushed in and was like it only 1/2 way disgaged, and truck shook.
then peddle went to the floor.

Rod came out of the Heim Joint. Broke off where I drilled the hole, really not enough meat left, and weakened it.
Pulled out the 1/4" piece broken off in the joint, stuck the rod back in, re red lock titted it and all is good.

I had to re-adjust the rod length a little bit for clutch adjustment.

I should add here.... I drove the 12 miles back home shifting by RPM`s and road speed.
I have driven trucks w/o synchro`s when I had a J-J-J-Job ( dang that is a dirty word), but doing it with a trans with Synchro`s is a bit more of a challenge especially if you have never done it.


Goat
 
Last edited:

03wr250f

Full Access Member
Joined
Jan 13, 2014
Posts
637
Reaction score
387
Location
Hamilton/Montana
years ago i tried the heim joint mod, ended up hating it and went back to stock.
I didn't like it because i was having issues with getting the clutch switch to actuate fully.
well after replacing the master and slave, rebuilding the pedal assembly and putting a south bend 900 ft lb super stiff clutch i started getting engagement issues in 1st and reverse.
I ended up welding the heim joint on, then grinding it down slowly, rewelding and grinding until it was smooth. I also removed the chamfer at the bottom so it would no longer grab in the master cylinder.

FUN FACT!!!!! the way to remove the pushrod from the master is to remove the snap ring from the end of the master. watch out their is a spring pushing back at you, and use a ford plastic fuel line removal tool to push in the 3 finger like clips that hold the pushrod in. some working with one of the smaller (i believe yellow) tools and the pushrod will come out. then push the spring you have been fighting the whole time back into place and reinstall snap ring.

after doing all of this i trimmed the pushrod end into the master until it was identical in lenght to a stock pushrod, and made sure that it was not actuation the clutch pivot arm or pushing on the throwout bearing in any way.

I now have much better and smoother engagement than i did when i first reverted back to a stock setup.
 

Austin86250

Full Access Member
Joined
Oct 5, 2021
Posts
831
Reaction score
464
Location
idaho
Just bought 2 as it was the same price as one of those plastic bushings
 

Latest posts

Forum statistics

Threads
91,217
Posts
1,128,469
Members
24,043
Latest member
tottripp

Members online

Top