Need advice on battery cable replacement kit

jibronee

Registered User
Joined
Apr 19, 2011
Posts
42
Reaction score
7
Location
Slo, California
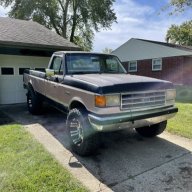
Looking to replace all battery cables on my 1986 f350. Only finding cable kits listed for 93' and newer powerstroke. Will these work on my 86'?

Thanks in advance
 

Nero

HD Diesel nut
Joined
Jan 3, 2022
Posts
4,209
Reaction score
4,793
Location
OR
Powerstroke ones, I dont believe will work.

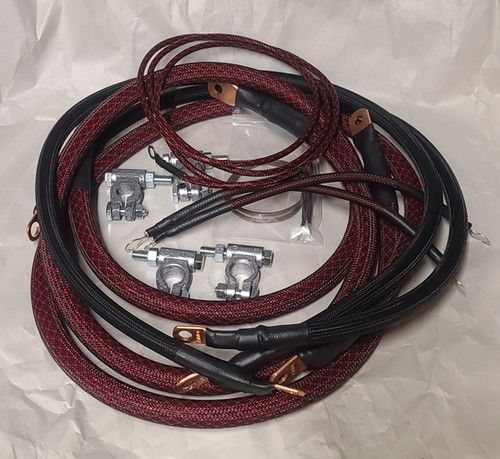
Here is a solution, I have his cables on my truck.


jibronee

Registered User
Joined
Apr 19, 2011
Posts
42
Reaction score
7
Location
Slo, California
Nero, OUCH!!! $400 for a cable set!! I'd rather spend that $$ on new batteries.

I made new cables 3 years back with good terminals, but I live next to the coast and the terminals have gotten dirty, open twice now. I'd rather go with a set that is factory crimped with the shrink tubing on terminal connections.

I saw some online for $125 with 3 year warranty, but they were for 93/94 and newer.
 

jibronee

Registered User
Joined
Apr 19, 2011
Posts
42
Reaction score
7
Location
Slo, California
Is the only difference the flat or 90 degree angle for the starter? Trucks seem to be the same size engine compartment and battery location, regarding if a 6.9, 7.3 or PS.
 

lotzagoodstuff

Full Access Member
Joined
May 19, 2007
Posts
2,832
Reaction score
829
Location
Carmel, IN
I've never replaced the battery cables, but keep in mind that a 1993 is an IDI. It's a 7.3 IDI in the "old body style/OBS" chassis, which started in 1992. Your truck is a 6.9 in the bullnose style chassis, but they could be a lot more similar than the Powerstroke listing, which really didn't start until model year 1995.

Lastly, good cables are getting pretty spendy these days, but a bad set of cables that don't work ain't worth nothing. A tip top starting system is important as it makes the starter and batteries last much, much longer. Speaking of which: if your starter is original you should think of an upgrade. The fast spinning starters make a night and day difference.

Good luck whichever way you go regarding your battery harness.
 

ROCK HARVEY

Full Access Member
Joined
Oct 3, 2021
Posts
665
Reaction score
684
Location
Dayton OH
This positive cable from Amazon fit perfect on my 89:

I bought 2 of these ones for the negatives, plus military-style terminals to attach to the batteries. They were longer than necessary, but work great:


It was 1 degree this morning and my truck fired up faster than my wife’s Honda!
 
As an Amazon Associate we earn from qualifying purchases.

lotzagoodstuff

Full Access Member
Joined
May 19, 2007
Posts
2,832
Reaction score
829
Location
Carmel, IN
This positive cable from Amazon fit perfect on my 89:

I bought 2 of these ones for the negatives, plus military-style terminals to attach to the batteries. They were longer than necessary, but work great:


It was 1 degree this morning and my truck fired up faster than my wife’s Honda!
So your positive and negative cables were around $160, plus the two negative mil-spec style terminals? That seems very reasonable for a completely new set: thanks for posting ;Sweet
 
As an Amazon Associate we earn from qualifying purchases.

DirtyWood

Full Access Member
Joined
Apr 20, 2025
Posts
327
Reaction score
206
Location
Earth
Nero, OUCH!!! $400 for a cable set!! I'd rather spend that $$ on new batteries.

I made new cables 3 years back with good terminals, but I live next to the coast and the terminals have gotten dirty, open twice now. I'd rather go with a set that is factory crimped with the shrink tubing on terminal connections.

I saw some online for $125 with 3 year warranty, but they were for 93/94 and newer.
I live close to the coast and have had zero issues with DIY cables. I don't think you have a cheap way out of this situation if you want quality cables. The FTZ branded crimper is one of the best deals out there as far as buying something new. I recommend buying FTZ Powerlugs to go with their crimper and then buy some adhesive lined shrink tubing and 2/0 welding wire. Military style terminals with a 3/8 bolt are cheap and easy.

Regardless of which route you take I recommend spraying your cable ends and terminals with Fluid Film because it has so far worked very well at reducing/eliminating corrosion. FLuid FIlm is available at O'Reilly's.
 

scsmith42

Registered User
Supporting Member
Joined
Nov 5, 2025
Posts
75
Reaction score
77
Location
New Hill, NC
I'm still using battery cables on a 1977 GMC Jimmy that I made back in the late 1980's. They survived 8 winters up north with all of the winter salt on the roads too.

There are two schools of thought - crimp versus solder. I've done both, but my longest lasting ones are all soldered.

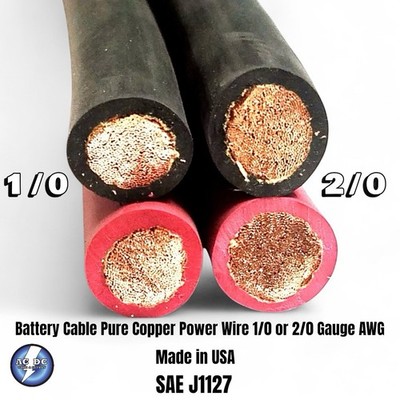
To make your own, pick up some 2/0 welding cable. Welding cable works best because it will convey a high amount of DC current with minimal loss.

Here is some USA mfg cable on Ebay.


Then obtain some fusion lug solder terminals for the 2/0 cable. You can use these ones from Delcity.net:


Also source some double or triple wall heat shrink tubing in the correct size.


You'll need a propane torch. I like to strip just enough insulation to where the copper wire is fully embedded into the terminal, with minimal if any gap between the insulation and the end of the terminal. If the heat shrink tubing does not already have an adhesive or sealer in it, sometimes I'll run a thin bead of silicone RTV around the end of the insulation before shrinking the tubing.

You can also use fusion lug terminals for the starter end, and the chassis ground end of the negative cables and battery to solenoid cable.


Clamp your terminal / lugs, etc in a vise, cut your heat shrink to 2" - 3" and slide it over one end of the cable, then strip the correct amount of insulation from the end of the cable (usually around 1"). Use a propane torch to heat the outside of the tubing on the terminal, just enough so that the solder is liquid. Then while you keep the torch on the terminal stick the cable into it. Once the cable is fully inserted pull the torch away and hold the cable steady while it cools for 20 seconds or so. Then move on to the next one. Let the terminals cool almost all the way before sliding the heat shrink over them; otherwise it may start shrinking on you before you get it into the proper location.

As long as you don't get a cold joint (pulling the heat away too soon or leaving it on too long) cables made this way will last for decades.
 
As an eBay Associate we earn from qualifying purchases.

WrenchWhore

Full Access Member
Joined
Jun 2, 2022
Posts
326
Reaction score
309
Location
Lake Havasu City
I did the 2/0 welding cable with correct copper lugs and built my own. $36 for 4 military style battery clamps, $15 for 2/0 cable lugs, $46 for (1/0-4/0) cable crimper, $57 for 10ft. of 2/0 cable, $4 for wire loom. I did have some extra cable leftover to make the negatives. Total was around $160 and I got to keep the crimper. I've used the crimper to make a second set of 2/0 cables for my 68 Ford when I wanted to go dual battery.
 

Attachments

  • IMG_2054.jpg
    IMG_2054.jpg
    241.1 KB · Views: 22
  • IMG_2053.jpg
    IMG_2053.jpg
    179.6 KB · Views: 22

Dirtleg

Full Access Member
Joined
Aug 11, 2007
Posts
1,408
Reaction score
695
Location
Cloverdale VA
I am in the middle of this currently. I have 2 trucks that need cables and I wanted it to be done properly. 93 IDI and 95 Powerstroke.
I have decided it is best to make my own cables.
Here is the breakdown.
First off, there is no way am I spending $800 on cables for 2 trucks.
What I did.
Qty 8 Marine grade battery terminals. Similar to Military terminals but bolt on vertically from the back rather than the sides.
25ft Red 2/0 welding and battery cable. 1100 strand.
30 ft Black 2/0 welding and battery cable. 1100 strand.
Red and Black 6ga wire. 7.5 ft each.
20 2/0 x 3/8 cable lugs.
10 6ga cable lugs.
Heat shrink.
Temco TH1818 Dieless hydraulic crimper. (Direct from Temco. Cheaper than elsewhere). Yes more expensive than most of the Amazon hydraulic crimpers. But worth it for the significantly better quality. And the warranty. (Must read the warranty.)
Temco Cable cutter capable of 4/0 cable. (My old large cable cutters are worn out)

Not cheap. All the cable, terminals, heat shrink and crimp lugs ran me about $380. /2 = $190 per truck in materials.
Tools ran about $150. Again not cheap.
I also have a tractor that needs new cables plus various other old cars and trucks with issues so I am sure the tools will be needed regularly.
 

XOLATEM

Full Access Member
Joined
May 5, 2023
Posts
916
Reaction score
1,191
Location
Virginia... in the brambles
There are two schools of thought - crimp versus solder. I've done both, but my longest lasting ones are all soldered.

To make your own, pick up some 2/0 welding cable. Welding cable works best because it will convey a high amount of DC current with minimal loss.
You can use these ones from Delcity.net:

Wow !! That was comprehensive and thorough....I have used Delcity Wire in the past also.

I have a question...on the solder method...what type of solder do you use and do you flux the cable and terminals before you heat them up ? If so...what type of flux do you recommend ?


First off, there is no way am I spending $800 on cables for 2 trucks.

Amen, Brother. Your method is pretty darn good, as well. If I ever break down and do this exercise I am going to be appreciative of both of you guys.

I scored a lot of cast-off cable from my last two jobs and am using it for small stuff repairs but I gotta root through my stuff to see if my welding cable is still where I left it.

You two are right-on.
 

scsmith42

Registered User
Supporting Member
Joined
Nov 5, 2025
Posts
75
Reaction score
77
Location
New Hill, NC
I have a question...on the solder method...what type of solder do you use and do you flux the cable and terminals before you heat them up ? If so...what type of flux do you recommend?
I use plain old Rosen core solder and pull out about 18 to 24 inches of solder off the spool. Large diameter solder will not require as many inches. At any rate I heat the lug and put the end of the solder Into it and within 20 seconds or so it will start to melt and generally I’ll fill up about half to 2/3 of the cavity in the lug with the solder and then I stab the cable into it. Keep the heat on it only for a few seconds more to ensure that it’s not a cold joint and then pull the torch away. It’s very important to keep the cable steady while it cools so that you have a good bond to the inside of the lug. The hot solder will penetrate all through the fine strands and give it a really excellent bond.
 
Top