Well, I finally did it and it works great! A little history. A few months back I posted to get ideas. My tank switch went bad (pulled off of the front tank, returned to the rear tank) (?). I thought about replacing the factory switch, to much money for something prone to failure. Thought about manual switches (2 needed, 1 for supply, 1 for return), at $70-80 each I wanted to look into other options. I decided on the Truckers fix (I am one of course), gravity feed between the 2 tanks. Pull out of the front (a little lower tank) return to the rear. I took some time to figure out parts, etc. and I came up with the following. About $60 total with a few days work (most was waiting for sealer, JB weld, to setup (15hrs)).
So here it is.
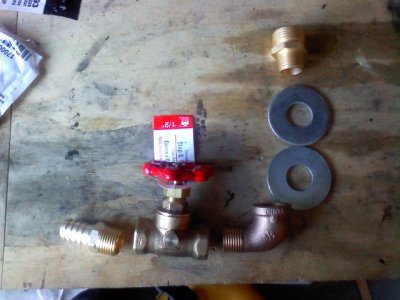
Parts: Purchased Plumbing @ Home Depot, Fuel line @ AZ
2 Valves ½” id. (Need to be rated for oil as the ones only rated for water might not last w/fuel)
4 Steel washers ¾” `
2 Elbows
2 5/8" Hose Barbs
5’ Fuel line 19/32”
13’ Fuel line 7/16” (to run new line)
13’ Fuel line 3/8” (to run new line)
10 Hose clamps (2 0n larger hoses between tanks, 8 for fuel lines)
1 3/8” bolt (to block off line) 1
1 7/16” blot (to block off line) 1
You will need to remove both tanks at different times throughout the process so you will need to plan which tanks to drain (they are a lot easier to handle empty ) if you are going to need to use the truck. I did the front tank 1st as this let me plan where to put the fittings and I also had air getting into the lines when I was pulling off of the front tank thru the switch (this was resolved when the switch was no longer used).
See pics for the layout of the parts as they would be installed. (note: I had to cut off the larger end of the fitting that is in the tank otherwise it would limit the amount of fuel available in the tank) The washers are installed 1 one the inside, 1 on the outside of the tank.
I had to drill a 13/16” hole in the tanks (front tank = low and on the side, Rear tank = bottom front drivers side) and enlarge the washers to accommodate the fittings. Also, I had to cut a notch out of the skid plate under the rear tank for access. You need to be sure you can reach into the hole for the fuel p/u to be able to tighten the fittings. If you do not plan this ahead you just might end up with only a holy fuel tank!!!
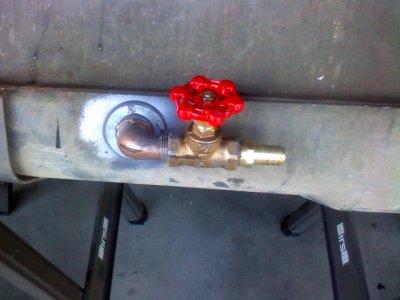
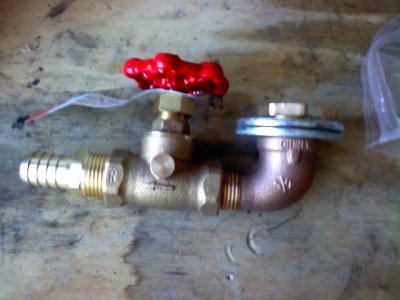
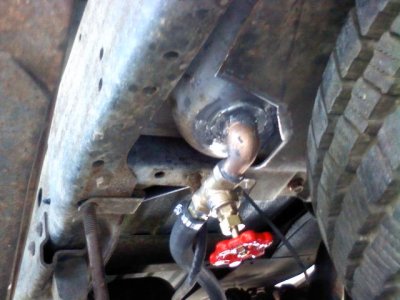
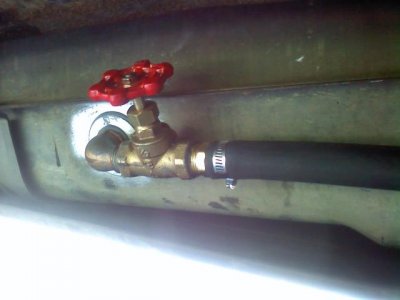
These are pics of the finished product:
I used JB Weld (regular not Quick to give more time to get things in place before hardening) as a sealer. I wanted more strength at the tank to avoid the possibility of something hooking the valve and ripping it off of the tank. I also sprayed Brake-Kleen to remove oil residue before sealing it up for a good seal. I have the valves setup so that there is as little chance for something to hook on them as possible and still be able to use them as needed.
The connector hose between the tanks has to be at pointed least a little downward or level with the front valve to make sure that the fuel will feed into the front tank. You also have to watch that it is a little loose as the rear end could force some parts up so leave a little slack (I zip tied it to one of the e-brake cables to avoid contact with the rear end)
I have not rewired the sending unit for the gauge yet. I just moved the switch out of the way and left it plugged in so that the switch on the dash will allow me to use either sending unit. I also have, as stated earlier, set it up to pull off the front and return to the rear tank. This has allowed for a good fuel flow and venting of the system.
Some people who have done a similar mod chose not to use valves at each tank. I chose to use valves as this allows me to disconnect either tank if needed, drain a tank if needed, etc. It just gave me more options. I also ran new fuel line from both tanks (supply and return) to where the switch went, plumbed the lines I needed, capped the ones I didn’t, this will allow me the option to use only 1 tank if the need arose.
I hope this gives someone else an additional source for ideas to make their truck better.
So here it is.
Parts: Purchased Plumbing @ Home Depot, Fuel line @ AZ
2 Valves ½” id. (Need to be rated for oil as the ones only rated for water might not last w/fuel)
4 Steel washers ¾” `
2 Elbows
2 5/8" Hose Barbs
5’ Fuel line 19/32”
13’ Fuel line 7/16” (to run new line)
13’ Fuel line 3/8” (to run new line)
10 Hose clamps (2 0n larger hoses between tanks, 8 for fuel lines)
1 3/8” bolt (to block off line) 1
1 7/16” blot (to block off line) 1
You will need to remove both tanks at different times throughout the process so you will need to plan which tanks to drain (they are a lot easier to handle empty
) if you are going to need to use the truck. I did the front tank 1st as this let me plan where to put the fittings and I also had air getting into the lines when I was pulling off of the front tank thru the switch (this was resolved when the switch was no longer used).See pics for the layout of the parts as they would be installed. (note: I had to cut off the larger end of the fitting that is in the tank otherwise it would limit the amount of fuel available in the tank) The washers are installed 1 one the inside, 1 on the outside of the tank.
I had to drill a 13/16” hole in the tanks (front tank = low and on the side, Rear tank = bottom front drivers side) and enlarge the washers to accommodate the fittings. Also, I had to cut a notch out of the skid plate under the rear tank for access. You need to be sure you can reach into the hole for the fuel p/u to be able to tighten the fittings. If you do not plan this ahead you just might end up with only a holy
fuel tank!!!These are pics of the finished product:
I used JB Weld (regular not Quick to give more time to get things in place before hardening) as a sealer. I wanted more strength at the tank to avoid the possibility of something hooking the valve and ripping it off of the tank. I also sprayed Brake-Kleen to remove oil residue before sealing it up for a good seal. I have the valves setup so that there is as little chance for something to hook on them as possible and still be able to use them as needed.
The connector hose between the tanks has to be at pointed least a little downward or level with the front valve to make sure that the fuel will feed into the front tank. You also have to watch that it is a little loose as the rear end could force some parts up so leave a little slack (I zip tied it to one of the e-brake cables to avoid contact with the rear end)
I have not rewired the sending unit for the gauge yet. I just moved the switch out of the way and left it plugged in so that the switch on the dash will allow me to use either sending unit. I also have, as stated earlier, set it up to pull off the front and return to the rear tank. This has allowed for a good fuel flow and venting of the system.
Some people who have done a similar mod chose not to use valves at each tank. I chose to use valves as this allows me to disconnect either tank if needed, drain a tank if needed, etc. It just gave me more options. I also ran new fuel line from both tanks (supply and return) to where the switch went, plumbed the lines I needed, capped the ones I didn’t, this will allow me the option to use only 1 tank if the need arose.
I hope this gives someone else an additional source for ideas to make their truck better.