I just finished putting my early Banks turbo with the huge air box back on a 93 F-350 7.3 IDI. Anyone who has ever pulled this air box out or put one back in knows what a PITA it is, but I have found a way to do it that minimizes the frustration for those of us who have not yet replaced the box with a small hat and a more civilized air filter rig (lots of good suggestions for such projects out there). The key is to get the big airbox-to-compressor elbow out of the way completely before trying to pull out the box. And when it’s time to put the box back in, leave that big elbow out until the box is in its correction position. The elbow should be warm and pliable for both removal and installation. Although it is possible to pull the box out with the elbow’s two clamps simply loosened, that approach limits your control of the box when you are trying to remove it and can also result in tearing the elbow. And for re-installation, it is near impossible to accomplish with the elbow clamped in place on one end -- either to the box or to the compressor – but it’s fairly easy to manage by leaving it until last. More detailed instructions follow.
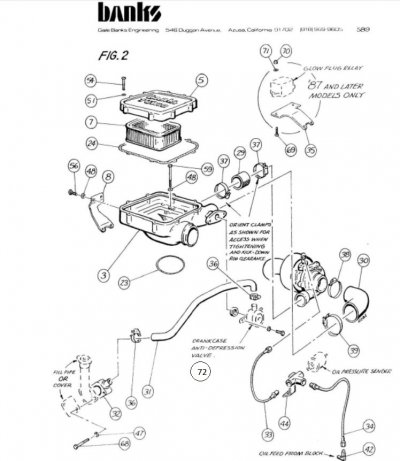
REMOVAL - First, remove the fresh air intake assembly and the hose and the crankcase depression regulator valve (CDR) from the driver’s side of the air box. That is the canister (#72 in attached picture) with the hose that runs to the crankcase vent at the oil fill neck. Removing the CDR from the manifold on the box not only gives you more space for the wrestling match with the box, but it also allows you easier access under the box to work the hose clamps on the compressor outlet hose that connects on the back of the box.
Rig a hair dryer to start blowing hot air on the big elbow hose that connects the air box to the compressor air intake. You want to make this elbow pliable and the heat will do the trick. (If it’s August and you’re in southern Arizona, maybe you can skip this step.)
Let the hair drier run while you take off the top of the box and remove the filter.
Keep heating the elbow. Get the two hose clamps on the compressor outlet hose on the back of the box nice and loose. This is the smaller hose that you cannot see from in front or from above but you can feel it if you reach down around the back. This is #29 on the picture below. The clamp screws will hopefully be positioned on the underside where you can reach them from the driver’s side with their screws facing that direction. Wherever they are, someone tightened them, so logically they can be loosened. A light and mirror or a mechanics video camera can help.
Still heating that elbow. Remove the two bolts that hold the box to the mounting bracket on the passenger side of the box toward the front. (Number 56 on the attached picture.)
Still heating. Loosen, but don’t yet remove the bolt (#59) inside the box that holds the box onto the center of the intake manifold. You want the box to be able to wiggle a little but not to come off its mount before you are ready to remove it. (If you are not careful, you will end up buying a new trash screen that goes between the box and the air intake below it.)
Still heating. If your boost gauge hookup is on the passenger side of the box, disconnect that (some were also on the back of the box and won’t come off until the box is out).
Get the two hose clamps holding the big elbow hose in place nice and loose. The elbow should be all warmed up by now, so put aside the hair drier. Grab the elbow with two hands, squeeze it, and wrestle it off the box connection and the compressor connection. Then pull it out of the way. On my truck, there is just enough space to get it out of there.
Time to get the box out now. Remove the center hold down bolt completely. Then, tip the front of the box up and wiggle it up and away from the compressor outlet hose, being careful (as you can) not to snag the trash screen and mangle it with the circular lip of the bottom of the box. If the box has not been out for a while, the compressor outlet hose might be heat sealed (or intentionally sealed) to its connections and it will take patient wiggles and pulling to get the box free. Don’t give up – it will come.
REINSTALLATION – Pretty much the reverse but the key to making it as easy as possible is DO NOT try to install the box with the fat elbow attached to either the box or the compressor. The elbow goes in later.
Coat the four airbox and compressor hose connection ports with some vegetable oil (rather than petroleum based oils). Also treat the inside of both ends of the small outlet hose with the vegetable oil.
Slide the compressor outlet hose onto its connection to the compressor and slip the two nice and loose clamps over it with the screws hanging underneath and pointed toward the driver’s side.* Tip that hose upward at an angle – about 30 degrees, so the connection on the air box can enter the hose when you come at it from about the same angle. Going at it straight and level does not work well.
(* If your hose clamp screws don’t have hex heads, get some new ones that do. It’s not easy to get them tight enough with just a screwdriver.)
Before you put the box back in, make sure you have your round trash screen in place held by the special bolt with the threaded female center into which your air box hold-down bolt will get inserted. Also make sure your big o-ring or gasket is in place around the base of the intake hole.
Start heating up the big elbow hose. I place it in front of an electric blower heater in the house until I’m ready for it. Or a hair dryer should do but keep it heated until you are ready for it later.
It will help to have an assistant or live video from a mechanic’s camera that will guide you next. Grab the box and guide it toward that waiting tipped-up compressor outlet hose. At a similar angle, push the box’s flange into the end of the hose and once done, maintain pressure toward it as you lower the box to level. You are now trying to get the circular opening on the bottom of the box to travel far enough rearward to be able to drop it in place over the engine air intake flange. When you have gone far enough rearward, bring the front end of the box down to fit the base over the intake and if you are lucky, you should still be “docked” into that short compressor outlet hose at the back. If you lost that connection, take the airbox back out carefully, set up the hose and clamps, and try again.
Once the box is in place over the engine air intake and the outlet hose is still in position connecting the box and compressor, screw the airbox hold down bolt in but not so tight that the box can’t be wiggled a little.
Tighten the two compressor outlet hose clamps. You should be able to adjust and hold their position by reaching them from the top and holding them in proper position with your left hand and screwing them tight with a socket wrench in your right hand. Go at them from underneath on the driver’s side of the box. You will find a light and a mirror (or a mechanic’s video camera) helpful for getting your socket wrench on the screw - - it is a tough place to get a look at under there with just your own eyes.
Get the elbow hose you’ve been heating and slide the loose hose clamps onto it so that you will be able to tighten them on top as you would look at them from the rear of the engine area. Apply some vegetable oil inside the openings on both ends of the elbow.
Now insert the elbow into that space where it goes with the ends oriented toward their connections. Because it’s warm and pliable, you can squeeze and manipulate it the way you need to and it can be done in a very short time. Once it is on both the connections, get the hose clamps properly oriented and tighten them in place.
Replace the two mounting bolts (#56) on the passenger side of the box but don’t tighten them until after you tighten the center hold-down bolt (#59). The rest of the project is the reverse of removal and no special instructions are needed.