Exhaust Brake-Anyone built their own?

cdennyb

Full Access Member
Joined
Oct 23, 2005
Posts
83
Reaction score
0
Location
Northern California
I was pretty interested in putting an exhaust brake on my cummins since the lack of back pressure on my 4" stainless exhaust didn't slow me down like it ussed to, so I built my own brake. Wondered if anyone else has and what kinda problems they ran into.
 

cdennyb

Full Access Member
Joined
Oct 23, 2005
Posts
83
Reaction score
0
Location
Northern California
here's what I have so far...

I'm fixing to install the brake unit into my exh system tomorrow if it isn't pouring down rain. I hate rain and trying to TIG weld! LOL cookoo
Anyway. The backpressure nuimbers I have now are:
cruising @ 55-60 no load= .3 to .5 psi
loaded (trailer @ 12000#) @ 55-60 = .8-1.0 psi

I'm going to have an 'upstream' and 'downstream' pressure gauge to see the differential pressure across the brake. I was going to install a spring loaded adjustable relief valve but wasn't sure where to set the pressure so I'll run it like it is first then decide it it's required or not. Here's some pics of what I've got.

The air tank is a fire extinguisher tank. (Proof tested to 1.5x working pressure) and will be aired up by the turbo. Simple huh? Should hold around 25-35psi working pressure. More than enough.
The red micro switch is attached to the TPS bracket so it'll only energize the solenoid if the dash switch is ON and the throttle is closed in the idle position.
The brake itself is all stainless. The butterfly inside is 9.4% less area than the ID of the tube so it'll bypass quite abit of exhaust anyway.
The line leaving the solenoid islooped back into the intake because I haven't installed gthe brake unit yet. This will then be routed down to the air cylinder to actuate the bake.
I'll keep everyone informed of the progress if they're interested. I just couldn't see spending 700-800$ for the same hting just to have ittie into my electronics and kick out the brake at some reduced speed. I need this thing on hills,with a load on or in the truck, and usually trying to keep everything cool and under control from say 60 mph down to 40 mph. Simple huh.
Any derogetory comments will greatly apppreciated and probably dismissed. Any constructive criticizism will be greatly appreciated. Thanks everyone.
db
 

Attachments

  • exh brake & electric control 015comp.jpg
    exh brake & electric control 015comp.jpg
    165.9 KB · Views: 56
  • exh brake & electric control 011comp.jpg
    exh brake & electric control 011comp.jpg
    86.7 KB · Views: 36
  • exh brake & electric control 009comp.jpg
    exh brake & electric control 009comp.jpg
    160.6 KB · Views: 43

argve

Resident Fruitcake
Joined
Dec 11, 2004
Posts
7,510
Reaction score
32
Location
Gwynneville, Indiana
How about actuating the cylinder with vacuum instead of compressed air? That is how the store bought brakes work - with doing it that way you don't have to actually drive the truck to use the brake - meaning I can go out when it's cold start the truck up flip a switch and bingo I'm putting a load on the engine which helps it warm up faster.

Using the boost of the engine is a slick idea but then it requires you to do two things extra - 1, you have to have an air tank to run the system. 2, you have to actually drive the truck to produce boost before you can use the brake.
 

rubberfish

Registered User
Joined
Dec 17, 2003
Posts
4,562
Reaction score
11
Location
Langley B.C.
argve said:
2, you have to actually drive the truck to produce boost before you can use the brake.
He hasn't gone into great detail yet, but Im guessing
that's what the tank is for. Storing the compressed air.
I'm guessing a check valve of sorts? I'm dying to find out
how well it works, and the cost to build? Cheap I guess,
if ya can build that sort of thing. Good job cdennyb. :thumbsup:
 

J.Keith

Registered User
Joined
Apr 16, 2005
Posts
335
Reaction score
0
Location
Loveland CO.
I like it!
I can't wait to see how it works.
If it works good I'll try one myself. Keep us posted!
Good Job
Joe
 

cdennyb

Full Access Member
Joined
Oct 23, 2005
Posts
83
Reaction score
0
Location
Northern California
More details...

Well, yes, if you look closly at the picture withthe gaugein it, there's acheckvalve that holds pressure. It actuallys holds 20-25psi overnight without problem.
As far as warm up the engine goes, flip the switch and warm it up. there's plenty of pressure to close the butterfly. This system doesn't require any additional pumps (vac or press) to go wrong. It's supposed to be used to slow down the truck instead of using the service brakes constantly and so far I'm into it for about $100.
 

cdennyb

Full Access Member
Joined
Oct 23, 2005
Posts
83
Reaction score
0
Location
Northern California
finally installed!

OK, latest update. I took lots of pics and will post them as I get them onto the laptop. The installation went well, as you might suspect, since it stopped raining for about 4 hours yesterday.
I installed the unit and hooked everything up, and it works flawlessly. I tested it this a.m. when I started the truck and stood outside the cab, reached in and hit the starter, then flipped the dash switch for the brake. It came on instantly and stayed on while the truck warmed up, (although it was only about 45-48 degrees this am...hardly cold). I had more than enough pressureto actuate and hold the brake for 15 minutes constantly on and only lost about 5 psi in my tank, which started out with about 22 psi in it after setting all night.
Anyway, the smooth hiss was a welcome sound and I hopped in and started to town. We have a couple of little hills that drop about 100-150' vertically over a distance of only 1/2-3/4mile. Hardly a good test but a test anyway.
I was cruising along about 50 in O.D. (empty, no trailer or load) and hit the switch to turn on the system. Then I eased back on the throttle and heard the familiar "hiss" of the brake actuated. It slowed me down considerably quicker and by the time I was at the bottom of the first little hill, (usually going about 40-45 at the bottom when I coast) I was down to 35-38 mph. Thatto me is a big difference. I'k going to Modesto this weekend with the car trailer and a light load of new bedroom furniture for my youngest boy and his family so I'll test it more then.
I should have the pics tomorrow or Sat if I can just find the time to quit playing with the damn truck! LoL
 

cdennyb

Full Access Member
Joined
Oct 23, 2005
Posts
83
Reaction score
0
Location
Northern California
pictures, pictures, and installation info...

I have a .pdf file which I converted from a WORD document. It's a little big because of the pictures and I appologize to all the users who have a dial up connection. Not much I can do about that. PM me and I'll e-mail it to you. It's almost 975 Kb in size so the message board won't let me upload it.
The .pdf file is 10 pages of descriptions and pictures, from start to finish.
Here's a few pics I can post that I reduced in size to upload.
I'll have pressure numbers next week after I get done hauling stuff in the trailer.
As far as "How much does a cdennyb brake cost? and...where can I get one?"
well... as much as I'd like to make a bundle of money building these for everyone, as you know, all trucks are a little bit different. I started out with 2-3 pounds of initial spring tension but at 2800 rpm the flow was too much and the brake wouldn't disengage until the rpm dropped to around 2000-2100so I did the next best thing... I increased the spring tension to around 4-7 pounds and guess what? It opens in about 1-2 seconds at 2800-2900 rpm. That's the thing with these exhaust brakes. Every truck flows a little bit different, not much but just a bit. Maybe you're brake would be installed closer to the turbo, maybe further from it, and this all changes the flow, volume, and backpressure numbers. I will have to contine to "fine tune" this item as I use it, and if you want to build one like this, I'll be happy to devote endless hours of advice and suggestions but the price is still the same...FREE for the building.

:draw
 

Attachments

  • exh brake installation on vehiclecomp.jpg
    exh brake installation on vehiclecomp.jpg
    119.9 KB · Views: 33
  • exh brake installation on vehicle 010comp.jpg
    exh brake installation on vehicle 010comp.jpg
    170.2 KB · Views: 45
  • exh brake installation on vehicle 017comp.jpg
    exh brake installation on vehicle 017comp.jpg
    89.1 KB · Views: 40
  • exh brake installation on vehicle 019comp.jpg
    exh brake installation on vehicle 019comp.jpg
    133.9 KB · Views: 42

argve

Resident Fruitcake
Joined
Dec 11, 2004
Posts
7,510
Reaction score
32
Location
Gwynneville, Indiana
;Sweet ;Sweet ;Sweet :thumbsup: :hail Very good - I was just worried about the ability to do warm ups in the morning and it looks like you got that nailed down - GOOD SHOW MAN!!!!

Now for how your brake performed - sounds like it works like mine does.

Again - good show man! ;Sweet
 

rubberfish

Registered User
Joined
Dec 17, 2003
Posts
4,562
Reaction score
11
Location
Langley B.C.
I'm wondering if the vice-grips are mounted
a bit too low. It's hard to tell from the picture
angle, but won't they get knocked off driving
in deep snow and on gravel backroads etc? :eek:
You seem smart enough to carry a spare set
with you though, so forget I said anything.

If you do decide to make more, and one
comes for sale, let me know eh? :)
Again, very nice job. Congrats. :)
 

cdennyb

Full Access Member
Joined
Oct 23, 2005
Posts
83
Reaction score
0
Location
Northern California
first weak link located...

-cuss Last night I was up in the mountains around here (about 3500' if you can call that a mountain.) and I loaded up some plywoord from a job site that was finished and brought it back to the shop. Well, not much, just a dozen sheets of 3/4 CDX. Maybe 500# or so and a portable cement mixer on top of that. So I had maybe 1200# in the back. I shot off the summit and headed down the hill in OD. I was thinking I'd click off theOD and run in direct to see how it did with a slammed load against it.
And I found the weak link. In my fabrication shortcuts and inability to accurately decide what the backpressure pulse would be on a sudden activation at high rpm, Ifound out the pressure was great enough to bend the 1/4"dia shaft the butterfly was welded on and it pulled out of the shaft hole that was oin the 4" tube! :rotflmao
So, in my embarresment and shame, I went back to the shop and startedto fab a "magnum" version of the sleek, hi-performancemodel and built another butterfly and shaft assembly. I fired up the mill and hogged out a bellcrank clamp as well and used set screws, soc hd cap screws to mount the butterfly and other better design practices. I'm changing it out this afternoon before I leave for Modesto. I'll have a pic later of the destruction.
:backoff
 

Headhunter_5.9

there it is Johnny!
Joined
Oct 20, 2005
Posts
133
Reaction score
0
Location
ILLINOIs
dang it! but if you'll have her back up and flapping that quick! you are the man! w/ the tools to GER 'ER DONE!
 

cdennyb

Full Access Member
Joined
Oct 23, 2005
Posts
83
Reaction score
0
Location
Northern California
repairs made just in time...

ok, you aren't going to believe this. No joke here, this is for true.
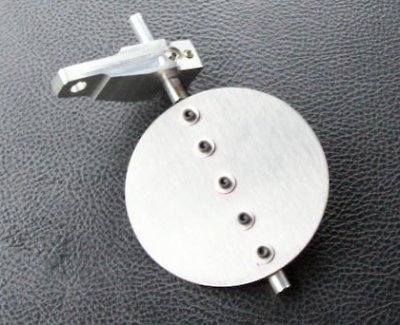
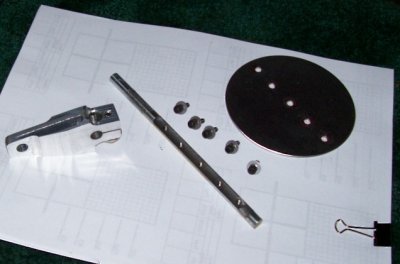
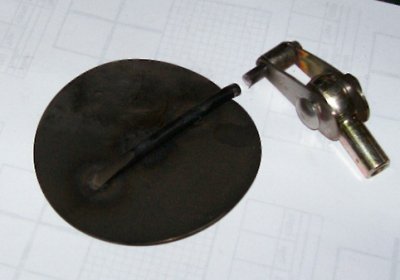
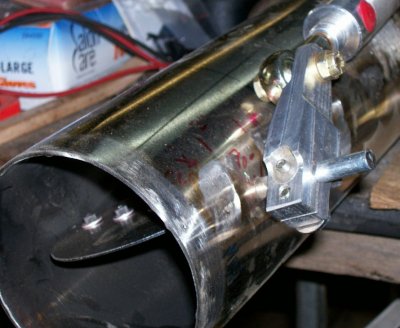
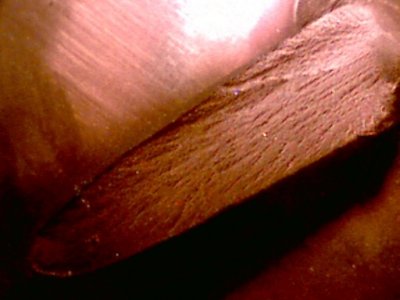
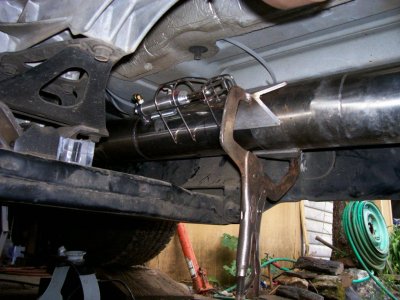
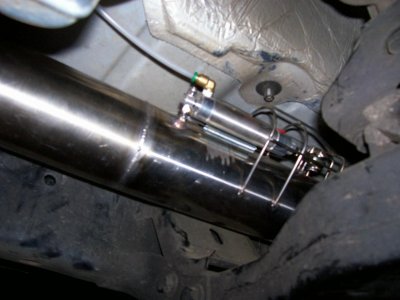
I disassembled the brake unit, well, I cut it off the truck, took it to the work bench and figured I'd just replace the bent and twisted carnage of what was left behind after I had abused it severely. I couldn't believe my eyes! I cut the shaft and removed the butterfly disk piece which was still welded solidly (of course) to the shaft. Now the bizarre part...the shaft had broken, and looked like a impact fracture in a piece of quartz rock! No kiddin'! At first I thought it was melted, God forbid at that distance from the turbo it melted!)
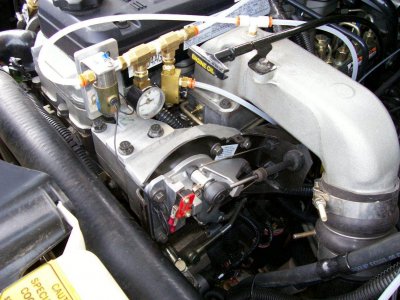
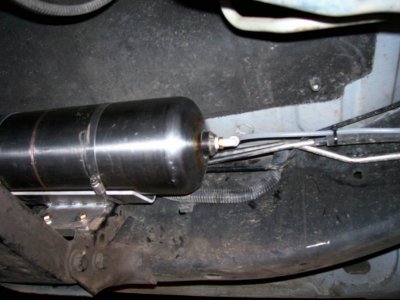
It broke like a barberpole. The new shaft is of course considerably larger in dia. (.312") and I only removed about .070" with the mill to install the new disk. Instead of welding it on this time, I got brave and figured I'd try my hand at breaking a couple of 6-32 taps, so I tap drilled the shaft for 5 screws, not ordinary ones either, no sir, (Hardened, socket head cap screws mind you.) Then decided I wouldn't weld on the arm assembly, hell no, let's find a chunk of billet aluminum and mill one out that looks cool. So, 2 hours later I have what you see in these pics. The biggest headache was die grinder cutting the pipe off, again. I only broke one tap, had to start the shaft piece only twice and the finished product is considerably nicer looking than the original prototype.
(I can see why these damn things cost so much, it's hard to get calm people to build them! Postal workers need not apply... LoL)
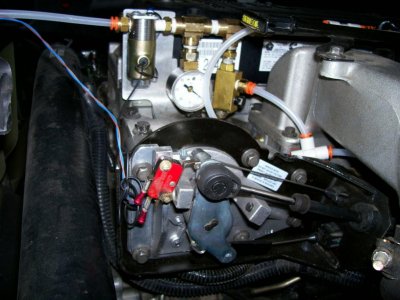
The tests are coming. Here's some pics to drool over. I'll leave for Modesto with a trailer load in a couple of hours. Wish me the best.
 

Attachments

  • A repair to exh brake 001comp.jpg
    A repair to exh brake 001comp.jpg
    99.7 KB · Views: 23
  • A repair to exh brake 007comp.jpg
    A repair to exh brake 007comp.jpg
    138.6 KB · Views: 21
  • A repair to exh brake 010comp.jpg
    A repair to exh brake 010comp.jpg
    77.2 KB · Views: 21
  • A repair to exh brake 016comp.jpg
    A repair to exh brake 016comp.jpg
    134.7 KB · Views: 28
  • fractured shaft1.jpg
    fractured shaft1.jpg
    57.7 KB · Views: 36

Latest posts

Forum statistics

Threads
91,292
Posts
1,129,834
Members
24,106
Latest member
lewisstevey7

Members online

Top