Tin bashing

laserjock

Almost there...
Supporting Member
Joined
Nov 20, 2012
Posts
8,841
Reaction score
3,129
Location
Maryland
:popcorn

About to tackle this very issue real soon. I like that approach. I was thinking similar but wasn't sure what to pour in it.
 

david85

Full Access Member
Joined
Feb 21, 2008
Posts
4,829
Reaction score
1,093
Location
Campbell River, B.C.
:popcorn

About to tackle this very issue real soon. I like that approach. I was thinking similar but wasn't sure what to pour in it.

Make sure its a good quality HIGH SOLIDS primer that won't shrink or crack as it cures. Zinc rich or even zinc chromate would also add some extra corrosion protection. Epoxy is preferred because it sticks like hell to just about everything (especially bare metal) and it can cure even in high thicknesses. The stuff I'm using can take a very long time to cure when coated heavy but it has the advantage of a long pot life. A well aimed space heater can speed things up nicely too. Depending on where you are, the paint supplier may not want to sell you zinc chromate primer for automotive application because of enviro-**** rules. I lucked out with my supplier because he didn't really care and I'm not actually an autobody shop. Besides, it was also about 25% more expensive than the regular epoxy.

I also had good luck with a much more down to earth primer called Cloverdale Rustex. Its an industrial general purpose zinc rich primer. It doesn't cure as hard, but its dirt simple to use. Just reduce it by 10-20% and shoot it. The reducer acts like an activator so high thickness builds (or pours) aren't a problem. I used it on some railing jobs as well as my F150 and it seems to hold up well.

I was planning to do this in the front edge of the hood, but decided not to since I have no way to clean the inside cavity like I did with the door. Fluid film will have to be enough in that case. My impression is also that rust tends to set in from the sharp edge of the exposed metal fold. Both doors and the hood all showed early signs of failure in this way.

And lastly, do not rely on any urethane 2000 primer for corrosion protection. Its primary role is to prep the surface for paint and smooth out any minor scratches/fish-eyes, etc. Even if the can says you can apply it to bare steel, it will rarely offer the same kind of corrosion protection as a good quality epoxy.
 

laserjock

Almost there...
Supporting Member
Joined
Nov 20, 2012
Posts
8,841
Reaction score
3,129
Location
Maryland
Yep. I bought SPI epoxy after reading a ton of good stuff about it. It's going on all the sheet metal except the undersides and frame. I put por 15 on the underside of the cab and I will on the underside of the bed too. I put enamel on the frame for easy touch up.
 

david85

Full Access Member
Joined
Feb 21, 2008
Posts
4,829
Reaction score
1,093
Location
Campbell River, B.C.
Dry fitted the other door today. All mods are also completed (stiffeners), and now I'm waiting on epoxy to dry on the inside (have no way to hang it at the moment, so it'll have to be done one side at a time).

No adjustments were required and it probably fit better then what's on there right now. This door will need some more shaping and TLC due to those dents but it shouldn't take too long. I need to get epoxy down on the outside before I can put a skin coat of filler though.

I'm hoping to drop the doors off at the painter on monday. We'll see if I can make it, but once that happens the only major thing left is the cab (yeah...ONLY:rolleyes:)

Actually, the box I have for it still needs work too, but that can be done later and dropped on the truck at anytime.
 

Attachments

  • IMG_1402.JPG
    IMG_1402.JPG
    401.7 KB · Views: 15
  • IMG_1403.JPG
    IMG_1403.JPG
    308.9 KB · Views: 15
  • IMG_1404.JPG
    IMG_1404.JPG
    281.4 KB · Views: 15
  • IMG_1405.JPG
    IMG_1405.JPG
    455.9 KB · Views: 15

david85

Full Access Member
Joined
Feb 21, 2008
Posts
4,829
Reaction score
1,093
Location
Campbell River, B.C.
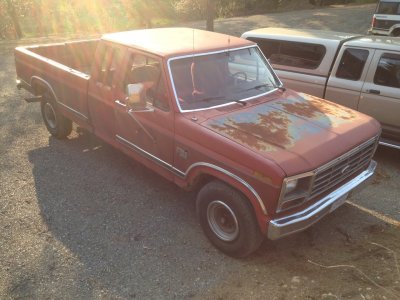
what kind of shape is the cab in?

Nothing major, just a lot of minor stuff.

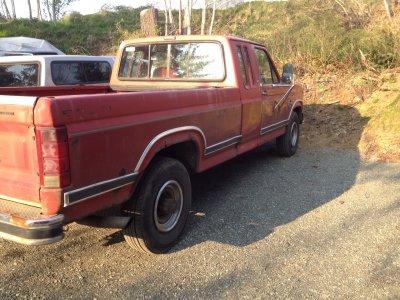
Both cab corners need work but its only at the rear wall, so its quite minor. Tin bashing will be required, but the repair won't be visible. There is likely a rust hole at the rain gutter below the wind shield (under the cowling), but repairs there don't have to look pretty either. Both roof line rain gutters were repaired previously before rust could spread from the front corners, but one side was left in primer for a few years and has since cracked from sun exposure (no evidence of rust).

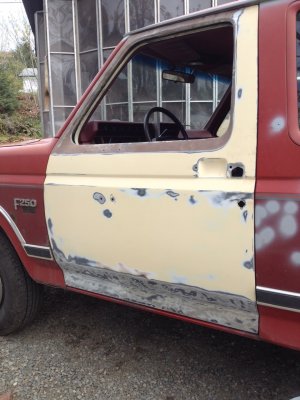
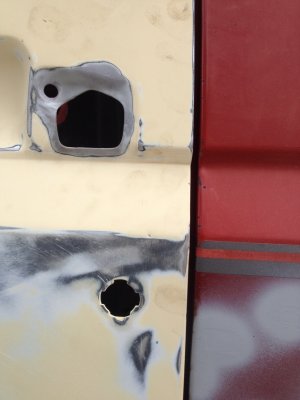
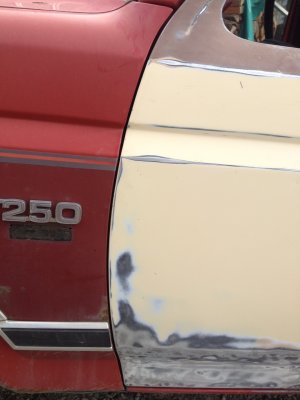
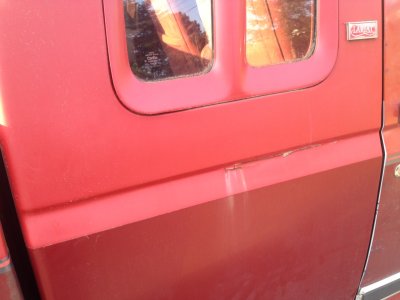
Somebody backed into the passenger side a few years ago too (family member, who will remain nameless LOL). I tried shopping around for a decent body shop at the time and the only one who was confident he could pull it out ended up doing a crappy job. I'll post pictures later, but sufficed to say, cracked bondo is involved. It was the one part of the truck that didn't have any dents or rust spots!-cuss Its also a reason why I can't trust anyone to do this kind of work.

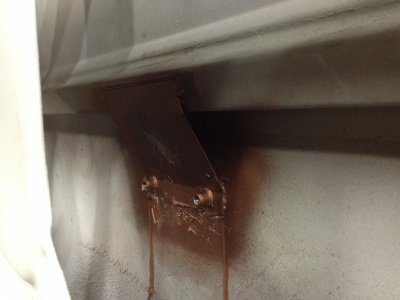
There are also some dents on the roof. I did try to reattach the rear roof support brace a long time ago, but I think its since dropped down again. I'll have to drop the headliner and have a look at it when the time comes. Heck, I may even add another stiffener depending on what I find. I'm pretty sure ex-cab trucks after 1986 had an extra one anyway.

The floors are pretty much mint, which is unheard of for a canadian truck. The PO had undercoating done early in its life and I can't see anything that needs attention.

Oh, and I'll be removing the current windshiled and restoring the lip before sending it to paint. Right now the plan is to send the truck on a rollback with nothing but the rad support and cab still on the frame. That way the painter can get to pretty much everything but the firewall and still move the truck under its own power to get it in and out of the booth.

Removing the cab is not 100% ruled out but I'd rather not take a step down that slippery slope:rolleyes:
 

david85

Full Access Member
Joined
Feb 21, 2008
Posts
4,829
Reaction score
1,093
Location
Campbell River, B.C.
Epoxy on the second door is finished. I also shot the valance while I was at it. Only thing left is the cowling, but that needs some cleanup first.

I also attached some photos of the rest of the truck as it looks today. Note the crack on the extended cab.
 

Attachments

  • IMG_1410.JPG
    IMG_1410.JPG
    310.5 KB · Views: 19
  • IMG_1408.JPG
    IMG_1408.JPG
    460.7 KB · Views: 17
  • IMG_1407.JPG
    IMG_1407.JPG
    300.8 KB · Views: 19
  • IMG_1406.JPG
    IMG_1406.JPG
    638 KB · Views: 18

FORDF250HDXLT

The life of an Indian is like the wings of the air
Supporting Member
Joined
Dec 27, 2009
Posts
6,456
Reaction score
1,127
Location
Maine & Oklahoma
are you going with the same original color or?

lucky you with the solid floorboards.just like my 2wd (never seen winter roads) log truck.just as if it rolled off the assembly line basically.
chip truck not so lucky.iv got a couple holes starting and a slightly tender rad support that i need to get addressed before it spreads.
 

david85

Full Access Member
Joined
Feb 21, 2008
Posts
4,829
Reaction score
1,093
Location
Campbell River, B.C.
are you going with the same original color or?

Nope. Changing it to red/white bar. See post #17 for a photo of one of the actual finished fenders.
Not my truck but this is the idea, only without the white cap
You must be registered for see images attach


lucky you with the solid floorboards.just like my 2wd (never seen winter roads) log truck.just as if it rolled off the assembly line basically.
chip truck not so lucky.iv got a couple holes starting and a slightly tender rad support that i need to get addressed before it spreads.

I drove mine year round but paid attention to areas behind the front tires that wore through the undercoating. I also poured gear oil in many of the hollow areas of the body a few years back and its still caking up dust to this day. Fluid Film is also great for hidden areas prone to rusting from the inside out. It creeps uphill over time.
 

FORDF250HDXLT

The life of an Indian is like the wings of the air
Supporting Member
Joined
Dec 27, 2009
Posts
6,456
Reaction score
1,127
Location
Maine & Oklahoma
oh yeah,sneaky.i did see that and it didn't click it was a different scheme.
http://www.oilburners.net/forums/attachment.php?attachmentid=56387&d=1428390691

that's going to look sharp! is it just the lighting in the paint booth with the white looking cream,or is it really bright white like the guys pic you used for reference above?
either way is great.
edit; oh yeah you state there's a yellow hue to it.i dunno how i missed that whole lower paragraph i guess.my bad.

iv always been a fan of the red/white but yours is going to a step above that when it's done.it's a going to be a bit more classy.
i can envision that whole truck done up pretty well now.there's going to be a lot of dropped jaws on OBN soon.:D
 
Last edited:

david85

Full Access Member
Joined
Feb 21, 2008
Posts
4,829
Reaction score
1,093
Location
Campbell River, B.C.
Honestly, I think my jaw will be the first to drop. The beast has been through a lot, and it shows. I'm not even half way through the resto at this point.
 

david85

Full Access Member
Joined
Feb 21, 2008
Posts
4,829
Reaction score
1,093
Location
Campbell River, B.C.
Caught a second wind late tonight. Remember that dilemma I had about how to re-enforce the door skin behind the lower mirror bracket? It took some thinking but I have a solution. This wasn't my first choice because I wasn't sure if it would make a big enough difference to be worth while.

I made a backing brace out of 16ga steel to make a triangle between the door skin and the 1" stiffener tube. The catch is I had to remove the nutserts that were still good. I tried using my fancy custom made ones, but the the combined thickness of the washer, and two layers of sheet metal proved too much. So I'm using the nutserts as per off the shelf - not mods to them at all. The advantage is they are now very low profile, and since the door skin has a backing plate on the inside, the extra wide flange is no longer necessary.

The plate is zinc coated steel, but I still shot the back side with copper weld through primer before installing it. The inside of the door skin was also treated in the copper before assembly overtop of urethane sealer. Everything is sealed up nice, but it also acts like an adhesive to spread the load a little better. Once both nutserts were properly seated, the top of the plate was tack welded to the stiffener spar to complete the triangle. I was hoping to make a brace that had a wider cross section for guaranteed stiffness, but even like this, it made a big difference and there's no worry of interfering with the door mechanisms. I'll be modding the other door this way tomorrow (er...later today...).
 

Attachments

  • IMG_1412.JPG
    IMG_1412.JPG
    364.2 KB · Views: 18
  • IMG_1411.JPG
    IMG_1411.JPG
    350.4 KB · Views: 21

david85

Full Access Member
Joined
Feb 21, 2008
Posts
4,829
Reaction score
1,093
Location
Campbell River, B.C.
Well, the doors are at the painter now. I'm not sure if I'll get to do the cab on this hitch though. I'm back to work on May 7th, and I need to catch up on other things. I might try and tear off that cracked bondo on the extended cab, but may not be able to do much else.
 

laserjock

Almost there...
Supporting Member
Joined
Nov 20, 2012
Posts
8,841
Reaction score
3,129
Location
Maryland
Stuff looks really nice. Let me warn you about repairing the extended cab stuff. The repair panels are awful. I think the ones I have are Keystone that came from LMC. I haven't posted it yet but I will in my build thread. The thing will look like a jigsaw puzzle once I'm done with it. It's too short back to front and it's too thick at the door post. If you can at all help it, don't cut all the way back to the door gap. -cuss
 
Top