head stud leaking

JSVD

Full Access Member
Joined
Jun 6, 2013
Posts
112
Reaction score
1
Location
Juneau, AK
just fired my truck up for the first time after a headgasket fix.

There's water seeping up from a head bolt.

anyone experience this before? time to pull the head back off?
 

riotwarrior

Supporting Member
Supporting Member
Joined
Sep 19, 2006
Posts
14,778
Reaction score
483
Location
Cawston BC. Canada
Was this an inframe HG repair meaning engine in truck?

Did you clean out all the bolt holes with a tap prior to installing the bolts? Are they bolts or are they Studs there is a big difference?

Did you check the block surface for straightness? How about the heads?

Was all the old gasket material completely cleaned off with a razor or something similar and no remaining contaminant left?

Are you certain that the HG was installed correctly...THIS SIDE UP should be clearly visible and readable,

Lots of questions and not enough info makes bad diagnosis..

Regardless likely has to come apart again sorry to say.

JM2CW

Al
 

icanfixall

Official GMM hand model
Joined
Apr 10, 2005
Posts
25,858
Reaction score
673
Location
West coast
I agree with the above posting. Only reason coolant will leak up from a studs or head bolt is something was left on the head or a damaged head gasket. Please do answer the above questions so we can better help you with this issue. BTW the head bolt holes in the block are a blind drilled hole. they do not enter the water jackets ever. Also the timing meter needs to be shipped back. Others are waiting to use it and your time using it has long expired.
 

JSVD

Full Access Member
Joined
Jun 6, 2013
Posts
112
Reaction score
1
Location
Juneau, AK
thanks for the help. The gaskets were installed correctly, the heads were cleaned and magnafluxed.

We somehow put a scratch on the head transporting it that is in the area of where it's leaking. It's a tiny scratch, we thought it would be fine, but doesn't seem to be.

Sorry about the timing meter.. the end of this project seemed to drag out (and will be dragging out longer). I can pay for whatever extra time we've had it and we can ship it back today.
 

riotwarrior

Supporting Member
Supporting Member
Joined
Sep 19, 2006
Posts
14,778
Reaction score
483
Location
Cawston BC. Canada
thanks for the help. The gaskets were installed correctly, the heads were cleaned and magnafluxed.

We somehow put a scratch on the head transporting it that is in the area of where it's leaking. It's a tiny scratch, we thought it would be fine, but doesn't seem to be.

Sorry about the timing meter.. the end of this project seemed to drag out (and will be dragging out longer). I can pay for whatever extra time we've had it and we can ship it back today.

Still no answer about bottom tapping head bolt holes for one...studs or bolts 2

We need this info...Bottom line a small scratch shouldn't cause a leak, however..small is purely a subjective description...
 

JSVD

Full Access Member
Joined
Jun 6, 2013
Posts
112
Reaction score
1
Location
Juneau, AK
i tapped all the holes with a bottoming tap, and ARP head studs.

I put some sealant on the stud and reinstalled it. Put the overflow line for the rad into a cup of water and it's bubbling pretty bad. I'm pretty sure the scratch is leaking. It's a small scratch, but it was going almost directly from a water passage to the fire ring. Pulling the head tomorrow.

thanks for the help.
 

icanfixall

Official GMM hand model
Joined
Apr 10, 2005
Posts
25,858
Reaction score
673
Location
West coast
I do agree with pulling the had with the scratch in it. When its off the engine please use a honing stone on the scratch to clean off the burr thats been made. Use most any oil on the stone too. After 3 or 4 strokes the scratch will really slow up just how bad it might be. The raised area will be shiny looking and the stone will drag when it cuts down the burr. Compared to any other area you will feel almost no drag from the stone on the surface. For all those reading this post. Please use a honing stone on any cast iron making surfaces. This is a trick I learned so many years ago about metal joining surfaces. This is especially important with any metal to metal surfaces where no gasket is used. Any bur in the sealing surface is like having a washer stuck in their. It raises the surfaces so they can't meet and form a seal. You posted that you have a coolant leak but you have posted that the scratch goes from the fire ring to a coolant passage. Thats not a good thing but it may be an easy fit to by honing the area. Don't run a small honing stone on just that tiny scratch but run it over a wide area. A pocket stone is not what I suggest using. Get one thats about 6 inches long. Norton makes a nice cheap 2 sided stone that works great for many surfaces. It red on the fine side and black on the courser side. Mcmaster Carr or grainger or any good hardware store wil have one. A white Arkansas stone is not a recomended stone. Its too fine a cut. Remember the head and block have a surface finish you want to keep as best you can. A mirror surface is possible but not recommended. The gasket needs to bite into the machined surfaces. Please take a pic of this area so this forum can help you more with this. I don't think JB Weld will help but some Belzone Molecular Metal epoxy will but very expensive for what you need. I wish I was there to see. I may have been able to silver soldier the scratch and hand lap it back to factory but I can't see whats wrong. You might also find the gasket is bad too causing all this. Having 2 helpers lifting the head with any long piece of pipe or wood and you sitting up on the engine guiding it back on the block is a great way to make sure no gasket gets moved or cut. The Warden has a posting showing this idea. It looks lke a great white hunter getting back to camp with a kill strung between a long tree branch. The animal is hanging by its tied leggs from the pole.. As for the meter return please ship it back. We will work out sending you another meter when its needed but someone is really needing it now. Thanks for being understanding too..:thumbsup:
 

JSVD

Full Access Member
Joined
Jun 6, 2013
Posts
112
Reaction score
1
Location
Juneau, AK
I'm planning on taking the head to have it resurfaced. Perhaps i'll look into the stone method. I'll keep you posted, and send the timing meter first thing tomorrow morning.

good idea? bad idea? seems like the jury is out on resurfacing 6.9 heads... but both machinists I talked to said that it's not hard at all.

is there anything that goes with resurfacing (adjusting the valves?) or once it's done can I put it back on?
 
Last edited:

riotwarrior

Supporting Member
Supporting Member
Joined
Sep 19, 2006
Posts
14,778
Reaction score
483
Location
Cawston BC. Canada
Gary has the Minimum thickness of head from deck to valve cover gasket surface.

Going below that is not good. I prefer a ground head as opposed to a cut head myself.

Some head mills use cutters some use large grinding stones, having worked with a stone mill I prefer it as it produces a much better result IMHO.

Precups are harder than heads and may require a separate machining process. They are spec'd to 0.002 + - above below head surface no more.

JM2CW

Al
 

JSVD

Full Access Member
Joined
Jun 6, 2013
Posts
112
Reaction score
1
Location
Juneau, AK
pulling it today and its 20 degrees outside... thankfully all these bolts are nice and easy to crack ;Sweet. We're also living in this truck... thankfully it has a wood burning stove in it...

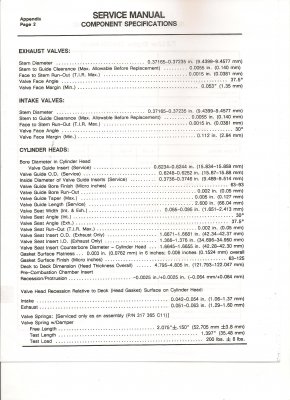
Gary, can you give me the minimum clearance? Hoping to have the heads at the machinist Monday so we can get them back before thanksgiving. They magnafluxed fine before the scratch, so I’m hoping it's not so deep and they only really have to skim the surface.

I thought they pull the precups out, grind the heads, recess the holes for the precups the same amount they ground the heads, and then put the precups back in?

Any and all information is good... as the machinist does not have much IDI experience. If it's crucial to use a machinist with experience we can take the head to Portland Engine Rebuilders... But that means a lot of driving in another old and limping IDI ( '82 isuzu P'up).

Never done this before (and if i ever do it again.. any scratch on the head is being machined out) so i really appreciate all the help.
 
Last edited:

TahoeTom

Supporting Member
Supporting Member
Joined
May 19, 2010
Posts
749
Reaction score
113
Location
S. Lake Tahoe, CA
Here you go. Good luck working in those temperatures. You are tougher than me. Necessity is a great motivator.
 

Attachments

  • Image (10).jpg
    Image (10).jpg
    508 KB · Views: 81

icanfixall

Official GMM hand model
Joined
Apr 10, 2005
Posts
25,858
Reaction score
673
Location
West coast
Everything posted above in the specs is what I have. So far nobody has been able to explain the minimum head thickness of 4.795. If the valves are set into the seats its the same deal from contacting the pistons. A hydraulic lifter can compinsate for a 5 thousands thinner head easily. So whats wrong with a head thats milled under the min of 4.795. I can't see anything. Please try to get a pic of the head scratch and the block area where this leak is. I really can't fathom a scratch causing a coolant leak but it is what it is with your engine. If then you install the intake manifold and its not fitting because the head is closer to the other head you can open up the bolt holes in the manifold safely. The head to manifold port mismatch will not cause any air flow issues. We are not turning 8500 rpm and at 3500 rpm the bumps will not harm the air flow thru the heads at all. It is nice to have matched ports with no interruptions to flow but we do what we do to run these simple engines. Reasons for all my porting and matching a test to see what this or that was going to do hp, torque and mpg was going to do. A lot of little improvements makes for a large improvement overall.
 

JSVD

Full Access Member
Joined
Jun 6, 2013
Posts
112
Reaction score
1
Location
Juneau, AK
i believe i read somewhere it has something to do with the length of the pushrod. I believe you could grind a lot more with shorter pushrods.

Edit: Found the post

Gary, the min max thickness has quite a bit to do with valve train geometry actually. As well depth of valve does when head is within those specs.

Milling head surface brings that surface closer to rocker shaft mounting boss, this then changes how the valves and rocker arms and pushrods function. You could I suppose SHIM rocker stands, however I don't see this as a feasible method myself shorter pushrods would be!

We already have issues with guide wear for what ever reason, these specs affect where the rocker contacts the valve stem tip and how much thrust is put on it as well.

Now for me after seeing the guide I have, if I can ever get to where I can afford it, I'll have ROLLER rockers made cause that will eliminate the side-ward thrust imparted by rockers on valve stem once and for all.

I hope this makes sense I'd draw pictures but I suck at drawing I'm sure if you do some digging on the net you'll find info on what I mean!

It really comes down to geometry and if you mill enough off the heads you will need shorter pushrods to compensate for that removal of material.

JM2CW

Al

I'll get some photos once the head is off... perhaps it is just the gasket. We'll see in about 2 hours!
 

bbjordan

Snow Monkey
Joined
Feb 24, 2011
Posts
1,421
Reaction score
393
Location
Ashern Manitoba
Question: why bother to mill the pre-cups? Why not just pop them out and end-mill the ledges that the pre-cups sit on the same amount as taken off the the head?
 

JSVD

Full Access Member
Joined
Jun 6, 2013
Posts
112
Reaction score
1
Location
Juneau, AK
got the vally pan off.. about to pull the head. Is the RTV around the coolant passages necessary? A good bit got into the passages... one is just about clogged. I suppose i put to much on there. Why are there coolant passages getting deadheaded directly into the valley pan/intake manifold?
 

Forum statistics

Threads
91,348
Posts
1,130,808
Members
24,147
Latest member
Alleycat

Members online

Top