89 CC build thread Frame off resto!! - Bad Idea

junk

Full Access Member
Joined
May 25, 2006
Posts
1,773
Reaction score
63
Location
Paullina, IA
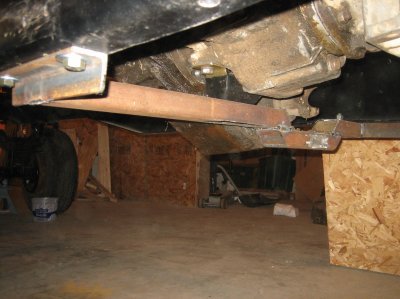
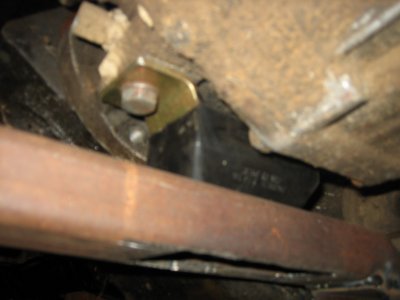
Ok I finished up the transmission crossmember last weekend. I'm just getting around to posting pictures. Before anyone gets too worried about it being bolted to the bottom of the frame I've done a couple transmission mounts this way and have never had a problem. I would have preferred it to fit in the frame like the factory one, but with the US gear I've had troubles getting the xfercase and use gear jacked up high enough to get the crossmember out. I used an energy suspension transmission mount to go between the US gear and the mount. Mount needs to come back out now and get cleaned up and painted.

Next I need to pull the transmissions and start cleaning them up for paint. I also need to reseal the NP205 before putting it back in.

I also have all the brake parts ordered to get the brakes plumbed back up. I ended up buying some 18" braided stainless lines that are AN-4 on each end to go to the calipers and rear end. I'll post pictures as I install it.

Question for everyone Since I'll have the engine out and good access to the pan and rear main. Should I put in a new pan gasket and rear main? They appear to be pretty dry. I put this engine in as a drop in replacement in 98 and it has about 70K on it. So what brand or style of pan gasket should I use? Seemse like a no brainer to replace them.

Also on the fuel tank mounts was a padding or rubber type sheet that went between the mount and the tank. What could I use to replace that? I'm thinking either a wide self adhesive weather stripping or a butyl rubber strip?

Next is to paint up the tie rods, fuel tank straps, front cab mounts and other misc. stuff.

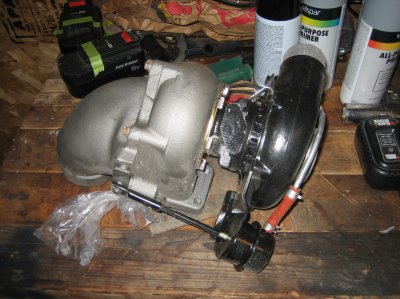
Oh, also I pulled the turbo out of the box and thought I would show that. I'ts a factory ford with the ATS housing. I had it rebuilt a couple years ago as I thought this project would go much quicker than it has!!;Sweet

I keep plugging along. I've always had a problem with project monogamy, but am trying my darndest to stay on task with this one.
 

Attachments

  • IMG_8216.jpg
    IMG_8216.jpg
    558.5 KB · Views: 80
  • IMG_8220.JPG
    IMG_8220.JPG
    910.3 KB · Views: 68
  • IMG_8212.jpg
    IMG_8212.jpg
    612.7 KB · Views: 98

junk

Full Access Member
Joined
May 25, 2006
Posts
1,773
Reaction score
63
Location
Paullina, IA
Well I need to post some pictures, but I'm making progress. Transmissions are painted, Steering tie rods are painted and installed, fuel tanks and straps are painted and getting ready for reinstall. Currently putting the fuel lines, break lines and wiring back on. Then I'm getting the engine reinstalled, but I need to reseal the pan, oil cooler and crank seals.

I'll try to get some pictures up tomorrow.
 

GOOSE

Happy IDI'er
Joined
Jun 5, 2009
Posts
3,514
Reaction score
315
Location
Galloway Twp, NJ, USA
DO NOT use an oil pan gasket. I learned this the hard way. Ford/IH doesn not use them either. I used Permatex black and torqued to factory specs. The only time I used a gasket, it leaked like a siive.:backoff The inasallation was done on an engine stand so I know it was right. I couldn't believe how bad it leaked right out of the gate:eek:
 

seawalkersee

It needs a turbo...
Joined
Mar 28, 2008
Posts
1,467
Reaction score
1
Location
KCMO
I used the cooler, intake, rear seal, and valve cover gaskets. The rest of them are silicone. The best RTV I have found is some junk called "The right stuff" Russ and Gary seem to like the grey stuff other than the black. I use grey on the water gasket and front cover and it works.

SWS
 

junk

Full Access Member
Joined
May 25, 2006
Posts
1,773
Reaction score
63
Location
Paullina, IA
No pictures to post of the progress yet, but this weekend I'll try to get decent pictures and update this thread. Frame and drivetrain is mostly done. I need to finish cleaning up the wiring and I painted and hung all the transmissions & transfercase. Engine has been test run pre-turbo instal. Fuel lines are all installed. Stainless brake line kit is installed. Now onto the cab.

For the cab I just bought a bunch of Lizard skin to sound and thermal deaden the interior. Hopefully I made a good choice. www.lizardskin.com

Thanks,
Jeremy
 

seawalkersee

It needs a turbo...
Joined
Mar 28, 2008
Posts
1,467
Reaction score
1
Location
KCMO
I have not heard anything bad about the lizard skin product. I have seen a few places use it, but most of them were also selling it.

SWS
 

junk

Full Access Member
Joined
May 25, 2006
Posts
1,773
Reaction score
63
Location
Paullina, IA
Yeah, everybody swears by the stuff, but there are a lot of guys selling it also. Lizard skin must be pretty simple to be a dealer for. Well hopefully in a month or two I'll have it all applied.

It's absolutely frustrating to me this project is taking this long, but with the wife, kids, house projects, keeping the daily drivers repaired, owning an acreage I have plenty taking focus from the truck project.

Over the holiday's I'll be working on getting pictures of current progress. And hopefully getting the dash out of the cab, rust repaired and getting it ready for lizard skin and paint.
 

junk

Full Access Member
Joined
May 25, 2006
Posts
1,773
Reaction score
63
Location
Paullina, IA
You must be registered for see images attach

I gotta do some repair to this top fender mount. I'm guessing this truck has a few miles on her. I don't know if it's clear, but that mount is darn near cracked off. The welded areas are all broken loose.
You must be registered for see images attach

Bottom Fender mount came off with the fender. I'll have to clean this up and weld it back on.
You must be registered for see images attach

This is where the bottom fender mount should be versus in my hand.
You must be registered for see images attach

Both rear cab corners look like this. Not too bad, but they'll take some time to rebuild. I'm going to look for patches in the usual places, but if anyone has some recommended places to buy them I'm all ears.
You must be registered for see images attach

Drivers floor has a hole here along this seam. Here again nothing too bad, but I'll have to patch it up.
You must be registered for see images attach

I'm not done going through the wiring yet, but this is the E40d plugs I pulled out of my harness. With any luck it will still start. :sly Not too worried or I wouldn't have done it.

Over the next couple months I'll get the cab fixed up and then get it ready for paint.
 

junk

Full Access Member
Joined
May 25, 2006
Posts
1,773
Reaction score
63
Location
Paullina, IA
You must be registered for see images attach

This 5th wheel hitch has been on the truck since I bought it. There is a lot of weld there. They took a piece of 1/2" plate and put it on top of the frame and then put a piece of 1/4" channel over that. Frustrating thing about this is the frame is powdercoated along with this plate. Clearly the powder was thin hear. I'll touch it up with paint before I put a box on, but the powder coated frame rusting like that is frustrating.
You must be registered for see images attach

View down through the ball mount hole showing the 1/4" and 1/2" plate.
You must be registered for see images attach

This is the turbo supply line. I used an-4 stainless line to run the oil supply. It looks a little tight so I'm planning to put a 45 degree adapter straight out of the oil feed housing on the turbo to ease the bends. The piece on my turbo is part of the factory turbo system. I didn't use the hard line. As you can see I'm planning to put my oil sender up on the turbo versus down by the bell housing.
You must be registered for see images attach

This shows the inside of passenger side frame rail where I extended the frame some and put ford excursion sprint mounts on to accept the ford superduty springs.
You must be registered for see images attach

This shows the outside of the drivers side frame rail with how I plated down the side of the frame.

Everything is dirty in these pictures. I'll have to clean everything up good before putting the body back on.
 

junk

Full Access Member
Joined
May 25, 2006
Posts
1,773
Reaction score
63
Location
Paullina, IA
Doesn't look like much, but I did make some decent progress today on the wiring. All splices were soldered and covered with heat shrink.

You must be registered for see images attach

This harness is the one that runs from the cab around the front to the passenger side. It was amazing how much stuff ran through this for the e40d transmission.
You must be registered for see images attach

This is the harness I made to that goes to the reverse light switch, VSS on the speedo cable and the US gear. I need to put loom on it and a plug for the 12awg US gear wires and this one is ready to go.
You must be registered for see images attach

This picture shows my glow plug relay and wiring. I bought a U-haul glow plug harness for a S1600 truck. I flipped the glow plug relay on the bracket so that the S1600 glowplug harness fit. I ran the wires from the drivers bank under the throttle cable bracket and then to the stud on the glow plug relay. Seems to fit well.
You must be registered for see images attach

All of this wiring goes to the injection pump and cold idle sensor. Seems like a lot of stuff for a small area.
You must be registered for see images attach

This is the injection pump wiring that I removed from the S1600 glowplug harness. I think this is going to get modified and used to replace all the BS that ford put on for the Injection pump. And all these connectors are new.

I also installed the oil line 45 degree fitting making the oil supply a little less tight.

I was short a couple hanger bearing bolts and blind nuts or I would have installed the driveshafts tonight also.
 

lotzagoodstuff

Supporting Member
Supporting Member
Joined
May 19, 2007
Posts
2,728
Reaction score
673
Location
Carmel, IN
You must be registered for see images attach

This shows the inside of passenger side frame rail where I extended the frame some and put ford excursion sprint mounts on to accept the ford superduty springs.
You must be registered for see images attach

This shows the outside of the drivers side frame rail with how I plated down the side of the frame.

Everything is dirty in these pictures. I'll have to clean everything up good before putting the body back on.

Very cool frame work and suspension mods ;Sweet

Keep going, you're getting closer!
 

junk

Full Access Member
Joined
May 25, 2006
Posts
1,773
Reaction score
63
Location
Paullina, IA
Yeah I'm getting interested in this again. I lost interest in this for a while cause it's such a big project. I'm starting to hit the end of the heavy fab/thinking stuff. Once I get into the cab and body work it should be pretty straight forward as I'm not doing any heavy modifications to the body. Well I don't count a 95 clip swap heavy mods.

I am going to install the keyless entry keypad from a 2000 explorer in my drivers door though. I already have the ford explorer keyless entry installed on my power locks.

Oh and I'm thinking about doing the 98-2003 or around those years dodge tow mirror swap to my front doors. I really like the look of those mirrors on these trucks.

Worst thing is I started this project probably 2-3 years early. I didn't have my shop heated or with decent concrete so it was hard to work in and I couldn't work year round. This will be the second winter I've had heat. I also wasn't planning for the expense of this project so I kept having to wait on parts. Now I got cash flow planned for this and for the most part can keep it rolling. Money and time are matching up pretty well now. ;Sweet

I'll keep plugging along and post updates as I have them. Lots of stuff getting done, but nothing that seems likes a lot of progress.
 

hesutton

The Anti-Anderson
Supporting Member
Joined
Aug 19, 2005
Posts
8,200
Reaction score
738
Location
Bowling Green, KY
Hang in there man. You are right, it's a really big project, but one worth doing. I love a good project and my frame off resto on the '86 F250 took forever. But, when it was done, I've driven it everyday since. I love it and it will always be my truck. This project will always be your truck as well.

Keep up the good work, and keep us up to date.

Heath
 

Latest posts

Forum statistics

Threads
91,292
Posts
1,129,832
Members
24,106
Latest member
lewisstevey7
Top