Turbo time thanks to head gasket leak

PwrSmoke

Full Access Member
Joined
Jan 2, 2007
Posts
807
Reaction score
22
Location
Northwest Ohio
... Yeah and then he told me about how "suddenly" FOrd comes up with this great idea after they had torn the sheets!
 

BioFarmer93

OPEC Hater
Joined
Sep 19, 2009
Posts
687
Reaction score
26
Location
Jacksonville, Florida
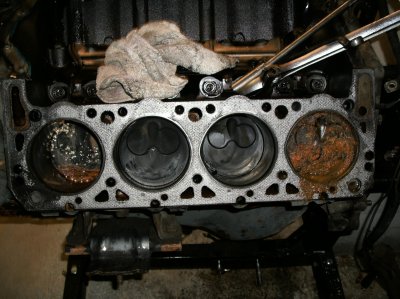
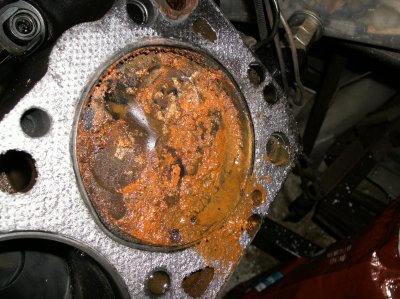
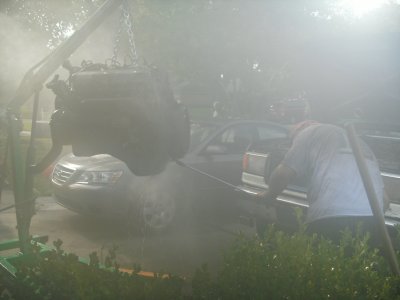
Well, it's been quite a while since I gave an update on the progress.. I rented a hoist from a local place and pulled the engine, only needed to pull out my pretty new radiator, the front clip stayed in place and presented no problems. PS pump, A/C comp and vacuum pump were pulled out of the way and held with wires/zip ties. I de-greased and pressure washed it while it was hanging on the hoist. The hoist was in my driveway for less than 36 hrs. but I still managed to get a nasty letter from the HOA about it. I tore down the engine and was pretty upset about what I found- rust and water in three cylinders, 2-7-8. I honed a little to get an idea what I was dealing with and became upset all over again. 7 and 8 had already been sleeved, but 7 has a low area in it that I can not figure, the hone stones never even touched it. I removed all of the rings and cleaned the pistons, taking care to get all of the crud out of the ring grooves. Only two of them had any side to side slop on the wrist pins. No cracks or hole elongation was observed. Pistons were measured and determined to be stock size, and no scuffing was noted. 3 rod bearings and 4 hydraulic lifters had some very minor scuffing. As all of the bores are at, or just over the max for stock pistons, I am thinking that the best way to go is to just sleeve all of the cylinders with the thick wall (1/8") sleeves. I admit I was surprised to see that they came in 3/32" and 1/8" thicknesses (i.d. is the same for both). My thinking on this is such; pistons are good so re-use ($100 a piece, new), sleeve install is $130 a hole, but will give me (supposedly) at least another 150,000 miles and eliminate cavitation worries. Henry has 278,000 miles on him (110,000 of which are mine) and the PO had never heard of cavitation or run anything but plain green antifreeze, even after having 7 and 8 sleeved. I have just over $1000 saved up for the sleeving, but need a little bit more as I'm going to have him line bored as well.. Here are a couple of photos of the cleaning and carnage.
 

Attachments

  • GEDC0077.jpg
    GEDC0077.jpg
    792.8 KB · Views: 44
  • GEDC0079.jpg
    GEDC0079.jpg
    976.5 KB · Views: 45
  • GEDC0071.JPG
    GEDC0071.JPG
    628.6 KB · Views: 42

stealth13777

Full Access Member
Joined
May 28, 2014
Posts
493
Reaction score
37
Location
Jacksonville, FL
I'm sure the people complaining on that hoa don't even know how to check their oil. People nowadays.. I get the want to prevent junk vehicles and all that to keep home values up, but that's a little ridiculous. Mini rant over

That's not the most fun thing to find pulling an engine apart, but the plan of attack you have sounds great imo. Good luck with it.


Sent from my iPhone using Tapatalk
 

icanfixall

Official GMM hand model
Joined
Apr 10, 2005
Posts
25,858
Reaction score
673
Location
West coast
Sad seeing water in the cylinders but nice pics showing the plugged coolant passages in the lower corners of the block.
 

BioFarmer93

OPEC Hater
Joined
Sep 19, 2009
Posts
687
Reaction score
26
Location
Jacksonville, Florida
Sad seeing water in the cylinders but nice pics showing the plugged coolant passages in the lower corners of the block.

Yes- and speaking of that.. When I start to re-assemble, is there anything in the way of prep work I should do to the raw edges of the new holes I have to make in the head gaskets for the improved cooling? (removing those plugs) Like a thin film of high temp RTV or Permatex copper spray? I assume that we don't want the gasket material to become saturated with coolant.. Thoughts?
 

icanfixall

Official GMM hand model
Joined
Apr 10, 2005
Posts
25,858
Reaction score
673
Location
West coast
Those plugs don't need to be completely removed if you plan opening them up like is the way the 6.9 head gaskets are. I suggest getting a 6.9 head gasket and copying the size holes that are made in them in these areas. Be aware you have to open the same size holes in the block and head plugs. Just opening the holes in the block will not make coolant flow into the head. Here is the 6.9 head gasket design.
You must be registered for see images attach

BTW that last pic is a punched out piece of the head gasket that did not completely come out of the gasket. Look close to insure all passages are clear.
 

BioFarmer93

OPEC Hater
Joined
Sep 19, 2009
Posts
687
Reaction score
26
Location
Jacksonville, Florida
Wow, this is taking forever.. So I am making a very tardy update. When I got the block back from the machine shop with 8 shiny new sleeves in it, it sat hermetically sealed in plastic wrap for 2-1/2 months while I again saved up money for fresh lifters and piston rings. Those were the last of the "expensive" things, there have been more nickel and dime parts and pieces acquired since then, but until I start plumbing the exhaust that should be it for a while. All bolt holes in the block were chased and cleaned, ARP studs installed, rear (plugged) coolant passages in block and heads were holed with a sharpened center punch, head gaskets were modded also to same diameter holes and edges sealed with black RTV. Heads were installed and over torqued to 140 ft lbs. -based on research by Justin at R&D. They can safely be taken to 160 ft. lbs., but I don't race and my torque wrench only goes to 150 ft. lbs., so... New hardware was installed on the oil pressure tap at the back of the block to accept turbo oiling hoses. The oil pan was drilled and a bung welded on for oil return, a new mechanical (OE) fuel pump will assist that task since it hasn't been used in years for pumping fuel. Since I don't use the stock fuel filter head and like the ability to view the contents of my return lines, I have used 3/16" Tygon for all returns to the back of the engine, from that point to the FSV, all is stock. Today the front plate with water pump and new front seal gets installed, also the harmonic balancer (if I can find it). I don't know how to rig something to get the oil cooler apart, and that is the last major thing left to do in this adventure.. I have the new O-rings for it but I suppose it will be one of those things that will have to be farmed out. That brings me up to date on progress. I've included some photos for your viewing pleasure..
You must be registered for see images attach
 

icanfixall

Official GMM hand model
Joined
Apr 10, 2005
Posts
25,858
Reaction score
673
Location
West coast
Great pics of what you have done. Thanks for the pic showing the passenger side of the air intake and the firing order. That will help many actually see what many have talked about.
Taking apart the oil cooler is easy. Use some oil on the outside o ring and anything to lever the bundle out of the headers. Just be careful not to damage the aluminum housing lip. Going back together is even easier. A couple of 2x4 or 2x6 blocks and a pipe clamp similar to a Bessey clamp used for clamping wood panels together. They can be found in any hardware store. Use the wood blocks to protect the bundle end and the housing end. Care needs to be done when fitting the headers on the bundle. Its a very close fit. Do a test fit without o rings just so you know what it feels like. Then install o rings and squeeze it together one header at a time.
 

TahoeTom

Supporting Member
Supporting Member
Joined
May 19, 2010
Posts
749
Reaction score
113
Location
S. Lake Tahoe, CA
Good looking engine. Depending on where you mount your turbo you may want to reroute the return line that is behind the intake. I think factory turbos dead ended the #7 return and ran across between banks in front of the intake. The Hypermax kit had a long length of fuel line to run from #7 to #8 in front of the intake.
 

laserjock

Almost there...
Supporting Member
Joined
Nov 20, 2012
Posts
8,841
Reaction score
3,130
Location
Maryland
Ooooooo twin remotes???? That sounds interesting. Question, did you just clean and paint your manifolds or is that metal that's been cleared or something? Looks like silver paint (and nicely done btw).
 

BioFarmer93

OPEC Hater
Joined
Sep 19, 2009
Posts
687
Reaction score
26
Location
Jacksonville, Florida
Thanks, man.. The intake was initially washed with mineral spirits to get as much crud as possible off of it, then blasted in my homemade Redneck Approved Visqueen & plate glass blast cabi- er, area. Then it was sprayed with high temp silver & high temp clear gloss, compliments of the NAPA rattle can selection..
 

Latest posts

Forum statistics

Threads
91,301
Posts
1,129,947
Members
24,110
Latest member
Lance

Members online

Top