Stabbin Cabin build-log

ironworker40

NYC Ironworker
Joined
Dec 16, 2013
Posts
939
Reaction score
19
Location
nj
and without question, my favorite so far!!!
Thats a real beauty there

" I've been to Janesville, Maine, Spain, Spokane, and Fort Wayne, seen three world fairs, been around the world twice, looked danger in the face, and seen goats f**k in the marketplace, but I ain't never seen no **** like the **** that!"
 

junk

Full Access Member
Joined
May 25, 2006
Posts
1,773
Reaction score
63
Location
Paullina, IA
Look on here for a guy named Jaybee. He put a zf6 behind an idi. Lots of good info there. May help with clutch options and getting the top flange bolted up.

Pretty sweet van overall even with the great previous owner.
 

scphantm

Registered User
Joined
Jan 12, 2015
Posts
21
Reaction score
0
Location
United States
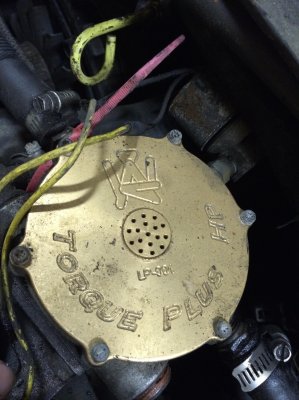
anyone recognize this logo? im trying to track down a manual for this propane injector before i rip it out.
 

Attachments

  • IMG_4153.jpg
    IMG_4153.jpg
    637.2 KB · Views: 69

scphantm

Registered User
Joined
Jan 12, 2015
Posts
21
Reaction score
0
Location
United States
I found JayBee's post, here it is

Ok, I am still getting occasional requests for info on how to do this swap, so I'll make a post with all the info I can remember on how to do it. It's been almost 2 years since I did it, so please excuse anything I forget to mention.

I now have about 20,000 miles on the truck with the conversion, and could not be happier. My only complaint in that time was with the ceramic puck style clutch disk I used. I have since replaced it with a conventional LUK disk and love it! There will be more on this to follow.

First of all, you have to remove the approximately 1" thick adapter plate the IDI's use in order to get the clutch and flywheel spacing correct. In other words, the bellhousing on the ZF6 is deeper and the input shaft is shorter, so the spacer has to go. The 7.3 powerstrokes have a different bellhousing bolt pattern cast into the block compared to the IDI. The good news is the 2 dowel pins, and 4 lower bolts do match up. The upper 2 bolts are the only difference. I made a stepped adapter to go from the upper 2 bolts on the IDI block to the upper 2 bolts on the ZF6. It was 2 pieces of 1/2" x 2" flat steel bar overlapped and welded together, making sure both bars were parallel after welding. The lower bar bolts to the upper holes in the block, and the upper bar sits behind it and has the upper 2 holes tapped for the tranny bolts. That makes the front face of the upper part of the adapter flush with the rest of the bellhousing in the block. I bought the stock tranny dust plate for a '99 and had to cut a little clearance into it for the adapter.

The next big hurdle is the clutch. The ZF6 has a 1.375" input shaft, and the smallest disk you can find with that spline is going to be 13" diameter. A 13" disk will not fit under any pressure plate that fits an IDI flywheel. My first way around this was to use a custom made 12.25" disk with the 1.375" spline and 4 ceramic pucks per side. This disk turned out to be miserable! The more you tried to slip it, the harder it grabbed sending the truck into convulsions. Backing up to a trailer was virtually impossible. So, I recently went a different route.

I had already used a LUK solid flywheel, so I pulled it back out and redrilled it for a LUK 13" PSD pressure plate. I now have the LUK pressure plate and disk for a '99 PSD and it works great. It reduced the pedal effort, virtually eliminated the gear rollover noise, and is very smooth. This is definitely the way to go. Oh, and you can't use a LUK flywheel for a PSD because they have a different bolt pattern on the crankshaft.

The clutch hydraulics weren't too bad, but not a simple bolt together deal, either. I used the correct master cylinder for my year truck. I used a slave cylinder for a '99 ZF6. The fork, pivot, and throwout bearing were all for a ZF6. The only real problem was trying to come up with a clutch hose that would work. I ended up making adapters that fit into the clutch and slave with a -3 AN on the other end. I then made a stainless steel braided hose to connect them. Bleeding was the typical pain, but it has worked great ever since.

The shifter ended up in exactly the same spot as a ZF5, so the tranny tunnel cover for a manual and boot all bolted up fine. I made my own cross member for the back of the tranny by heavily modifying the one that was in my truck with the E4OD. You might be able to bolt in a cross member from a '99 ZF6 - I'm not sure - was too cheap to buy one.

Of course you'll have to visit a driveshaft shop and get yours modified or a new one made. I also went to a '99 E350 disc brake rear axle at the same time, and had an all new driveshaft built to fit.

The ZF6 does not have a speedo drive gear. This is where a '92 up truck has the advantage. I used a speedo from the '92 up truck and made it fit inside my cluster with some slight customization. The '92 up speedo is all electronic, and I was able to drive it from the sensor on the rear axle.

The 7.3 IDI starter bolts directly into the bellhousing of the ZF6 and works fine. The bellhousing lower cover for the '99 bolted right up.

Oh, I did have to bend the floor of the truck up just a little bit for clearance, but it's under the seat and totally unnoticable.

I think that about covers it... If I remember anything else I'll reply to this post. If anyone wants a flywheel redrilled I could probably take care of that part of the conversion for them.

Jason

I do believe i will be able to pull this off. Once i get the tranny out (next summer) i can see what was done under there and do this mod to it. I like the idea of using stock parts rather than tractor parts. And i have a machinist that can pull that off as well.

As for the adaptor for the top two bolts, hell im sitting in a full blown blacksmith shop. i think we can pull that off without much trouble.

For the clutch line, well, he ran the line against the exhaust pipe from the manifolds all the way back, so i planned on rebuilding that setup anyways to bring it under the cab and over. so i should be good.

Sounds like for me it won't be such a huge deal to fix it right. Then get a new drive shaft of course.
 

scphantm

Registered User
Joined
Jan 12, 2015
Posts
21
Reaction score
0
Location
United States
i just finished measuring. its official. I have pulled more lamp cord out of this van today than exists in my dads entire house. And im not done pulling.

Pops took pitty on me watching yesterday with a drill, hammer and chisel trying to cut out that floor so today he brought home his air chisel. That certainly sped things up. (more pics tomorrow. it was too dark)

Once i got the floor out in the very back, i realized i was in way more trouble than expected. The way these things were built, the side panel comes down and turns in about an inch at floor level. then the rocker comes up to that point and rolls in at floor level, then the floor welds to that lip that is formed. Then the primary support pillar goes thru the floor and ties into the body cross member with a gusset plate.

So what i have, the rocker and side panel lips have rotted completely away, there is nothing left but a flat inside panel at the seam. the only thing holding the rockers on in the back is about half an inch of bondo. then since the rocker rotted away, it took the skin side of the gusset plates with it, leaving all the weight of that corner of the body resting on the very end of the crossmember. The part that was never intended to support the weight. the crossmember caved and the whole corner of the body fell by about 3/8 of an inch from best i can tell.

The gusset plates are easy enough to fab. just big triangles. but the ***** is the floor lip. I was hoping i could do this without having to put quarters and rockers on this thing but that now looks impossible. without them, i have nothing to weld the floor to.

so when it hit time to stop the noisy stuff to avoid ******* off the neighbors, i moved my attention to the dash and cab. i pulled the carpet out and found a piece of diamond plate aluminum. the moment i saw that, i was very happy i ordered new floor panels. pulled the diamond plate up and low and behold, i saw concrete. Looks like i was right and this is going to be a firewall to back door floor replacement.

i started ripping the dash out, wire everywhere. i mean everywhere. There was this really nice oak headboard thing above the dash. I don't want pretty things in this so i try to take it down. turns out it was screwed into the headliner chip board with two drywall screws. frighteningly easy to pull out. thats gone.

ripped out TONS of wires. No clue what any of it went too, don't care. its gone now. Once i get my 12v power supply up on it i will start working thru the stupid thing system by system and getting it all going again. in the mean time, its GONE.

In the process of pulling the speedo cable out (new speedo is electronic), i slid under the thing. I have some plumbing to do. Im not sure what some of these lines are, but there are a whole series of 3/8 soft copper lines running along the frame to the back. I didn't track them down yet, but my gut is telling me they are fuel lines because right in the same general area, was a disconnected fuel line. Now i never had a serious problem with running copper like that, but the issue is he never fastened them down. he just zip tied them to the steel emergency brake cable. in just about 18 inches that i looked at, the copper was worn badly in 2 spots. So once i have the floor out, i am going to track down all these lines and run them correctly. If they are fuel, i will grab some steel lines and run them right.

Oh well, more pics to come tomorrow.
 

Sir AxleRod

Full Access Member
Joined
Dec 15, 2014
Posts
55
Reaction score
0
Location
Osburn, ID 838349
and without question, my favorite so far!!!

I've got a $1 that says he did that more to circumvent the hub-centric out-put of that t-case.... My Expy has a vibration due to 6 states fu**ing up the shaft 3 out of 3 times, with the Hub centric coupler given to them, 3 out of three times.
 

Sir AxleRod

Full Access Member
Joined
Dec 15, 2014
Posts
55
Reaction score
0
Location
Osburn, ID 838349
I will say this about the ZF-6... It's my absolute favorite tranny, ever. In fact, it's so good, GM used it for the Duramax manual option.
 

scphantm

Registered User
Joined
Jan 12, 2015
Posts
21
Reaction score
0
Location
United States
I've got a $1 that says he did that more to circumvent the hub-centric out-put of that t-case.... My Expy has a vibration due to 6 states fu**ing up the shaft 3 out of 3 times, with the Hub centric coupler given to them, 3 out of three times.

LOL, could be. right now my money is he measured the shaft with the front wheels in the air. then when it was on all 4's, it was too short.
can ya guess how i know that little trick?
 

Greg5OH

Full Access Member
Joined
May 14, 2011
Posts
2,373
Reaction score
42
Location
MI
IDIot, damn thats wha ti coudl have used exactly when i was doing my new body bushings! instead i paid liek 180 for my kit, and had ot make my own sleeves anbd source my own washers. grrr...that kit is so perfect!
 

laserjock

Almost there...
Supporting Member
Joined
Nov 20, 2012
Posts
8,841
Reaction score
3,130
Location
Maryland
and without question, my favorite so far!!!

Wow.... good thing that IDI isn't a torque monster. Really wow is all I have.

Your PO must have been quite the engineer. I thought I had some messes to deal with. Good luck man is all I can say.
 

IDIoit

MachinistFabricator
Supporting Member
Joined
Aug 26, 2014
Posts
13,324
Reaction score
3,897
Location
commiefornia
IDIot, damn thats wha ti coudl have used exactly when i was doing my new body bushings! instead i paid liek 180 for my kit, and had ot make my own sleeves anbd source my own washers. grrr...that kit is so perfect!

sorry man! ill inform ya better next time! lol
perhaps it should go into the parts bin
 

scphantm

Registered User
Joined
Jan 12, 2015
Posts
21
Reaction score
0
Location
United States
my dad just gave me a bad ass idea. from right in front of the wheel well, all the way back to the last post, im going to cut the entire side out of the van and build in outside and inside facing tool boxes. build all the strength and structure i need right into the boxes and eliminate the quarters all together. we are on our way to pick up some plywood to do a mockup with, i will post some drawings and pics when i get them ready
 

scphantm

Registered User
Joined
Jan 12, 2015
Posts
21
Reaction score
0
Location
United States
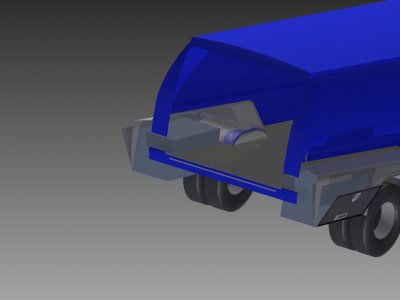
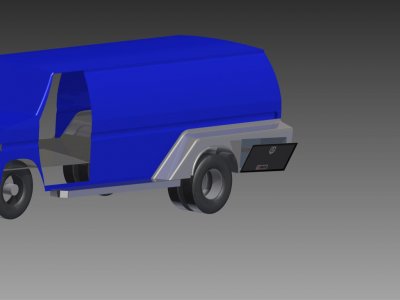
Well, instead of spending the day chopping, i spent it measuring. My dad had a kick ass idea that i ran with. Since i have to rebuild all the structure in the back half of this van, especially since half of it has already collapsed. Why not do something unique with it. We can't find most of the parts we need anyways so all the gussets and brackets would have been fabricated. So this is what dad suggested and i refined it a bit. The boxes are 36 inch tractor supply under bed boxes. I took a rolled edge trailer fender, widened it to about 23 inches and put those in. then designed the big fairing to pull it all together. As strange as it sounds, this will actually be far easier to fabricate than it would be to hang new quarters and rockers on this beast.

the model has a ton more to figure out, and its not intended to be blueprints, im trying to get things within about a half inch on the model and its pretty close to being there.

what do you think?
 

Attachments

  • Render 1.jpg
    Render 1.jpg
    34 KB · Views: 14
  • Render 2.jpg
    Render 2.jpg
    33.7 KB · Views: 12

DOE-SST

1994 E350
Joined
Apr 17, 2010
Posts
318
Reaction score
22
Location
USA
You should make part of that wheel well repair a clear polycarbonate window, to remind observant passengers back there that they're indeed riding in a dually...

What is it about vans and Great Stuff?

I insulated all my vans, using Great-Stuff and sheet foam. Makes them a lot easier to heat and cool, seriously reduces road noise, and when camping, I can use candles to keep the sleeping area warm during 20f nights. Also, it prevents a dark colored van in the SW desert from turning into an oven when the temp hits 104f.
 

Forum statistics

Threads
91,304
Posts
1,129,977
Members
24,110
Latest member
Lance

Members online

Top