Some additional thoughts. (Ditto on rodents.) I have never heard of a dog who jumps in a engine compartment and chews up wires. But rats and mice love to eat wires! I would start by washing down all the mice poop on the fender wells being careful not to get water on the engine or valley pan (May be pitted and leaks into the block. Your CDR gromet may also leak.) or in the intake. Mice poop dust can transfer viruses, but not so much when wet. Also wear a N95 mask and goggles while you do it.
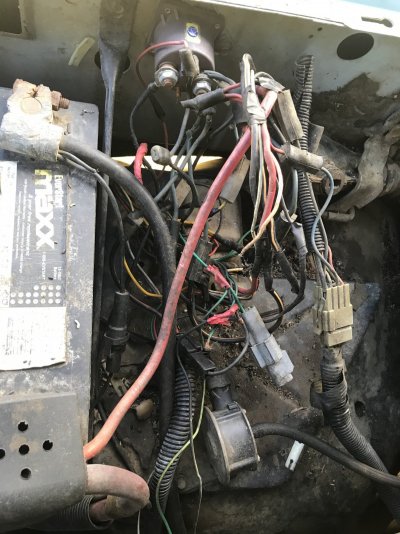
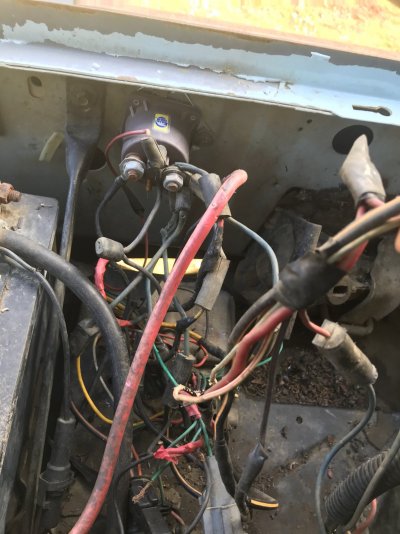
1) Everything on the right side of the starter solenoid is powering up something in the truck. So start with all those wires. (One from the battery, one from the alternator, and the rest power something.) Also unwrap each wire that has electrical tape to see what is covered up. Do this one at a time and fix one at a time. That way you will not end up with a buch of half wires and confused what goes to what.
2) Do not twist together a broken wire and tape. (Replace any that were fixed that way.) You need to splice a new piece of wire on with a solder splice connector. I will discuss more below.
3) If the rodents just took a little of the rubber coating (Often all they mean to take.) and there is little to no corrosion you can use liquid tape to fix. (See below.) If they took a bunch of insulation then use liquid tape, let it dry and then wrap with electrical tape or cover with shrink wrap. If the wire is damaged (Half chewed through, very corroded, splintered, etc. it is best to cut it back to where it is good and splice on a extension and reconnect.
4) I see a bunch of green wires. Some look like they were added. You may want to get rid of things that are no longer used. (Like relay wiring for after market fog lamps.) Also I see three red wires that were twisted together and tapped. Be sure to fix that.
5) Be careful of that black wire with the big crimp that is laying on the starter solenoid. It looks like a ground, could arc out to the postive when you put batteries in. FYI replace both batteries together when ever changing batteries.
6) To start the truck you just need a couple of things.
a) Power to the IP solenoid on top of the IP. There are two solenoids on the IP, one is fuel on/off. The other is for cold start advance. So test for power on both with the key on. If neither has power run a jumper to both.
b) If you have a electric fuel pump you will need to make sure it is powered. If you have the factory mechanical pump you will see it on the passenger side of the engine block and looks like a gasser mechanical fuel pump. It does not require any power to work.
c) Make sure to have good diesel. If they were running bio diesel in it and it has sat for more than 8 months drain and refill. If it has #2 diesel and has sat less than 5 years you should be good.
d) You need the glow plugs to run for about 10 seconds. If the wait to start light does not come on and stay on for 8-15 seconds you will need to jump the glow plug wire harness with a jumper cable. You give it +12v to the relay side going to the GP wiring to power the glow plugs.
e) Now you need to send +12v down the left side wire on the starter solenoid. Your key should do this when in the start position. If not you can jump it with a jumper cable to +12v.
Your engine should now turn over.
7) It may start right up, you may have to try 12 seconds of crank, 30 seconds to cool, 12 seconds of crank, 30 seconds to cool. (Warming the glow plugs for say 8 seconds before trying to start again.) If you do that a dozen times and no go. You can loosen the line nuts on the injectors and crank to see if you can bleed them and get diesel to come out. (Loosen a couple of turns and lightly pull up the line to make sure it is free to leak out.) Once diesel is coming out tighten them up. (Snug tight not hulk tight.) It will likely now start after one or two more cycles. No diesel, you have a issue, let us know and we can share more.
8) As mentioned above I like these solder ones for splicing a new end wire on an existing wire. Take one of these connectors and slide it on. Cut back and twist together the two exposed parts of the wires nice and tight so they are straight. (Not like you are going to put a wire nut on, rather to just make a nice straight piece of wire.) Now take a mini torch, slide the connector over the middle, wave it back and forth to not burn anything, start in the middle, and let the solder melt. Now you can heat the rest to shrink wrap it. I suggest you practice on a couple pieces of wire. Twist and solder. Let it cool and pull to see if you can pull it apart. Practicing will help you understand how to best wrap but also how much torch heat you can use before you burn the connector or the wires.
9) I find it hard to find smaller end piece solder connectors. I like these for crimp connectors as they have shrink wrap covers. I use in combination with a Channel Lock brand wire crimper. I like to use the male side of the crimper to crimp the back side of the connector. Then use the female side for the side of the connector where the split is. I feel it makes a better crimp that graps harder.
10) Liquid tape is a great way to fix a small issue with a wire. But if the rodents took a inch off, you might be stretching it by just using liquid tape, I like to come back when it dries and add electrical tape or a piece of shrink wrap tube. Also liquid tape comes in a few colors if you are a detail type of guy.
11) You asked about wire sizes, likely you are looking at some 16, 14, 12, and 10 gauge wires. Then some thick ones you will need to match up. But do not go smaller when you splice in. If you are going to error, error on the side of slightly larger.
12) You have a lot going on right there. External regulator and wiring, alternator wiring, starter wiring, some grounds, your vacuum warning system, starter wires, glow plug fussible links, ignition feed, etc. But you will get through it. Just be carefull to not hook grounds to power feed wires. That will cause a blown fuse or fusible link or a meltdown of the wiring harnes. Feel free to post a pic and ask if we know what it is. Likely a member will be able to remember what that specific wire does.
13) Also when you get done check all your fuses. You should just be able to take a test light, then if the fuse top on the left has power, the right should too. If only one side has power it has blown.
14) 87' was the last year of the 6.9 and thus the bugs were all worked out. Send a pic of the glow plug controller. You may have the 7.3 style or the 6.9 style. As I recall it was a split year. The 7.3 gp controller was a better design. The 6.9 was a great engine and was only a little less capable than the 7.3. (They are very simliar.) All the IDI's have issues with injector return lines, oil cooler seals, glow plug system, and other items. Start in the IDI tech section to learn more about the most common issues.
Welcome to the club!
")