Aux Tank question,.

Darrin Tosh

IDI Hound
Joined
Jan 11, 2005
Posts
5,408
Reaction score
91
Location
Grand Rapids, Michigan
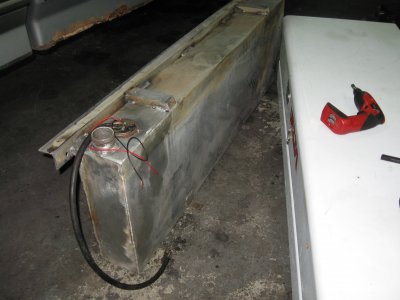
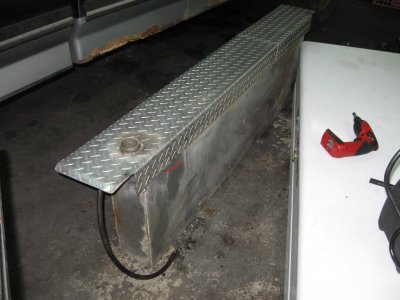
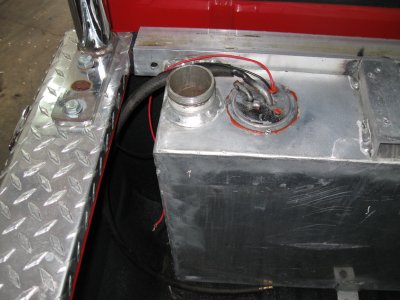
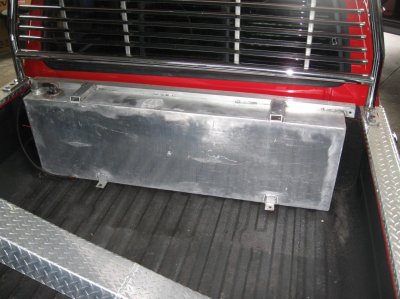
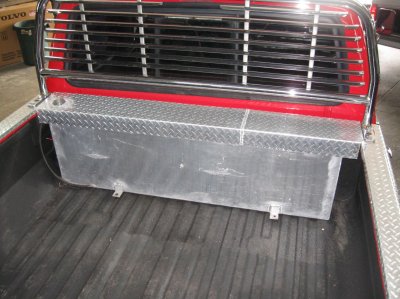
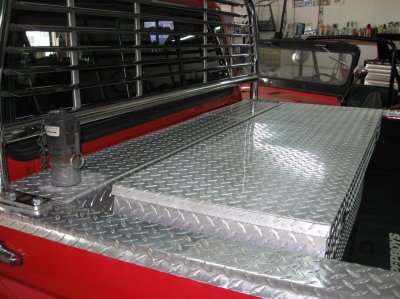
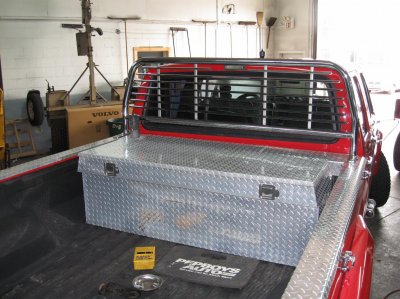
I picked up a small aluminum fuel tank today, Looks like about 28 gallon that will fit nicely between the tool box and the front of the box. I'll have to move my tool box back by about 7". It has an electric fuel pump inside that I installed and works good.

I think that I want to hook it up as a transfer tank to fill my front tank when needed. My question is how is the best way to get the fuel into the front tank? Splice it into the filler neck? "T" it into the return line?

I will probably tear into it this weekend, but it involves changing all of the lines and wires that are currently in the tool box, Propane, Lights, and Air Compresser.

Thanks!
 

LCAM-01XA

Full Access Member
Joined
Mar 17, 2008
Posts
5,932
Reaction score
12
Location
my very own hell
There is a vent on top of the tank, it holds the rollover valve but many people use it to run an external vent pipe to the top of the filler neck so they can ditch the filler's internal vent pipe and fill up at the big truck pumps. I have both of my rollover valves removed, and I have a 1/2" hose connecting the tops of my tanks, this way if the tank selector valve ever goes stupid like they often do I have an overflow route so I don't lose any fuel on the ground. If your filler necks are still in their factory setup inside them, you can ditch the rollover valve and run the hose from the aux tank to the front tank through there.
 

MIDNIGHT RIDER

Full Access Member
Joined
Sep 29, 2005
Posts
4,639
Reaction score
38
I dislike and do not trust any form of "transfer" tank set-up; they are just a big fuel spill waiting to happen.

Plumb the thing right by adding two manual fuel-control valves, one for DRAW and the other RETURN.

Better yet, completely discard the factory valve and do like I did = install TWO three-way/four-position manual valves.


I did like "catfish guy" and replaced the factory 7/16 vents with long 1/2 hoses, TEEing them together and routing them into the vent for the big auxilliary tank.

Like he said, should any tank over-fill, the excess simply finds it's way into a tank that has room for it.


BUT, I would hesitate to use those factory vents as an all-the-time fuel passage; reason being, the vents are simply friction-fit into simple rubber grommets; it would be too easy for one to decide to slide right out.


Also, I have had over-full tanks to leak fuel at the cap; with a transfer system, the lower tank must, by design, never have the cap removed when fuel is present in the upper tank, else it just pours out; if the caps will seep simply from being over-full, I imagine they could really leak when another tank-full is pushing against them.


Imagine someone un-knowingly removing the cap from the lower tank, fuel immediately comes gushing out, in the excitement they drop the cap, it rolls under the truck, ...............you see the picture.:eek:
 

LCAM-01XA

Full Access Member
Joined
Mar 17, 2008
Posts
5,932
Reaction score
12
Location
my very own hell
BUT, I would hesitate to use those factory vents as an all-the-time fuel passage; reason being, the vents are simply friction-fit into simple rubber grommets; it would be too easy for one to decide to slide right out.
Actually, there's a way around that - you pull the entire rollover valve assembly, but leave the grommet in place, then take a 1/2" NPT fitting with a 90-degree bend and a 1/2" barb end, and thread that into the grommet. It's very very tight fit, quite a pain in the butt really if you do it with the tanks still in the truck, but it does work good in the end, as there ain't no way those fittings ever come out on their own. Adding some fuel-resistant gasket-maker compound to the threads before installing the fittings is a good idea, but not entirely necessary.
 

Dsl_Dog_Treat

I lost my face to the jaws of a poodle
Joined
Jan 13, 2005
Posts
7,191
Reaction score
160
Location
Decatur,MI
Darrin,
I've got Goldies plumbed into the filler neck drilling a hole and threading in a brass fitting barbed on the other end for the fuel line. It's up close enough to the opening of the neck that I can monitor it's output just by opening the filler cap.
The access port to my aux tank is on top and so far to date, I haven't had a single lick of problems with it wanting to gravity flow on it's own.
 

bbressler

Full Access Member
Joined
Apr 18, 2007
Posts
114
Reaction score
0
Location
Happy, TX
I've got mine plumbed through a check-valve installed next to the roll-over valve. I drilled a new hole and threaded a pipe bushing in there, sealed with JB-Weld. I've had an overflow leak twice, but I firmly believe it was caused by running WVO through the valve, causing it to stick. Since I've been running regular diesel lately, I've not had any trouble. Since the check valve is lower than the filler neck, you can remove the cap and not loose fuel.
 

Darrin Tosh

IDI Hound
Joined
Jan 11, 2005
Posts
5,408
Reaction score
91
Location
Grand Rapids, Michigan
Lots of good info guys, Thanks,.

Ron I like that and it looks like that is what I will do for now. I really don't want to drop the tank and the neck cause if I do then I may as well drop the rear tank and do both filler neck mods. I just don't want to get into that big of a project right now, too much other stuff gong ot.

So I think I will tap it in at the filler neck and wire the pump. My access point is at the top as well so it wont pump unless the pump is on.

Here are a couple of pics of the tank, and there is a diamond plate that covers everything once it is installed.
 

Attachments

  • IMG_2034.JPG
    IMG_2034.JPG
    779.1 KB · Views: 28
  • IMG_2035.JPG
    IMG_2035.JPG
    802.2 KB · Views: 25
Last edited:

LCAM-01XA

Full Access Member
Joined
Mar 17, 2008
Posts
5,932
Reaction score
12
Location
my very own hell
Darrin, you can do my rollover valve mod without dropping the front tank, there is plenty of space between the tank and the bed. The rear tank, that one will need dropped, or at least swung down with the straps still attached - I loosened the rear bolts and just let the rear of the tank drop, pretty easy to do really. But yah, since you're working on the front tank, all you need to do is crawl under there and you can reach the rollover valve.
 

flatlander

plays dirty when losing
Joined
Jan 12, 2005
Posts
1,320
Reaction score
1
Location
ft. wayne IN
hopefully Chris will chime in or give him a call. He bought a kit that includes a ball stopper which will shut off the filler tube once the tank is full so you won't over fill.
 

diesel4me2

Camping is more importanter!
Joined
Apr 3, 2007
Posts
770
Reaction score
0
Location
northern illinois
this is what i used.....

http://www.northerntool.com/webapp/wcs/stores/servlet/product_6970_200315503_200315503?cm_vc=C5503

***** double check the size of the fill tube. the one posted above is for an 2inch fill tube. there is also one for a 1 1/2 inch line. make sure you know what size yours is before ordering******


i left out the shut off as i plumbed the line into a four way valve to control what tank i wanted to fill. i also have done the harpoon mod to my tanks. if you haven't done this there will be another hose inside the other one that you don't want to cut
 
Last edited:

Double-S-Diesel

parts seller
Joined
Mar 8, 2005
Posts
2,520
Reaction score
77
Location
derry pa
Darrin
I welded a fitting right in the filler neck.
I did have to put a shut off valve in, when the big tank is full it will gravity feed the sock tank
 

Darrin Tosh

IDI Hound
Joined
Jan 11, 2005
Posts
5,408
Reaction score
91
Location
Grand Rapids, Michigan
Well I am getting the tank installed, I removed the tool box wich means removing the propane tank, air compresser, and all lines and wires that are associated with them. But my tool box had some seams busting off the end so I took it to my buddys welding shop and welded it back up.

I got the tank sitting and am ready to bolt it in, and drill the holes for the lines and wires. I am going to wire the in tank pump to a switch on the counsol, and plumb it into the filler neck. Sounds like the easiest way to make it functional, so thanks for all of the input on that!

Once it is installed and plumbed I will reinstall the tool box and all related accesseries.

Here are some pics,...Not a bad setup for $60.00 hu,..?
 

Attachments

  • IMG_2107.JPG
    IMG_2107.JPG
    917.1 KB · Views: 22
  • IMG_2106.jpg
    IMG_2106.jpg
    351.6 KB · Views: 12
  • IMG_2105.jpg
    IMG_2105.jpg
    395.2 KB · Views: 20

ericboutin

Full Access Member
Joined
Jan 10, 2005
Posts
937
Reaction score
0
Location
Boiling Springs, SC
You're killing me! Not bad! Not bad at all! You kill me with your "finds"! Looks awesome! You get alot for how little space it takes up! :thumbsup:
 

Darrin Tosh

IDI Hound
Joined
Jan 11, 2005
Posts
5,408
Reaction score
91
Location
Grand Rapids, Michigan
You're killing me! Not bad! Not bad at all! You kill me with your "finds"! Looks awesome! You get alot for how little space it takes up! :thumbsup:

Thanks Eric, The little space thing is what I was looking for, It fits real nice.

I got it bolted in and the tool box installed last night. Now I have to get everything wired up and installed.
 

Attachments

  • IMG_2108.jpg
    IMG_2108.jpg
    383.3 KB · Views: 17
  • IMG_2109.jpg
    IMG_2109.jpg
    402.1 KB · Views: 9

Exekiel69

Registered User
Joined
Jul 6, 2005
Posts
5,391
Reaction score
8
Location
Maryland
Darrin Your truck is beautiful, I wish I had the patience and money :rolleyes: to build mine like just as good.;Sweet
 

Latest posts

Forum statistics

Threads
91,304
Posts
1,129,983
Members
24,111
Latest member
Lance

Members online

Top