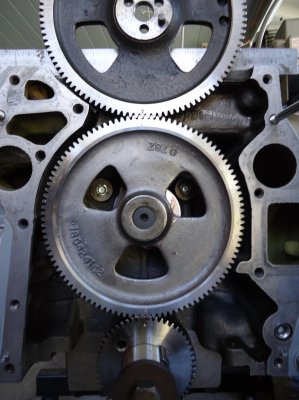
Began the 6.9 upgrade

OldIron82

Full Access Member
Joined
Aug 9, 2015
Posts
264
Reaction score
24
Location
Northampton PA
Well I hauled the 1st gen 6.9 into the garage today and set her up on the engine stand with the skid steer loader. I'll mention that as I lowered the loader arms and the stand began to hold the weight I believe heard a WHY!? I placed a 20 ton bottle jack under the front of the oil pan and gave a little upward pressure to ease the burden. Its says 1250lb capacity but I dunno it didn't look to happy with this old old iron hung on the front. I got all the accessories pulled off including the turbo, all that is left is the injector lines and pump and then I'll be ready to yank the heads. Upon closer inspection of the block at the block heater after a good cleaning I am very pleased to see there is no cracking and I hope it always stays that way. Tomorrow after work I'm hoping to get the injection pump off then it should be intake, valve covers, then finally the heads.

I can see I am all ready getting struck with the "well, while I'm here" sickness. Even though the engine on a whole looks relatively dry, I may just get a full gasket kit anyway and do everything. I purchased head gaskets and a intake valley pan from a very awesome member here (thanks again man!) with the intention of just studding the heads and turning right back around and reassembling it but again, "well, while I'm here".... I'll sleep on it. It's just that if I put this in the 89 F350 dump and a week later something starts to leak I'm going to be wild.

I sure wish this was my high performance late model 6.9 monster build, hate to feel like I'll be doing this twice but oh well. I'm thoroughly enjoying this thus far. It's such a cool engine and a pleasure to work on and NO computer :) Oh, and just to mention. You would be amazed the amount of chestnuts and insulation a chipmunk or mouse is able to stuff under the intake manifold on a IDI. Little *******!

OI82
 

OldIron82

Full Access Member
Joined
Aug 9, 2015
Posts
264
Reaction score
24
Location
Northampton PA
79jasper: I was not aware of the RTV. Is there no gasket available or just not a good idea.

riotwarrior: I completely forgot about the rockers. Can I flip flop the ones I have in that 7.3 that will be getting yanked? Would new ones be advisable?
 

icanfixall

Official GMM hand model
Joined
Apr 10, 2005
Posts
25,858
Reaction score
673
Location
West coast
New is better than used when it comes to rockers. Reason is a rocker wears to the valve stem. you can grind or file the rocker to make it new again if you have the means to do so too.. We never had a factory oil pan gasket and we never needed one. Seems gasket makers have made a gasket for a location we don't need one just to increase their revenues...
 

OldIron82

Full Access Member
Joined
Aug 9, 2015
Posts
264
Reaction score
24
Location
Northampton PA
Thanks for the info thus far. While on the topic of gaskets, how about the oil cooler, thermostat housing, water pump housing, and Injection pump gear housing. (the one I keep hearing do not remove to remove injection pump) are these silicone procedure as well or gasket?
 

icanfixall

Official GMM hand model
Joined
Apr 10, 2005
Posts
25,858
Reaction score
673
Location
West coast
Thanks for the info thus far. While on the topic of gaskets, how about the oil cooler, thermostat housing, water pump housing, and Injection pump gear housing. (the one I keep hearing do not remove to remove injection pump) are these silicone procedure as well or gasket?

Water pump is gasketed as is the thermostat housing. The oil cooler bundle to the front and rear heads are o ring sealed but to the block they have a gasket. The injection pump gear cover housing is an rtv seal. No gasket.
 

OldIron82

Full Access Member
Joined
Aug 9, 2015
Posts
264
Reaction score
24
Location
Northampton PA
Cool. Back to the 7.3 rockers, are they roller rockers from factory or is that a performance upgrade? What specifically is wrong with the stock 6.9's vs 7.3's?
 

icanfixall

Official GMM hand model
Joined
Apr 10, 2005
Posts
25,858
Reaction score
673
Location
West coast
The early rockers had an aluminum bridge piece in them and wore out. The newer 7.4 rockers are all steel and don't wear out and break. No idi came with roller rockers but they are available for about 800 bucks. We have a member that installed a set but have not seen any posts of it running yet.
 

OldIron82

Full Access Member
Joined
Aug 9, 2015
Posts
264
Reaction score
24
Location
Northampton PA
@icanfixall I finally got back to the project today and I see the aluminum bridge piece you speak of.

I pulled everything off the top except for the injection pump which is still attached to the drive housing. Since I'll be yanking the entire front anyway to re seal everything, can I just remove the drive housing which I have heard not to do? I'm guessing there timing marks you cannot see to realign if you do not pull off the front but since I am is there any harm? I'd like to not mess with the pump if possible since it is already in time I would rather leave it attached to the housing and just pull the housing itself letting the pump go with it.

I cannot remove the valley pan yet due to the pump being in the way. Thanks to this wonderful place and it's plethora of info, I found out about the drain plug in the back of the valley pan and the sealer the factory must have used when assembling. I needed a huge 3/8" breaker bar to get it loose. Thought I would have needed to get the fire wrench but she came out on her own. I

The best part, I finally got a head off tonight. :) Passenger side. That ******* got to be close to 100lbs. Holy Hannah I wasn't expecting that. Now I didn't do much cleaning yet but from what I can see, no cracks anywhere. My only concern is the oil I found in certain places. Some of the injectors were dry, some had oil all over them. The head bolts, two of them came out caked in black soot. Some were oily, some were dry and rusty. Is all of this normal, or could there be an issue somewhere?

That's all I have to report for now. Hopefully more tomorrow.
 

TahoeTom

Supporting Member
Supporting Member
Joined
May 19, 2010
Posts
749
Reaction score
113
Location
S. Lake Tahoe, CA
The problem with removing the pump and housing together is the difficulty of putting them back in correct timing. Once removed as a unit, the pump and gear are free to rotate. The timing mark between the cam gear and pump gear can't be seen with the front engine cover in place. If you want to preserve your current timing, scribe a line or center punch a mark at the seam where the pump meets the housing. When putting everything back together, line up all the timing marks before installing the front engine cover. The pump gear will just sit on top of the cam gear, so don't rotate the assembly. After the front cover and water pump are installed, install the pump gear cover using RTV. Once the gear cover is in place the gear can't jump time, but I still would not rotate the crank until the injection pump is installed. Line up the marks you made and the pump timing will be the same as it was.
Edit: Rt click on pic and select "view image" for a smaller view.
 

Attachments

  • DSC00119.jpg
    DSC00119.jpg
    829.2 KB · Views: 110

OldIron82

Full Access Member
Joined
Aug 9, 2015
Posts
264
Reaction score
24
Location
Northampton PA
I can't view the attached image all I see is a paperclip. I'll have to try on my laptop. Also my cell phone does not bring up the "manage attachments" options. Again I'll have to try on my laptop but I don't know how to put pictures on my laptop from my smart phone. I'll try and get this figured out. I do not do techno. Thank you for the info
 

The Warden

MiB Impersonator
Supporting Member
Joined
Jan 12, 2005
Posts
7,356
Reaction score
35
Location
Fog Bless Pacifica (CA)
I pulled everything off the top except for the injection pump which is still attached to the drive housing. Since I'll be yanking the entire front anyway to re seal everything, can I just remove the drive housing which I have heard not to do? I'm guessing there timing marks you cannot see to realign if you do not pull off the front but since I am is there any harm? I'd like to not mess with the pump if possible since it is already in time I would rather leave it attached to the housing and just pull the housing itself letting the pump go with it.
IF AND ONLY IF you are pulling the timing gear cover (the plate behind the water pump) to expose the cam and crank drive gears, you can pull the injector pump and IP drive gear housing as one unit. I would pull the timing gear cover first, so you can have a good idea of how it'll go back on...the top lip of the timing gear cover fits into a groove in the IP drive gear cover. I was able to bolt the IP drive gear cover (and IP) onto the block first, make 1000% sure all gear markings were aligned, then fit the top lip of the timing gear cover into the groove in the IP drive gear cover at a slight angle (the bottom of the timing gear cover leaning forward). Once it's aligned, push the bottom in, and you're good! ;Sweet

I was able to do this with the front main seal installed; it cleared the crank snout nicely, and then install the harmonic balancer (which serves as the surface the seal rides on) afterwards.

I should note that most of the warnings to not pull the IP drive gear housing are there because, most of the time, when people ask about it, they're not planning to pull the timing gear cover, and they have no plan in place to align the gear markings when re-installing. It is possible to get the marks aligned with the timing cover on, but it's extremely difficult and requires planning ahead. If the timing gear cover's coming off, and if you'll be putting the timing gear cover back on after the IP drive gear housing (and drive gear and pump) are re-installed, you're good to go ;Sweet
 

OldIron82

Full Access Member
Joined
Aug 9, 2015
Posts
264
Reaction score
24
Location
Northampton PA
IF AND ONLY IF you are pulling the timing gear cover (the plate behind the water pump) to expose the cam and crank drive gears, you can pull the injector pump and IP drive gear housing as one unit. I would pull the timing gear cover first, so you can have a good idea of how it'll go back on...the top lip of the timing gear cover fits into a groove in the IP drive gear cover. I was able to bolt the IP drive gear cover (and IP) onto the block first, make 1000% sure all gear markings were aligned, then fit the top lip of the timing gear cover into the groove in the IP drive gear cover at a slight angle (the bottom of the timing gear cover leaning forward). Once it's aligned, push the bottom in, and you're good! ;Sweet

I was able to do this with the front main seal installed; it cleared the crank snout nicely, and then install the harmonic balancer (which serves as the surface the seal rides on) afterwards.

I should note that most of the warnings to not pull the IP drive gear housing are there because, most of the time, when people ask about it, they're not planning to pull the timing gear cover, and they have no plan in place to align the gear markings when re-installing. It is possible to get the marks aligned with the timing cover on, but it's extremely difficult and requires planning ahead. If the timing gear cover's coming off, and if you'll be putting the timing gear cover back on after the IP drive gear housing (and drive gear and pump) are re-installed, you're good to go ;Sweet

SWEEEET thanks!
 
Top