TWeatherford
Full Access Member
Many who have the early Banks turbo complain that the airbox is very difficult to remove and re-install, and that it covers so much of the top of the IDI engine (most of the IP, injectors, glowplugs etc) that it has to be removed fairly often. It also uses a K&N air filter which many believe feeds dirt to the turbo and engine, as well as being very hard (and expensive) to find if a replacement is needed. It also doesn’t have a lot of surface area to flow well. I searched a lot on this and other forums, and only found a few people who have done it (that posted about it). So I thought I would try to make it a little easier on the next guy. Here is how I got rid of mine.
Parts List:
>6” of 4” ID tube, I used aluminum because it can’t feed rust to my turbo and engine
>Filter, I used a Donaldson B085011. I obtained it for about $32. Its supposed to be water resistant. It has a 4” connection and is supposedly good for 470 CFM. A paper filter from NAPA is available, I believe it’s a 6637 part number, and its 1” longer. I chose the Donaldson because of the better water reistance and the fact that it’s a little shorter, and its cheaper.
>Small (1.5”) chunk of 2” ID exhaust tubing, I would have preferred aluminum but I just painted the steel
>Intake hat from an ATS turbo, note that this intake hat is a mirror image of the Ford factory turbo intake hats, the factory Ford one definitely wouldn’t work because the opening is on the opposite side
>90 degree rubber elbow, one leg about .75” long and the other about 5.5” long. I just went to autozone and asked to look at their rack of radiator hoses in the back, and I found one, part number E70739, and cut it down.
>3” to 4” reducing rubber elbow
>Clamps for two 4” connections and one 3” connection, and you should already have two for the intake hat to turbo outlet
>Mounting band for 8.5” air cleaner, http://store.airflo.com/m002119.html I got the filter, 4” aluminum tube, reducing elbow, and clamps here as well. I also have about 3.5 feet of 4” aluminum left over, and some exhaust tube if some members want me to chop off a chunk and send it to them.
>Some sort of material to make a bracket to bolt the mounting band to, I used 1” angle iron
>Assorted bolts
>I also used black RTV to seal the intake to intake hat, and got a new rubber o-ring for the intake hat
The exhaust tube has to fit in the intake hat, with the o-ring making the seal. It’s a very tight fit, at least for the exhaust tube I got, so I ended up filing and then dremeling down the end to help it wedge in there. I also painted that piece to prevent rust (you don't want to feed rust to your engine). The rubber 90 degree hose will have to be cut to the proper size as well. I RTV’d the intake hat down. I would have preferred a proper gasket but I doubt I’ll have it off very often at all.
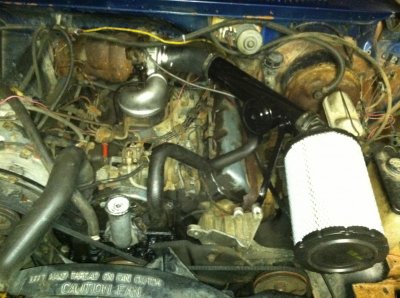
The connection from turbo intlet to filter outlet is pretty straight forward. I made a bracket for the air filter mounting band from angle iron (using a dremel tool and cutting wheel no less!). It bolts to a factory hole in the intake manifold. Yes, I still have to weld the bracket where I bent it, and paint it, I’ll just have to wait until I have access to a welder. I have a 3” body lift and still was tight on clearance, so I had to bring the bracket forward of the mounting hole because injection lines are in the way further back. This is a big filter! No way it would fit where I have it without the 3” lift, and its still tighter than I’d like. Anyway the bracket comes forward 3.5”, then up 2.5”, then over 8”. The filter mounting band is nice, it holds the filter firmly instead of letting it just flop around on the top of the engine. I doubt that would be good on the filter or the injection lines.
For the sake of keeping water away from my intake, as well as running a cowl induction, I would have much preferred an enclosed filter. However, with the room I have available under the hood I didn’t want to mess with one. I also didn’t want to relocate the driver side battery, or the coolant expansion tank and wiper washer reservoir. Having the filter over there seems like it would leak rain down on the filter in heavy rain. Where I have the filter is directly over the engine, in about as protected a spot from water as possible. Its going to suck some warm air but I’d prefer warm air over water. And at highway speed I doubt the air is more than a few degrees warmer than ambient temperature.
This filter is definitely an improvement. I haven’t had the chance to work it hard but I have much less black smoke, really only a slight haze when I’m really getting on it. It'll definitely be a lot easier to work on everything, the filter isn't in the way of that much, and its only a few minutes to remove and reinstall. I may have to shim the filter mounting band up with some washers to keep the filter from rubbing on the forward most injection line, I don’t want that cracking.
Parts List:
>6” of 4” ID tube, I used aluminum because it can’t feed rust to my turbo and engine
>Filter, I used a Donaldson B085011. I obtained it for about $32. Its supposed to be water resistant. It has a 4” connection and is supposedly good for 470 CFM. A paper filter from NAPA is available, I believe it’s a 6637 part number, and its 1” longer. I chose the Donaldson because of the better water reistance and the fact that it’s a little shorter, and its cheaper.
>Small (1.5”) chunk of 2” ID exhaust tubing, I would have preferred aluminum but I just painted the steel
>Intake hat from an ATS turbo, note that this intake hat is a mirror image of the Ford factory turbo intake hats, the factory Ford one definitely wouldn’t work because the opening is on the opposite side
>90 degree rubber elbow, one leg about .75” long and the other about 5.5” long. I just went to autozone and asked to look at their rack of radiator hoses in the back, and I found one, part number E70739, and cut it down.
>3” to 4” reducing rubber elbow
>Clamps for two 4” connections and one 3” connection, and you should already have two for the intake hat to turbo outlet
>Mounting band for 8.5” air cleaner, http://store.airflo.com/m002119.html I got the filter, 4” aluminum tube, reducing elbow, and clamps here as well. I also have about 3.5 feet of 4” aluminum left over, and some exhaust tube if some members want me to chop off a chunk and send it to them.
>Some sort of material to make a bracket to bolt the mounting band to, I used 1” angle iron
>Assorted bolts
>I also used black RTV to seal the intake to intake hat, and got a new rubber o-ring for the intake hat
You must be registered for see images attach
The exhaust tube has to fit in the intake hat, with the o-ring making the seal. It’s a very tight fit, at least for the exhaust tube I got, so I ended up filing and then dremeling down the end to help it wedge in there. I also painted that piece to prevent rust (you don't want to feed rust to your engine). The rubber 90 degree hose will have to be cut to the proper size as well. I RTV’d the intake hat down. I would have preferred a proper gasket but I doubt I’ll have it off very often at all.
The connection from turbo intlet to filter outlet is pretty straight forward. I made a bracket for the air filter mounting band from angle iron (using a dremel tool and cutting wheel no less!). It bolts to a factory hole in the intake manifold. Yes, I still have to weld the bracket where I bent it, and paint it, I’ll just have to wait until I have access to a welder. I have a 3” body lift and still was tight on clearance, so I had to bring the bracket forward of the mounting hole because injection lines are in the way further back. This is a big filter! No way it would fit where I have it without the 3” lift, and its still tighter than I’d like. Anyway the bracket comes forward 3.5”, then up 2.5”, then over 8”. The filter mounting band is nice, it holds the filter firmly instead of letting it just flop around on the top of the engine. I doubt that would be good on the filter or the injection lines.
For the sake of keeping water away from my intake, as well as running a cowl induction, I would have much preferred an enclosed filter. However, with the room I have available under the hood I didn’t want to mess with one. I also didn’t want to relocate the driver side battery, or the coolant expansion tank and wiper washer reservoir. Having the filter over there seems like it would leak rain down on the filter in heavy rain. Where I have the filter is directly over the engine, in about as protected a spot from water as possible. Its going to suck some warm air but I’d prefer warm air over water. And at highway speed I doubt the air is more than a few degrees warmer than ambient temperature.
This filter is definitely an improvement. I haven’t had the chance to work it hard but I have much less black smoke, really only a slight haze when I’m really getting on it. It'll definitely be a lot easier to work on everything, the filter isn't in the way of that much, and its only a few minutes to remove and reinstall. I may have to shim the filter mounting band up with some washers to keep the filter from rubbing on the forward most injection line, I don’t want that cracking.
You must be registered for see images attach
You must be registered for see images attach
You must be registered for see images attach
You must be registered for see images attach
You must be registered for see images attach
You must be registered for see images attach

 short ram air def. does better than the banks box pos