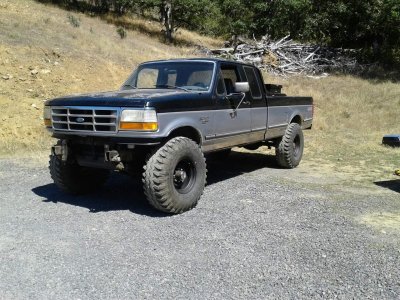
'90 F350 Crewcab 4x4 "BFTD" Project..

AcIdBuRn02ZTS

Full Access Member
Joined
Nov 15, 2012
Posts
1,052
Reaction score
89
Location
Indiana
I think (and hope) that I fixed my brake light issue finally. I had rewired the rear of the truck due to janky bs... Still had a slight issue where at random, the brake lights would go out unless I was firm on the pedal. If I lightly touched the pedal to just slow slightly in traffic or something, the lights would come on but go right back out (just flicker on). I figured it was the switch so I went on and bought one since it was only $9.

Went to change it and found more janky wiring. Had time so I started cutting and deleting.

Here is the brake light switch harness...
You must be registered for see images attach


You must be registered for see images attach


You must be registered for see images attach


You must be registered for see images attach


The factory battery hot wire from the harness was cut under the dash and left in the harness (found it because it started sparking when I was moving the wiring around). For some reason, they had cut the original power wire and ran that yellow wire to the fuse block instead. They had that wire daisy chained between 2 30 amp fuses in the box and then to the brake light switch.

Based on the melted wiring at the switch, I assume that the crap wiring I had cut out of the back of the truck was at some point shorting out (imagine that) and instead of tracing down the short, they spliced into the switch with 12awg wire and 2 power sources so it wouldnt pop any fuses... just cook the wiring instead. It was getting hot enough to start melting the coating off of the 12awg wire too and there are burnt places in the fuse block where the wiring was jammed in.

I cut all that crap out.. cut back as far as I could and I think I got most of the melted wire cut out.. then spliced in new wiring down to the switch and used female spade terminals on the switch itself instead of the burnt plug.

I'm amazed it didn't burn the truck to the ground. So far in the driveway, no more flickering lights. We'll see in the morning on the drive to work.
 

AcIdBuRn02ZTS

Full Access Member
Joined
Nov 15, 2012
Posts
1,052
Reaction score
89
Location
Indiana
Finally plumbed the stack tonight... soo much quieter in the cab now.

You must be registered for see images attach


You must be registered for see images attach


You must be registered for see images attach


4" from the Y pipe back. Still need to get proper hangers on it all.. maybe tomorrow. Now just need time to install that 093 "muffler" and it'll be good to go exhaust wise... Lol
 

AcIdBuRn02ZTS

Full Access Member
Joined
Nov 15, 2012
Posts
1,052
Reaction score
89
Location
Indiana
Got a wild hair today and decided to pull the tires/wheels off of another project and mount them on the truck. The tires were showing signs of slight dry rot and it's going to be a bit before the other project is road worthy.. so figured I might as well get some use out of them...

So... 38.5x14s and no lift...

You must be registered for see images attach


Rears fit great other then hitting the mud flaps which need to be relocated anyways.. The front was a different story.

You must be registered for see images attach


You must be registered for see images attach


You must be registered for see images attach


Out came the sawsall and the grinder. Considering the front fenders were rotting away anyways.. said screw it and cut to fit. It got dark before I could get pictures but was able to make room for them without removing too much sheetmetal. I ended up cutting out the majority of the rot though... so win/win.

Now onto the negative... death wobble like an SOB at anything over 30mph and the slightest bump. Truck had some slop in the front end but no issues with wobble with the 31s on it. Tires are bead balanced. I went on and ordered poly track bar bushings as I'm sure the stock bushings are shot. I will also probably order new bushings for the kingpins and shim the springs a bit to see if that helps. I'm banking on track bar issue.

On another note... the wheels are 16.5's... so when these tires are done... I'll be ordering some 37" military tires to replace them. Nothing like a good set of 37x12.50s for $500 shipped to your door.

Anyways...
 

AcIdBuRn02ZTS

Full Access Member
Joined
Nov 15, 2012
Posts
1,052
Reaction score
89
Location
Indiana
No after pics?

I plan to get Bruiser those same 37's and some split rims to boot. One day...

As you requested... ran out of light last night to get any decent pictures... however here it currently sits. Still need to clean up and "finish" the cutting.. but I love the stance. Something else nice about it is that I can swap back to 31" all terrains for highway / extended driving and not have the truck look goofy due to a lift kit.

You must be registered for see images attach


You must be registered for see images attach


I may be trying to sell these tires and wheels and if the guy comes up with the coin, I'll be able to order 2 sets of military take-offs and some 12 bolt h1 wheels (along with some pressed centers so I can recenter them).. We'll see if he decides to buy them or not.

Anyways.. I may be onto my death wobble issue. Apparently, a worn intermediate shaft can cause it (which mine is rather sloppy.. not the rag joint but the shaft itself). Everything else is tight from the box to the knuckles. I was able to get the hubs pulled tonight so hopefully I'll get the bearings repacked and my new brakes on tomorrow after work.
 

crash-harris

Breaker! Breaker!
Joined
Nov 18, 2011
Posts
2,063
Reaction score
66
Location
Chillicothe, OH
Not too shabby. Looks better than most cut fenders I've seen. Where are you thinking of getting your 37's and H1's from? Cheapest I've found online had been Trail Worthy Fab.
 

riotwarrior

Supporting Member
Supporting Member
Joined
Sep 19, 2006
Posts
14,778
Reaction score
482
Location
Cawston BC. Canada
Clearly tyres waaaay to much fer you..... peel em palletize em ship em to me I will do em right.....big cuts with no regard for looks...think big cut fenders....


Bad ass rig man..saweet;Sweet
 

AcIdBuRn02ZTS

Full Access Member
Joined
Nov 15, 2012
Posts
1,052
Reaction score
89
Location
Indiana
Not too shabby. Looks better than most cut fenders I've seen. Where are you thinking of getting your 37's and H1's from? Cheapest I've found online had been Trail Worthy Fab.

Southeastern Military Tires sells the 12 bolts for $20 each.

Jester Fab sells the pressed 8x6.5 centers for $50 each. That's the cheapest I've seen so far.

For tires, eBay. There is a seer on there that sells 80%+ for 400 a set + freight and he's a good guy to deal with... User name hotrod something...
 

AcIdBuRn02ZTS

Full Access Member
Joined
Nov 15, 2012
Posts
1,052
Reaction score
89
Location
Indiana
Passenger side hub came apart much easier then the driver's side.... so went on and took all the parts into work. Dipped them in our chem tank and cleaned them up.. then oiled everything with wd-40 to prevent flash rust.

You must be registered for see images attach


Gave the hub a good wire wheeling... then dipped it in the solvent tank... then brake clean... then a fresh coat of paint.

You must be registered for see images attach


You must be registered for see images attach


Bearings look to be in good shape... got new wheel seals and caliper slides. Hope to get it together tonight.
 

AcIdBuRn02ZTS

Full Access Member
Joined
Nov 15, 2012
Posts
1,052
Reaction score
89
Location
Indiana
Got the passenger side buttoned up...

You must be registered for see images attach


Then onto the driver's... the side that I had to split the lock out hub apart due to it being seized to the stub axle. This side had new brake pads like the passenger side. The pass. side had an "ok" rotor on it as well.. I assume it was replaced. This one however... I think it was a bit overdue...

You must be registered for see images attach


You must be registered for see images attach


The pads that were new (still pretty thick) had worn to match the rotor... looked pretty funny.

Got everything cleaned up and repacked the bearings on this side but ran out of light. I'll finish it up in the morning. Is it bad that I took the inner and outer spindle nuts off by hand? Lol

Bearings had been replaced at some point and didn't look too bad. The spindle itself looked like someone hit it with a ball peen hammer a few times. Hopefully it doesn't cause issues.
 

homelessduck

Full Access Member
Joined
Oct 2, 2009
Posts
2,708
Reaction score
298
Location
OR
Here's what 40's looked like on my '94 with no lift or fender trimming :D

Lookin good ! I love seeing these trucks refreshed and put back to work.
 

Attachments

  • FB_IMG_1461985326226.jpg
    FB_IMG_1461985326226.jpg
    224.6 KB · Views: 69

riotwarrior

Supporting Member
Supporting Member
Joined
Sep 19, 2006
Posts
14,778
Reaction score
482
Location
Cawston BC. Canada
Got the passenger side buttoned up...

You must be registered for see images attach


Then onto the driver's... the side that I had to split the lock out hub apart due to it being seized to the stub axle. This side had new brake pads like the passenger side. The pass. side had an "ok" rotor on it as well.. I assume it was replaced. This one however... I think it was a bit overdue...

You must be registered for see images attach


You must be registered for see images attach


The pads that were new (still pretty thick) had worn to match the rotor... looked pretty funny.

Got everything cleaned up and repacked the bearings on this side but ran out of light. I'll finish it up in the morning. Is it bad that I took the inner and outer spindle nuts off by hand? Lol

Bearings had been replaced at some point and didn't look too bad. The spindle itself looked like someone hit it with a ball peen hammer a few times. Hopefully it doesn't cause issues.

Thats the new grroved rotor providing increased surface area with ripple chip effect...jjst burn new pads in as required for a better stopping vehicle

Chinese made rotors at rock bottom prices...
 

AcIdBuRn02ZTS

Full Access Member
Joined
Nov 15, 2012
Posts
1,052
Reaction score
89
Location
Indiana
More progress...

Replaced track bar bushings which helped a good bit with the wobble... however the main fix was to drop tire pressure down to 18psi and drive it for about 10 miles to get rid of the flat spots.... then ran them back up to 25 and its drivable now. Smooth as glass at 55+. Pretty rough between 40-50 due to tire balance. I'll be ordering a set of the military radials soon.

Anyways... I did get some work done on my overhead console...

I cut out an area for my 6 switch panel and got it fit.... then sprayed it with black plasti-dip. I really like plasti-dip for interior panels like this as the texture looks really close to a factory finish.
You must be registered for see images attach


You must be registered for see images attach


Made up a harness and got it wired up and mounted...
You must be registered for see images attach


You must be registered for see images attach


Night shot (need a green bulb cover for the pyro)
You must be registered for see images attach


These 2 switches are momentary. Still need to order my others but they are pricey so I'm doing that a little at a time. Here is how they look energized.
You must be registered for see images attach


I ordered my fuel gauge... and I'll be getting a boost gauge for it too in the near future.

More to come.
 

Forum statistics

Threads
91,281
Posts
1,129,775
Members
24,099
Latest member
IDIBronco86

Members online

Top