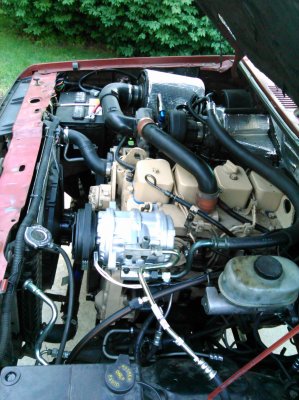
Project Red Cent

F350camper

BOOST!
Joined
Jan 11, 2005
Posts
1,950
Reaction score
671
Location
USA
gauges

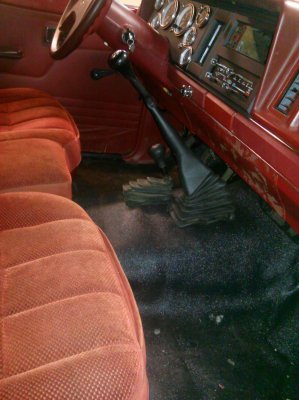
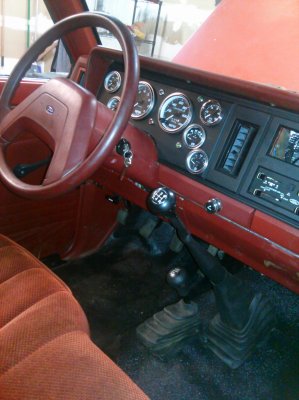
Started working on the gauges. I'm ditching all the stock gauges since some of them were controlled by the gasser ecu. I think this will work pretty slick.
Now I just have to do the final finish work on the panel, (the paint looks better in the pic than it actually is) and make a little bit of room behind the dash for the pyro and fuel gauge.

You must be registered for see images attach


You must be registered for see images attach


You must be registered for see images attach


You must be registered for see images attach


You must be registered for see images attach


You must be registered for see images attach


You must be registered for see images attach
 

F350camper

BOOST!
Joined
Jan 11, 2005
Posts
1,950
Reaction score
671
Location
USA
gauges done

Well, its not perfect, but overall I'm liking how it came out. Obviously the tach is for a gasser, but it'll do till I find a 4k one that sort of matches.
left side, top to bottom
Oil Pressure,
Coolant Temp,
Pyro,

Tach and Speedo in the middle,

Right side
Boost,
Volts,
Fuel

As for the LEDs I have left and right turn signal, brights indicator, Parking brake / brake fluid warning, no charge indicator, 4wd, and 4 Low.


Next up is hooking up the A/C to include mounting the compressor. Then on to fender flares, wheels, and tires.
:D

You must be registered for see images attach


You must be registered for see images attach
 

IDIoit

MachinistFabricator
Supporting Member
Joined
Aug 26, 2014
Posts
13,320
Reaction score
3,884
Location
commiefornia
so youre saying that you dont have a 6500 redline???

that cluster looks killer!
nice job
 

F350camper

BOOST!
Joined
Jan 11, 2005
Posts
1,950
Reaction score
671
Location
USA
Cool! Getting the A/C figured out.

I got the compressor mounted. I made a bracket out of some 3/16 plate and angle. This puts the compressor in nearly the stock location for the truck.

I opted to run the optional v-belt pulley for my setup. (Cummins part number 3903221 or 3919624) It mounts on top of the fan pulley, and gives you a standard 1/2" v-belt pulley.
I had to switch from having the oil filler on the timing case to one on the valve cover because the v-belt interferes. The funny part is, due to the crazy location of my crossover pipe, I had to put the oil fill on #3. That's gonna be annoying. LOL. Once I add an intercooler someday, I'll move it to #1 where it belongs.

I could have gone with an 8 groove serpentine driven compressor, and just run a longer serp belt. But I figured it would be better to not contaminate the factory belt setup with my hacked together bracket. That way when it breaks and I'm 1000 miles from home, I'll just lose A/C vs everything. ;Sweet

Now I'm just trying to source a couple of A/C fittings. Then I can hook it all up, suck it down, and put a charge in it.

You must be registered for see images attach


You must be registered for see images attach


You must be registered for see images attach


You must be registered for see images attach


You must be registered for see images attach
 

F350camper

BOOST!
Joined
Jan 11, 2005
Posts
1,950
Reaction score
671
Location
USA
Phase 1 complete!

I have a few odds and ends to sew up. The center caps for the wheels are suppose to come in tomorrow, I plan to get 1.5" wheel spacers for the rears, she needs a bath, and I plan to take some video soon, but this about sews up phase 1. the next phase will be the wvo conversion.
 

Attachments

  • IMG_20150706_184950_263.jpg
    IMG_20150706_184950_263.jpg
    460.5 KB · Views: 53
  • IMG_20150706_185005_689.jpg
    IMG_20150706_185005_689.jpg
    414.5 KB · Views: 51
  • IMG_20150706_185022_561.jpg
    IMG_20150706_185022_561.jpg
    506.7 KB · Views: 52
  • IMG_20150706_185042_923.jpg
    IMG_20150706_185042_923.jpg
    564.5 KB · Views: 52
  • IMG_20150706_185719_426-1.jpg
    IMG_20150706_185719_426-1.jpg
    369.4 KB · Views: 54
  • IMG_20150706_185142_746.jpg
    IMG_20150706_185142_746.jpg
    389.7 KB · Views: 50
  • IMG_20150706_185159_180.jpg
    IMG_20150706_185159_180.jpg
    421.1 KB · Views: 51
  • IMG_20150706_185256_060.jpg
    IMG_20150706_185256_060.jpg
    375.6 KB · Views: 57
  • IMG_20150706_185301_490.jpg
    IMG_20150706_185301_490.jpg
    536 KB · Views: 62
Last edited:

F350camper

BOOST!
Joined
Jan 11, 2005
Posts
1,950
Reaction score
671
Location
USA
few more pics
 

Attachments

  • IMG_20150706_185329_387.jpg
    IMG_20150706_185329_387.jpg
    429.9 KB · Views: 70
  • IMG_20150706_185523_475.jpg
    IMG_20150706_185523_475.jpg
    461.3 KB · Views: 75
  • IMG_20150706_185548_496.jpg
    IMG_20150706_185548_496.jpg
    438.4 KB · Views: 80
  • IMG_20150706_185604_816.jpg
    IMG_20150706_185604_816.jpg
    532.9 KB · Views: 78
  • IMG_20150608_174800_570.jpg
    IMG_20150608_174800_570.jpg
    470.5 KB · Views: 64
  • IMG_20150608_174827_562.jpg
    IMG_20150608_174827_562.jpg
    414.3 KB · Views: 72
Last edited:

RedTruck

Registered User
Joined
Feb 13, 2006
Posts
739
Reaction score
0
Slick looking rig, Rob! Man that's a sweet pickup! Really fantastic job.

Thanks for sharing!

Paul
 

F350camper

BOOST!
Joined
Jan 11, 2005
Posts
1,950
Reaction score
671
Location
USA
as always, Rob, thanks for documenting a top-shelf job :D

Slick looking rig, Rob! Man that's a sweet pickup! Really fantastic job.

Thanks for sharing!

Paul


Thanks guys, I havent been able to get in on the road all that much yet. Still need to get plates and what not, but the little I have driven it, I really think its going to be a great little daily driver and off-roader for a long long time.
 
Top